 在 TensorFlow.org 上查看 在 TensorFlow.org 上查看
|
 在 Google Colab 中运行 在 Google Colab 中运行
|
 在 GitHub 上查看 在 GitHub 上查看
|
 下载笔记本 下载笔记本
|
 查看 TF Hub 模型 查看 TF Hub 模型
|
此笔记本向您展示如何使用来自 TensorFlow Hub 的 **CropNet 模型在来自 TFDS 或您自己的作物病害检测数据集上进行微调**。
您将
- 加载 TFDS 木薯数据集或您自己的数据
- 使用未知(负面)示例丰富数据以获得更强大的模型
- 将图像增强应用于数据
- 加载并微调来自 TF Hub 的 CropNet 模型
- 导出一个 TFLite 模型,可以使用 任务库、MLKit 或 TFLite 直接部署到您的应用程序中
导入和依赖项
在开始之前,您需要安装一些所需的依赖项,例如 模型制作器 和最新版本的 TensorFlow 数据集。
sudo apt install -q libportaudio2## image_classifier library requires numpy <= 1.23.5pip install "numpy<=1.23.5"pip install --use-deprecated=legacy-resolver tflite-model-maker-nightlypip install -U tensorflow-datasets## scann library requires tensorflow < 2.9.0pip install "tensorflow<2.9.0"pip install "tensorflow-datasets~=4.8.0" # protobuf>=3.12.2pip install tensorflow-metadata~=1.10.0 # protobuf>=3.13## tensorflowjs requires packaging < 20.10pip install "packaging<20.10"
import matplotlib.pyplot as plt
import os
import seaborn as sns

import tensorflow as tf
import tensorflow_datasets as tfds

from tensorflow_examples.lite.model_maker.core.export_format import ExportFormat
from tensorflow_examples.lite.model_maker.core.task import image_preprocessing

from tflite_model_maker import image_classifier
from tflite_model_maker import ImageClassifierDataLoader
from tflite_model_maker.image_classifier import ModelSpec
2023-11-07 13:39:32.174301: W tensorflow/stream_executor/platform/default/dso_loader.cc:64] Could not load dynamic library 'libcudart.so.11.0'; dlerror: libcudart.so.11.0: cannot open shared object file: No such file or directory
/tmpfs/src/tf_docs_env/lib/python3.9/site-packages/tensorflow_addons/utils/tfa_eol_msg.py:23: UserWarning:

TensorFlow Addons (TFA) has ended development and introduction of new features.
TFA has entered a minimal maintenance and release mode until a planned end of life in May 2024.
Please modify downstream libraries to take dependencies from other repositories in our TensorFlow community (e.g. Keras, Keras-CV, and Keras-NLP).

For more information see: https://github.com/tensorflow/addons/issues/2807

  warnings.warn(
/tmpfs/src/tf_docs_env/lib/python3.9/site-packages/tensorflow_addons/utils/ensure_tf_install.py:53: UserWarning: Tensorflow Addons supports using Python ops for all Tensorflow versions above or equal to 2.12.0 and strictly below 2.15.0 (nightly versions are not supported).
 The versions of TensorFlow you are currently using is 2.8.4 and is not supported.
Some things might work, some things might not.
If you were to encounter a bug, do not file an issue.
If you want to make sure you're using a tested and supported configuration, either change the TensorFlow version or the TensorFlow Addons's version.
You can find the compatibility matrix in TensorFlow Addon's readme:
https://github.com/tensorflow/addons
  warnings.warn(
加载要微调的 TFDS 数据集
让我们使用来自 TFDS 的公开可用的 木薯叶病数据集。
tfds_name = 'cassava'
(ds_train, ds_validation, ds_test), ds_info = tfds.load(
    name=tfds_name,
    split=['train', 'validation', 'test'],
    with_info=True,
    as_supervised=True)
TFLITE_NAME_PREFIX = tfds_name
2023-11-07 13:39:36.293577: E tensorflow/stream_executor/cuda/cuda_driver.cc:271] failed call to cuInit: CUDA_ERROR_NO_DEVICE: no CUDA-capable device is detected
或者加载您自己的数据以进行微调
除了使用 TFDS 数据集之外,您还可以使用自己的数据进行训练。此代码片段展示了如何加载您自己的自定义数据集。有关支持的数据结构,请参阅 此 链接。这里提供了一个使用公开可用的 木薯叶病数据集 的示例。
# data_root_dir = tf.keras.utils.get_file(
#     'cassavaleafdata.zip',
#     'https://storage.googleapis.com/emcassavadata/cassavaleafdata.zip',
#     extract=True)
# data_root_dir = os.path.splitext(data_root_dir)[0]  # Remove the .zip extension

# builder = tfds.ImageFolder(data_root_dir)

# ds_info = builder.info
# ds_train = builder.as_dataset(split='train', as_supervised=True)
# ds_validation = builder.as_dataset(split='validation', as_supervised=True)
# ds_test = builder.as_dataset(split='test', as_supervised=True)
可视化来自训练拆分的样本
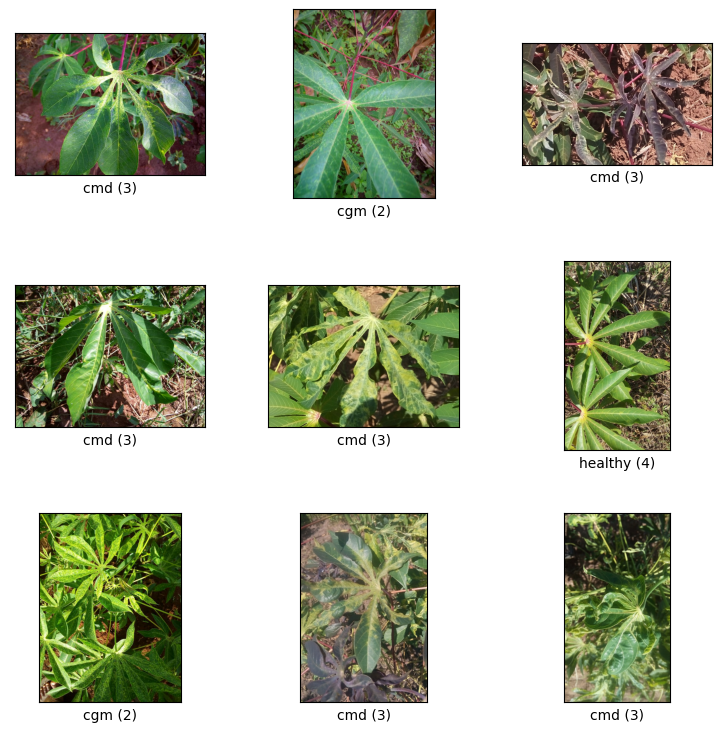
让我们看看数据集中的示例,包括图像样本及其标签的类 ID 和类名称。
_ = tfds.show_examples(ds_train, ds_info)

添加要作为未知示例从 TFDS 数据集中使用的图像
向训练数据集添加额外的未知(负面)示例,并为它们分配一个新的未知类标签编号。目标是让模型在实际使用时(例如在现场)能够在看到意外情况时预测“未知”。
您可以在下面看到将用于对额外未知图像进行采样的数据集列表。它包括 3 个完全不同的数据集,以增加多样性。其中一个是豆类叶病数据集,因此模型可以接触到除木薯以外的其他病害植物。
UNKNOWN_TFDS_DATASETS = [{
    'tfds_name': 'imagenet_v2/matched-frequency',
    'train_split': 'test[:80%]',
    'test_split': 'test[80%:]',
    'num_examples_ratio_to_normal': 1.0,
}, {
    'tfds_name': 'oxford_flowers102',
    'train_split': 'train',
    'test_split': 'test',
    'num_examples_ratio_to_normal': 1.0,
}, {
    'tfds_name': 'beans',
    'train_split': 'train',
    'test_split': 'test',
    'num_examples_ratio_to_normal': 1.0,
}]
UNKNOWN 数据集也从 TFDS 加载。
# Load unknown datasets.
weights = [
    spec['num_examples_ratio_to_normal'] for spec in UNKNOWN_TFDS_DATASETS
]
num_unknown_train_examples = sum(
    int(w * ds_train.cardinality().numpy()) for w in weights)
ds_unknown_train = tf.data.Dataset.sample_from_datasets([
    tfds.load(
        name=spec['tfds_name'], split=spec['train_split'],
        as_supervised=True).repeat(-1) for spec in UNKNOWN_TFDS_DATASETS
], weights).take(num_unknown_train_examples)
ds_unknown_train = ds_unknown_train.apply(
    tf.data.experimental.assert_cardinality(num_unknown_train_examples))
ds_unknown_tests = [
    tfds.load(
        name=spec['tfds_name'], split=spec['test_split'], as_supervised=True)
    for spec in UNKNOWN_TFDS_DATASETS
]
ds_unknown_test = ds_unknown_tests[0]
for ds in ds_unknown_tests[1:]:
  ds_unknown_test = ds_unknown_test.concatenate(ds)

# All examples from the unknown datasets will get a new class label number.
num_normal_classes = len(ds_info.features['label'].names)
unknown_label_value = tf.convert_to_tensor(num_normal_classes, tf.int64)
ds_unknown_train = ds_unknown_train.map(lambda image, _:
                                        (image, unknown_label_value))
ds_unknown_test = ds_unknown_test.map(lambda image, _:
                                      (image, unknown_label_value))

# Merge the normal train dataset with the unknown train dataset.
weights = [
    ds_train.cardinality().numpy(),
    ds_unknown_train.cardinality().numpy()
]
ds_train_with_unknown = tf.data.Dataset.sample_from_datasets(
    [ds_train, ds_unknown_train], [float(w) for w in weights])
ds_train_with_unknown = ds_train_with_unknown.apply(
    tf.data.experimental.assert_cardinality(sum(weights)))

print((f"Added {ds_unknown_train.cardinality().numpy()} negative examples."
       f"Training dataset has now {ds_train_with_unknown.cardinality().numpy()}"
       ' examples in total.'))
Added 16968 negative examples.Training dataset has now 22624 examples in total.
应用增强
为了使所有图像更加多样化,您将应用一些增强,例如更改
- 亮度
- 对比度
- 饱和度
- 色调
- 裁剪
这些类型的增强有助于使模型对图像输入的变化更加稳健。
def random_crop_and_random_augmentations_fn(image):
  # preprocess_for_train does random crop and resize internally.
  image = image_preprocessing.preprocess_for_train(image)
  image = tf.image.random_brightness(image, 0.2)
  image = tf.image.random_contrast(image, 0.5, 2.0)
  image = tf.image.random_saturation(image, 0.75, 1.25)
  image = tf.image.random_hue(image, 0.1)
  return image


def random_crop_fn(image):
  # preprocess_for_train does random crop and resize internally.
  image = image_preprocessing.preprocess_for_train(image)
  return image


def resize_and_center_crop_fn(image):
  image = tf.image.resize(image, (256, 256))
  image = image[16:240, 16:240]
  return image


no_augment_fn = lambda image: image

train_augment_fn = lambda image, label: (
    random_crop_and_random_augmentations_fn(image), label)
eval_augment_fn = lambda image, label: (resize_and_center_crop_fn(image), label)
为了应用增强,它使用 Dataset 类中的 map 方法。
ds_train_with_unknown = ds_train_with_unknown.map(train_augment_fn)
ds_validation = ds_validation.map(eval_augment_fn)
ds_test = ds_test.map(eval_augment_fn)
ds_unknown_test = ds_unknown_test.map(eval_augment_fn)
INFO:tensorflow:Use default resize_bicubic.
INFO:tensorflow:Use default resize_bicubic.
INFO:tensorflow:Use customized resize method bilinear
INFO:tensorflow:Use customized resize method bilinear
将数据包装到 Model Maker 友好格式
为了将这些数据集与 Model Maker 一起使用,它们需要位于 ImageClassifierDataLoader 类中。
label_names = ds_info.features['label'].names + ['UNKNOWN']

train_data = ImageClassifierDataLoader(ds_train_with_unknown,
                                       ds_train_with_unknown.cardinality(),
                                       label_names)
validation_data = ImageClassifierDataLoader(ds_validation,
                                            ds_validation.cardinality(),
                                            label_names)
test_data = ImageClassifierDataLoader(ds_test, ds_test.cardinality(),
                                      label_names)
unknown_test_data = ImageClassifierDataLoader(ds_unknown_test,
                                              ds_unknown_test.cardinality(),
                                              label_names)
运行训练
TensorFlow Hub 提供了用于迁移学习的多个模型。
在这里,您可以选择一个,也可以继续尝试其他模型以获得更好的结果。
如果您想尝试更多模型,可以从这个 集合 中添加它们。
选择一个基础模型
为了微调模型,您将使用 Model Maker。这使得整体解决方案更容易,因为在模型训练完成后,它还将将其转换为 TFLite。
Model Maker 使这种转换成为可能,并提供所有必要的信息,以便稍后轻松地在设备上部署模型。
模型规范是您告诉 Model Maker 您想使用哪个基础模型的方式。
image_model_spec = ModelSpec(uri=model_handle)
这里一个重要的细节是设置 train_whole_model,这将使基础模型在训练期间进行微调。这使得过程变慢,但最终模型的准确率更高。设置 shuffle 将确保模型以随机洗牌的顺序查看数据,这是模型学习的最佳实践。
model = image_classifier.create(
    train_data,
    model_spec=image_model_spec,
    batch_size=128,
    learning_rate=0.03,
    epochs=5,
    shuffle=True,
    train_whole_model=True,
    validation_data=validation_data)
INFO:tensorflow:Retraining the models...
INFO:tensorflow:Retraining the models...
Model: "sequential"
_________________________________________________________________
 Layer (type)                Output Shape              Param #
=================================================================
 hub_keras_layer_v1v2 (HubKe  (None, 1280)             4226432
 rasLayerV1V2)

 dropout (Dropout)           (None, 1280)              0

 dense (Dense)               (None, 6)                 7686

=================================================================
Total params: 4,234,118
Trainable params: 4,209,718
Non-trainable params: 24,400
_________________________________________________________________
None
Epoch 1/5
176/176 [==============================] - 485s 3s/step - loss: 0.8830 - accuracy: 0.9190 - val_loss: 1.1238 - val_accuracy: 0.8068
Epoch 2/5
176/176 [==============================] - 463s 3s/step - loss: 0.7892 - accuracy: 0.9545 - val_loss: 1.0590 - val_accuracy: 0.8290
Epoch 3/5
176/176 [==============================] - 464s 3s/step - loss: 0.7744 - accuracy: 0.9577 - val_loss: 1.0222 - val_accuracy: 0.8438
Epoch 4/5
176/176 [==============================] - 463s 3s/step - loss: 0.7617 - accuracy: 0.9633 - val_loss: 1.0435 - val_accuracy: 0.8407
Epoch 5/5
176/176 [==============================] - 461s 3s/step - loss: 0.7571 - accuracy: 0.9653 - val_loss: 0.9859 - val_accuracy: 0.8655
在测试拆分上评估模型
model.evaluate(test_data)
59/59 [==============================] - 7s 101ms/step - loss: 0.9668 - accuracy: 0.8637
[0.9668245911598206, 0.863660454750061]
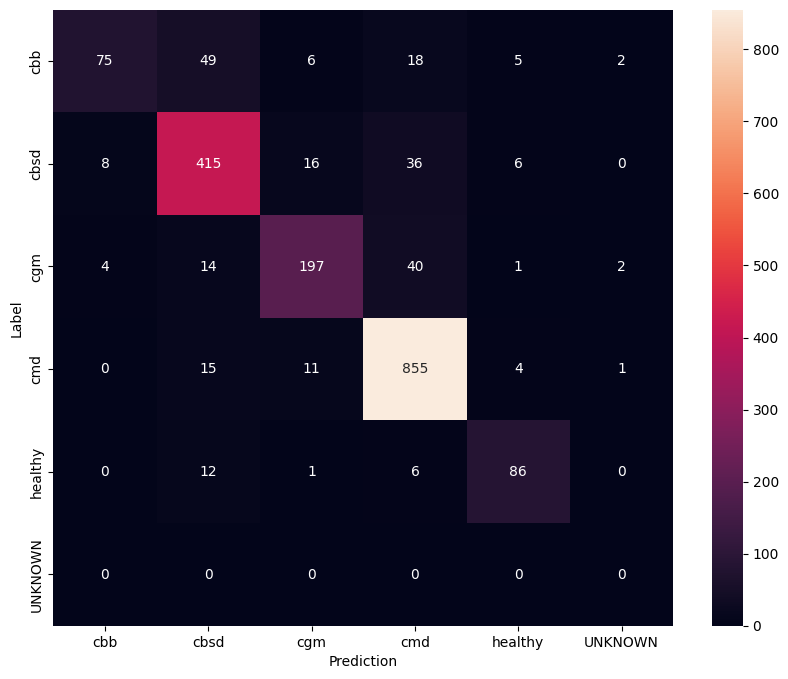
为了更好地了解微调后的模型,最好分析混淆矩阵。这将显示一个类别被预测为另一个类别的频率。
def predict_class_label_number(dataset):
  """Runs inference and returns predictions as class label numbers."""
  rev_label_names = {l: i for i, l in enumerate(label_names)}
  return [
      rev_label_names[o[0][0]]
      for o in model.predict_top_k(dataset, batch_size=128)
  ]

def show_confusion_matrix(cm, labels):
  plt.figure(figsize=(10, 8))
  sns.heatmap(cm, xticklabels=labels, yticklabels=labels,
              annot=True, fmt='g')
  plt.xlabel('Prediction')
  plt.ylabel('Label')
  plt.show()
confusion_mtx = tf.math.confusion_matrix(
    list(ds_test.map(lambda x, y: y)),
    predict_class_label_number(test_data),
    num_classes=len(label_names))

show_confusion_matrix(confusion_mtx, label_names)

在未知测试数据上评估模型
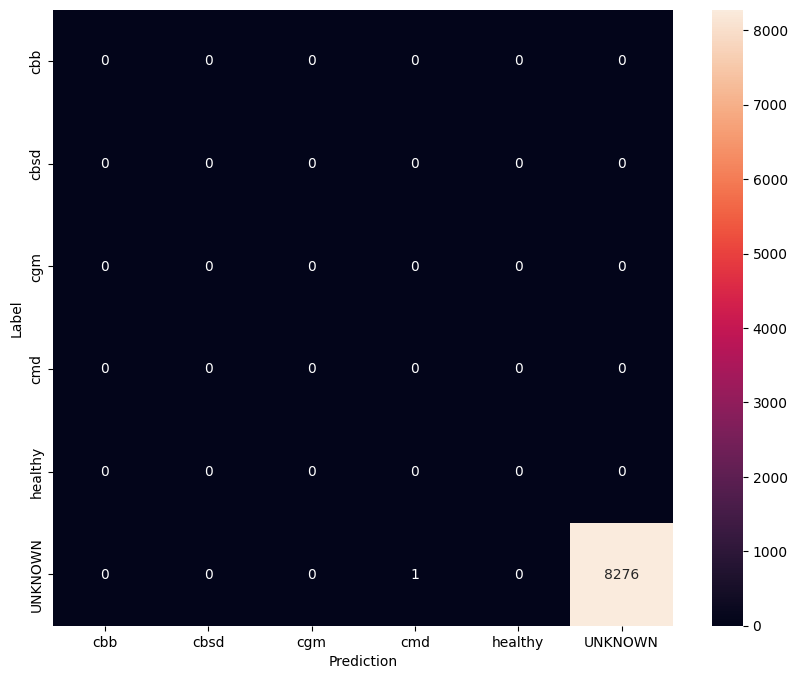
在此评估中,我们预计模型的准确率几乎为 1。模型测试的所有图像都与正常数据集无关,因此我们预计模型会预测“未知”类别标签。
model.evaluate(unknown_test_data)
259/259 [==============================] - 30s 111ms/step - loss: 0.6760 - accuracy: 0.9999
[0.6760221719741821, 0.9998791813850403]
打印混淆矩阵。
unknown_confusion_mtx = tf.math.confusion_matrix(
    list(ds_unknown_test.map(lambda x, y: y)),
    predict_class_label_number(unknown_test_data),
    num_classes=len(label_names))

show_confusion_matrix(unknown_confusion_mtx, label_names)

将模型导出为 TFLite 和 SavedModel
现在,我们可以将训练后的模型导出为 TFLite 和 SavedModel 格式,以便在设备上部署并用于 TensorFlow 中的推理。
tflite_filename = f'{TFLITE_NAME_PREFIX}_model_{model_name}.tflite'
model.export(export_dir='.', tflite_filename=tflite_filename)
2023-11-07 14:20:20.089818: W tensorflow/python/util/util.cc:368] Sets are not currently considered sequences, but this may change in the future, so consider avoiding using them.
INFO:tensorflow:Assets written to: /tmpfs/tmp/tmp99qci6gx/assets
INFO:tensorflow:Assets written to: /tmpfs/tmp/tmp99qci6gx/assets
/tmpfs/src/tf_docs_env/lib/python3.9/site-packages/tensorflow/lite/python/convert.py:746: UserWarning: Statistics for quantized inputs were expected, but not specified; continuing anyway.
  warnings.warn("Statistics for quantized inputs were expected, but not "
2023-11-07 14:20:30.245779: W tensorflow/compiler/mlir/lite/python/tf_tfl_flatbuffer_helpers.cc:357] Ignored output_format.
2023-11-07 14:20:30.245840: W tensorflow/compiler/mlir/lite/python/tf_tfl_flatbuffer_helpers.cc:360] Ignored drop_control_dependency.
fully_quantize: 0, inference_type: 6, input_inference_type: 3, output_inference_type: 3
INFO:tensorflow:Label file is inside the TFLite model with metadata.
INFO:tensorflow:Label file is inside the TFLite model with metadata.
INFO:tensorflow:Saving labels in /tmpfs/tmp/tmp8co343h3/labels.txt
INFO:tensorflow:Saving labels in /tmpfs/tmp/tmp8co343h3/labels.txt
INFO:tensorflow:TensorFlow Lite model exported successfully: ./cassava_model_mobilenet_v3_large_100_224.tflite
INFO:tensorflow:TensorFlow Lite model exported successfully: ./cassava_model_mobilenet_v3_large_100_224.tflite
# Export saved model version.
model.export(export_dir='.', export_format=ExportFormat.SAVED_MODEL)
INFO:tensorflow:Assets written to: ./saved_model/assets
INFO:tensorflow:Assets written to: ./saved_model/assets
下一步
您刚刚训练的模型可以在移动设备上使用,甚至可以在现场部署!
要下载模型,请单击 colab 左侧“文件”菜单的文件夹图标,然后选择“下载”选项。
此处使用的相同技术可以应用于其他植物病害任务,这些任务可能更适合您的用例,或任何其他类型的图像分类任务。如果您想继续并在 Android 应用程序上部署,您可以继续使用此 Android 快速入门指南。
