 在 TensorFlow.org 上查看 在 TensorFlow.org 上查看
|
 在 Google Colab 中运行 在 Google Colab 中运行
|
 在 GitHub 上查看源代码 在 GitHub 上查看源代码
|
 下载笔记本 下载笔记本
|
本教程演示了如何预处理 WAV 格式的音频文件,以及如何构建和训练一个基本的 自动语音识别 (ASR) 模型,用于识别十个不同的单词。您将使用 语音命令数据集 (Warden,2018) 的一部分,该数据集包含短的(一秒或更短)音频剪辑,包含命令,例如“向下”、“前进”、“向左”、“否”、“向右”、“停止”、“向上”和“是”。
现实世界的语音和音频识别 系统 很复杂。但是,就像 使用 MNIST 数据集进行图像分类 一样,本教程应该让您对所涉及的技术有一个基本了解。
设置
导入必要的模块和依赖项。您将使用 tf.keras.utils.audio_dataset_from_directory(在 TensorFlow 2.10 中引入),它有助于从 .wav 文件目录生成音频分类数据集。在本教程中,您还需要 seaborn 用于可视化。
pip install -U -q tensorflow tensorflow_datasets
import os
import pathlib

import matplotlib.pyplot as plt
import numpy as np
import seaborn as sns
import tensorflow as tf

from tensorflow.keras import layers
from tensorflow.keras import models
from IPython import display

# Set the seed value for experiment reproducibility.
seed = 42
tf.random.set_seed(seed)
np.random.seed(seed)
2024-07-13 06:07:40.179138: E external/local_xla/xla/stream_executor/cuda/cuda_fft.cc:485] Unable to register cuFFT factory: Attempting to register factory for plugin cuFFT when one has already been registered
2024-07-13 06:07:40.200347: E external/local_xla/xla/stream_executor/cuda/cuda_dnn.cc:8454] Unable to register cuDNN factory: Attempting to register factory for plugin cuDNN when one has already been registered
2024-07-13 06:07:40.206833: E external/local_xla/xla/stream_executor/cuda/cuda_blas.cc:1452] Unable to register cuBLAS factory: Attempting to register factory for plugin cuBLAS when one has already been registered
导入小型语音命令数据集
为了节省数据加载时间,您将使用一个更小的语音命令数据集。原始数据集包含超过 105,000 个音频文件,这些文件以 WAV(波形)音频文件格式存储,由人们说出 35 个不同的单词。这些数据由 Google 收集,并根据 CC BY 许可发布。
下载并解压缩包含较小语音命令数据集的 mini_speech_commands.zip 文件,可以使用 tf.keras.utils.get_file
DATASET_PATH = 'data/mini_speech_commands'

data_dir = pathlib.Path(DATASET_PATH)
if not data_dir.exists():
  tf.keras.utils.get_file(
      'mini_speech_commands.zip',
      origin="http://storage.googleapis.com/download.tensorflow.org/data/mini_speech_commands.zip",
      extract=True,
      cache_dir='.', cache_subdir='data')
Downloading data from http://storage.googleapis.com/download.tensorflow.org/data/mini_speech_commands.zip
182082353/182082353 ━━━━━━━━━━━━━━━━━━━━ 1s 0us/step
数据集的音频片段存储在八个文件夹中,分别对应于每个语音命令:no、yes、down、go、left、up、right 和 stop
commands = np.array(tf.io.gfile.listdir(str(data_dir)))
commands = commands[(commands != 'README.md') & (commands != '.DS_Store')]
print('Commands:', commands)
Commands: ['no' 'go' 'down' 'right' 'left' 'up' 'yes' 'stop']
以这种方式划分为目录后,您可以使用 keras.utils.audio_dataset_from_directory 轻松加载数据。
音频片段的时长为 1 秒或更短,采样率为 16kHz。 output_sequence_length=16000 将短片段填充到正好 1 秒(并会裁剪较长的片段),以便它们可以轻松地进行批处理。
train_ds, val_ds = tf.keras.utils.audio_dataset_from_directory(
    directory=data_dir,
    batch_size=64,
    validation_split=0.2,
    seed=0,
    output_sequence_length=16000,
    subset='both')

label_names = np.array(train_ds.class_names)
print()
print("label names:", label_names)
Found 8000 files belonging to 8 classes.
Using 6400 files for training.
Using 1600 files for validation.
WARNING: All log messages before absl::InitializeLog() is called are written to STDERR
I0000 00:00:1720850867.912012  506001 cuda_executor.cc:1015] successful NUMA node read from SysFS had negative value (-1), but there must be at least one NUMA node, so returning NUMA node zero. See more at https://github.com/torvalds/linux/blob/v6.0/Documentation/ABI/testing/sysfs-bus-pci#L344-L355
I0000 00:00:1720850867.915927  506001 cuda_executor.cc:1015] successful NUMA node read from SysFS had negative value (-1), but there must be at least one NUMA node, so returning NUMA node zero. See more at https://github.com/torvalds/linux/blob/v6.0/Documentation/ABI/testing/sysfs-bus-pci#L344-L355
I0000 00:00:1720850867.919624  506001 cuda_executor.cc:1015] successful NUMA node read from SysFS had negative value (-1), but there must be at least one NUMA node, so returning NUMA node zero. See more at https://github.com/torvalds/linux/blob/v6.0/Documentation/ABI/testing/sysfs-bus-pci#L344-L355
I0000 00:00:1720850867.923325  506001 cuda_executor.cc:1015] successful NUMA node read from SysFS had negative value (-1), but there must be at least one NUMA node, so returning NUMA node zero. See more at https://github.com/torvalds/linux/blob/v6.0/Documentation/ABI/testing/sysfs-bus-pci#L344-L355
I0000 00:00:1720850867.934459  506001 cuda_executor.cc:1015] successful NUMA node read from SysFS had negative value (-1), but there must be at least one NUMA node, so returning NUMA node zero. See more at https://github.com/torvalds/linux/blob/v6.0/Documentation/ABI/testing/sysfs-bus-pci#L344-L355
I0000 00:00:1720850867.937938  506001 cuda_executor.cc:1015] successful NUMA node read from SysFS had negative value (-1), but there must be at least one NUMA node, so returning NUMA node zero. See more at https://github.com/torvalds/linux/blob/v6.0/Documentation/ABI/testing/sysfs-bus-pci#L344-L355
I0000 00:00:1720850867.941515  506001 cuda_executor.cc:1015] successful NUMA node read from SysFS had negative value (-1), but there must be at least one NUMA node, so returning NUMA node zero. See more at https://github.com/torvalds/linux/blob/v6.0/Documentation/ABI/testing/sysfs-bus-pci#L344-L355
I0000 00:00:1720850867.945048  506001 cuda_executor.cc:1015] successful NUMA node read from SysFS had negative value (-1), but there must be at least one NUMA node, so returning NUMA node zero. See more at https://github.com/torvalds/linux/blob/v6.0/Documentation/ABI/testing/sysfs-bus-pci#L344-L355
I0000 00:00:1720850867.948405  506001 cuda_executor.cc:1015] successful NUMA node read from SysFS had negative value (-1), but there must be at least one NUMA node, so returning NUMA node zero. See more at https://github.com/torvalds/linux/blob/v6.0/Documentation/ABI/testing/sysfs-bus-pci#L344-L355
I0000 00:00:1720850867.951825  506001 cuda_executor.cc:1015] successful NUMA node read from SysFS had negative value (-1), but there must be at least one NUMA node, so returning NUMA node zero. See more at https://github.com/torvalds/linux/blob/v6.0/Documentation/ABI/testing/sysfs-bus-pci#L344-L355
I0000 00:00:1720850867.955402  506001 cuda_executor.cc:1015] successful NUMA node read from SysFS had negative value (-1), but there must be at least one NUMA node, so returning NUMA node zero. See more at https://github.com/torvalds/linux/blob/v6.0/Documentation/ABI/testing/sysfs-bus-pci#L344-L355
I0000 00:00:1720850867.958967  506001 cuda_executor.cc:1015] successful NUMA node read from SysFS had negative value (-1), but there must be at least one NUMA node, so returning NUMA node zero. See more at https://github.com/torvalds/linux/blob/v6.0/Documentation/ABI/testing/sysfs-bus-pci#L344-L355
I0000 00:00:1720850869.178994  506001 cuda_executor.cc:1015] successful NUMA node read from SysFS had negative value (-1), but there must be at least one NUMA node, so returning NUMA node zero. See more at https://github.com/torvalds/linux/blob/v6.0/Documentation/ABI/testing/sysfs-bus-pci#L344-L355
I0000 00:00:1720850869.181072  506001 cuda_executor.cc:1015] successful NUMA node read from SysFS had negative value (-1), but there must be at least one NUMA node, so returning NUMA node zero. See more at https://github.com/torvalds/linux/blob/v6.0/Documentation/ABI/testing/sysfs-bus-pci#L344-L355
I0000 00:00:1720850869.183168  506001 cuda_executor.cc:1015] successful NUMA node read from SysFS had negative value (-1), but there must be at least one NUMA node, so returning NUMA node zero. See more at https://github.com/torvalds/linux/blob/v6.0/Documentation/ABI/testing/sysfs-bus-pci#L344-L355
I0000 00:00:1720850869.185306  506001 cuda_executor.cc:1015] successful NUMA node read from SysFS had negative value (-1), but there must be at least one NUMA node, so returning NUMA node zero. See more at https://github.com/torvalds/linux/blob/v6.0/Documentation/ABI/testing/sysfs-bus-pci#L344-L355
I0000 00:00:1720850869.187358  506001 cuda_executor.cc:1015] successful NUMA node read from SysFS had negative value (-1), but there must be at least one NUMA node, so returning NUMA node zero. See more at https://github.com/torvalds/linux/blob/v6.0/Documentation/ABI/testing/sysfs-bus-pci#L344-L355
I0000 00:00:1720850869.189259  506001 cuda_executor.cc:1015] successful NUMA node read from SysFS had negative value (-1), but there must be at least one NUMA node, so returning NUMA node zero. See more at https://github.com/torvalds/linux/blob/v6.0/Documentation/ABI/testing/sysfs-bus-pci#L344-L355
I0000 00:00:1720850869.191236  506001 cuda_executor.cc:1015] successful NUMA node read from SysFS had negative value (-1), but there must be at least one NUMA node, so returning NUMA node zero. See more at https://github.com/torvalds/linux/blob/v6.0/Documentation/ABI/testing/sysfs-bus-pci#L344-L355
I0000 00:00:1720850869.193176  506001 cuda_executor.cc:1015] successful NUMA node read from SysFS had negative value (-1), but there must be at least one NUMA node, so returning NUMA node zero. See more at https://github.com/torvalds/linux/blob/v6.0/Documentation/ABI/testing/sysfs-bus-pci#L344-L355
I0000 00:00:1720850869.195140  506001 cuda_executor.cc:1015] successful NUMA node read from SysFS had negative value (-1), but there must be at least one NUMA node, so returning NUMA node zero. See more at https://github.com/torvalds/linux/blob/v6.0/Documentation/ABI/testing/sysfs-bus-pci#L344-L355
I0000 00:00:1720850869.197069  506001 cuda_executor.cc:1015] successful NUMA node read from SysFS had negative value (-1), but there must be at least one NUMA node, so returning NUMA node zero. See more at https://github.com/torvalds/linux/blob/v6.0/Documentation/ABI/testing/sysfs-bus-pci#L344-L355
I0000 00:00:1720850869.199080  506001 cuda_executor.cc:1015] successful NUMA node read from SysFS had negative value (-1), but there must be at least one NUMA node, so returning NUMA node zero. See more at https://github.com/torvalds/linux/blob/v6.0/Documentation/ABI/testing/sysfs-bus-pci#L344-L355
I0000 00:00:1720850869.201029  506001 cuda_executor.cc:1015] successful NUMA node read from SysFS had negative value (-1), but there must be at least one NUMA node, so returning NUMA node zero. See more at https://github.com/torvalds/linux/blob/v6.0/Documentation/ABI/testing/sysfs-bus-pci#L344-L355
I0000 00:00:1720850869.239185  506001 cuda_executor.cc:1015] successful NUMA node read from SysFS had negative value (-1), but there must be at least one NUMA node, so returning NUMA node zero. See more at https://github.com/torvalds/linux/blob/v6.0/Documentation/ABI/testing/sysfs-bus-pci#L344-L355
I0000 00:00:1720850869.241160  506001 cuda_executor.cc:1015] successful NUMA node read from SysFS had negative value (-1), but there must be at least one NUMA node, so returning NUMA node zero. See more at https://github.com/torvalds/linux/blob/v6.0/Documentation/ABI/testing/sysfs-bus-pci#L344-L355
I0000 00:00:1720850869.243218  506001 cuda_executor.cc:1015] successful NUMA node read from SysFS had negative value (-1), but there must be at least one NUMA node, so returning NUMA node zero. See more at https://github.com/torvalds/linux/blob/v6.0/Documentation/ABI/testing/sysfs-bus-pci#L344-L355
I0000 00:00:1720850869.245211  506001 cuda_executor.cc:1015] successful NUMA node read from SysFS had negative value (-1), but there must be at least one NUMA node, so returning NUMA node zero. See more at https://github.com/torvalds/linux/blob/v6.0/Documentation/ABI/testing/sysfs-bus-pci#L344-L355
I0000 00:00:1720850869.247220  506001 cuda_executor.cc:1015] successful NUMA node read from SysFS had negative value (-1), but there must be at least one NUMA node, so returning NUMA node zero. See more at https://github.com/torvalds/linux/blob/v6.0/Documentation/ABI/testing/sysfs-bus-pci#L344-L355
I0000 00:00:1720850869.249114  506001 cuda_executor.cc:1015] successful NUMA node read from SysFS had negative value (-1), but there must be at least one NUMA node, so returning NUMA node zero. See more at https://github.com/torvalds/linux/blob/v6.0/Documentation/ABI/testing/sysfs-bus-pci#L344-L355
I0000 00:00:1720850869.251113  506001 cuda_executor.cc:1015] successful NUMA node read from SysFS had negative value (-1), but there must be at least one NUMA node, so returning NUMA node zero. See more at https://github.com/torvalds/linux/blob/v6.0/Documentation/ABI/testing/sysfs-bus-pci#L344-L355
I0000 00:00:1720850869.253028  506001 cuda_executor.cc:1015] successful NUMA node read from SysFS had negative value (-1), but there must be at least one NUMA node, so returning NUMA node zero. See more at https://github.com/torvalds/linux/blob/v6.0/Documentation/ABI/testing/sysfs-bus-pci#L344-L355
I0000 00:00:1720850869.255025  506001 cuda_executor.cc:1015] successful NUMA node read from SysFS had negative value (-1), but there must be at least one NUMA node, so returning NUMA node zero. See more at https://github.com/torvalds/linux/blob/v6.0/Documentation/ABI/testing/sysfs-bus-pci#L344-L355
I0000 00:00:1720850869.257369  506001 cuda_executor.cc:1015] successful NUMA node read from SysFS had negative value (-1), but there must be at least one NUMA node, so returning NUMA node zero. See more at https://github.com/torvalds/linux/blob/v6.0/Documentation/ABI/testing/sysfs-bus-pci#L344-L355
I0000 00:00:1720850869.259763  506001 cuda_executor.cc:1015] successful NUMA node read from SysFS had negative value (-1), but there must be at least one NUMA node, so returning NUMA node zero. See more at https://github.com/torvalds/linux/blob/v6.0/Documentation/ABI/testing/sysfs-bus-pci#L344-L355
I0000 00:00:1720850869.262122  506001 cuda_executor.cc:1015] successful NUMA node read from SysFS had negative value (-1), but there must be at least one NUMA node, so returning NUMA node zero. See more at https://github.com/torvalds/linux/blob/v6.0/Documentation/ABI/testing/sysfs-bus-pci#L344-L355
label names: ['down' 'go' 'left' 'no' 'right' 'stop' 'up' 'yes']
数据集现在包含音频片段批次和整数标签。音频片段的形状为 (batch, samples, channels)。
train_ds.element_spec
(TensorSpec(shape=(None, 16000, None), dtype=tf.float32, name=None),
 TensorSpec(shape=(None,), dtype=tf.int32, name=None))
此数据集仅包含单声道音频,因此使用 tf.squeeze 函数来删除额外的轴
def squeeze(audio, labels):
  audio = tf.squeeze(audio, axis=-1)
  return audio, labels

train_ds = train_ds.map(squeeze, tf.data.AUTOTUNE)
val_ds = val_ds.map(squeeze, tf.data.AUTOTUNE)
utils.audio_dataset_from_directory 函数最多只返回两个拆分。最好将测试集与验证集分开。理想情况下,您应该将其保存在单独的目录中,但在这种情况下,您可以使用 Dataset.shard 将验证集拆分为两半。请注意,迭代**任何**分片将加载**所有**数据,并且只保留其部分。
test_ds = val_ds.shard(num_shards=2, index=0)
val_ds = val_ds.shard(num_shards=2, index=1)
for example_audio, example_labels in train_ds.take(1):
  print(example_audio.shape)
  print(example_labels.shape)
(64, 16000)
(64,)
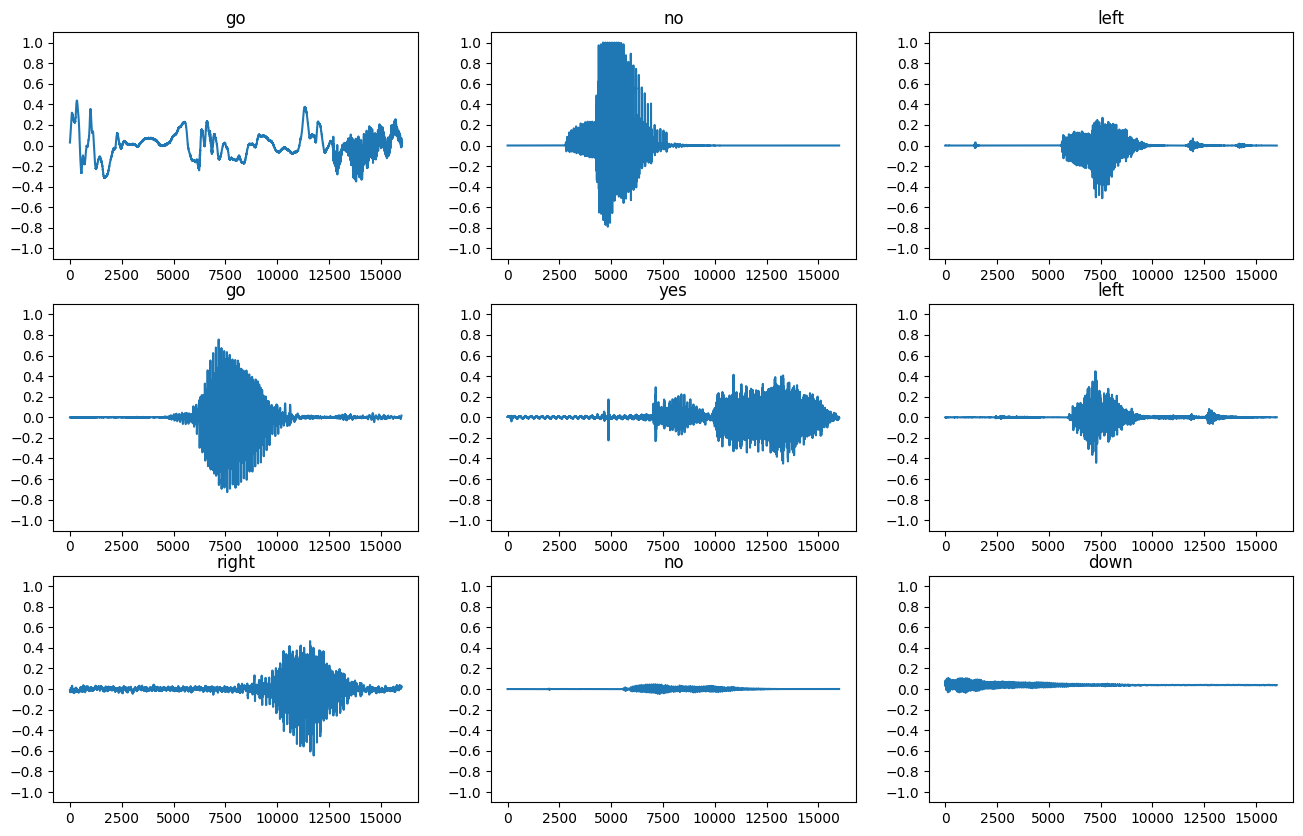
让我们绘制一些音频波形
label_names[[1,1,3,0]]
array(['go', 'go', 'no', 'down'], dtype='<U5')
plt.figure(figsize=(16, 10))
rows = 3
cols = 3
n = rows * cols
for i in range(n):
  plt.subplot(rows, cols, i+1)
  audio_signal = example_audio[i]
  plt.plot(audio_signal)
  plt.title(label_names[example_labels[i]])
  plt.yticks(np.arange(-1.2, 1.2, 0.2))
  plt.ylim([-1.1, 1.1])
将波形转换为频谱图
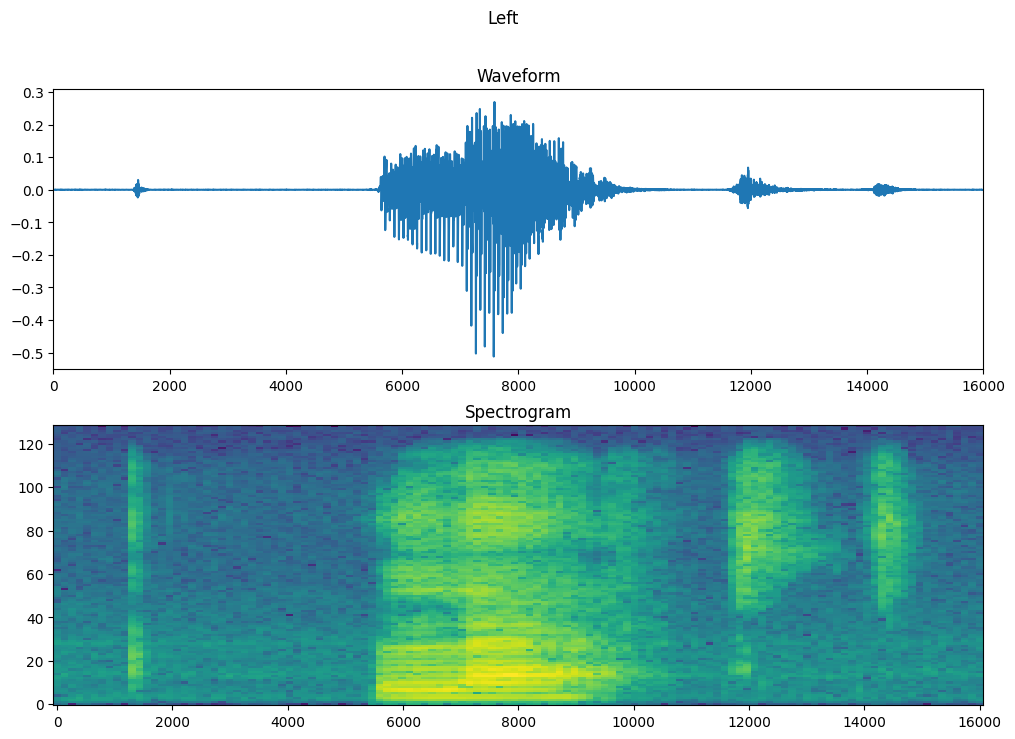
数据集中波形以时域表示。接下来,您将通过计算 短时傅里叶变换 (STFT) 将波形从时域信号转换为时频域信号,以将波形转换为 频谱图,频谱图显示了随时间变化的频率,可以表示为二维图像。您将把频谱图图像馈送到您的神经网络中以训练模型。
傅里叶变换 (tf.signal.fft) 将信号转换为其组成频率,但会丢失所有时间信息。相比之下,STFT (tf.signal.stft) 将信号分成时间窗口,并在每个窗口上运行傅里叶变换,保留一些时间信息,并返回一个二维张量,您可以在其上运行标准卷积。
创建一个将波形转换为频谱图的实用程序函数
- 波形需要具有相同的长度,这样当您将它们转换为频谱图时,结果将具有相似的维度。这可以通过简单地对短于一秒的音频片段进行零填充来完成(使用
tf.zeros)。 - 在调用
tf.signal.stft时,选择frame_length和frame_step参数,以便生成的频谱图“图像”几乎是正方形的。有关 STFT 参数选择的信息,请参阅 此 Coursera 视频,了解音频信号处理和 STFT。 - STFT 生成一个复数数组,表示幅度和相位。但是,在本教程中,您将只使用幅度,您可以通过对
tf.signal.stft的输出应用tf.abs来获得幅度。
def get_spectrogram(waveform):
  # Convert the waveform to a spectrogram via a STFT.
  spectrogram = tf.signal.stft(
      waveform, frame_length=255, frame_step=128)
  # Obtain the magnitude of the STFT.
  spectrogram = tf.abs(spectrogram)
  # Add a `channels` dimension, so that the spectrogram can be used
  # as image-like input data with convolution layers (which expect
  # shape (`batch_size`, `height`, `width`, `channels`).
  spectrogram = spectrogram[..., tf.newaxis]
  return spectrogram
接下来,开始探索数据。打印一个示例的张量化波形的形状和相应的频谱图,并播放原始音频
for i in range(3):
  label = label_names[example_labels[i]]
  waveform = example_audio[i]
  spectrogram = get_spectrogram(waveform)

  print('Label:', label)
  print('Waveform shape:', waveform.shape)
  print('Spectrogram shape:', spectrogram.shape)
  print('Audio playback')
  display.display(display.Audio(waveform, rate=16000))
Label: go
Waveform shape: (16000,)
Spectrogram shape: (124, 129, 1)
Audio playback
Label: no
Waveform shape: (16000,)
Spectrogram shape: (124, 129, 1)
Audio playback
Label: left
Waveform shape: (16000,)
Spectrogram shape: (124, 129, 1)
Audio playback
现在,定义一个用于显示频谱图的函数
def plot_spectrogram(spectrogram, ax):
  if len(spectrogram.shape) > 2:
    assert len(spectrogram.shape) == 3
    spectrogram = np.squeeze(spectrogram, axis=-1)
  # Convert the frequencies to log scale and transpose, so that the time is
  # represented on the x-axis (columns).
  # Add an epsilon to avoid taking a log of zero.
  log_spec = np.log(spectrogram.T + np.finfo(float).eps)
  height = log_spec.shape[0]
  width = log_spec.shape[1]
  X = np.linspace(0, np.size(spectrogram), num=width, dtype=int)
  Y = range(height)
  ax.pcolormesh(X, Y, log_spec)
绘制示例的波形随时间的变化以及相应的频谱图(频率随时间的变化)
fig, axes = plt.subplots(2, figsize=(12, 8))
timescale = np.arange(waveform.shape[0])
axes[0].plot(timescale, waveform.numpy())
axes[0].set_title('Waveform')
axes[0].set_xlim([0, 16000])

plot_spectrogram(spectrogram.numpy(), axes[1])
axes[1].set_title('Spectrogram')
plt.suptitle(label.title())
plt.show()
现在,从音频数据集中创建频谱图数据集
def make_spec_ds(ds):
  return ds.map(
      map_func=lambda audio,label: (get_spectrogram(audio), label),
      num_parallel_calls=tf.data.AUTOTUNE)
train_spectrogram_ds = make_spec_ds(train_ds)
val_spectrogram_ds = make_spec_ds(val_ds)
test_spectrogram_ds = make_spec_ds(test_ds)
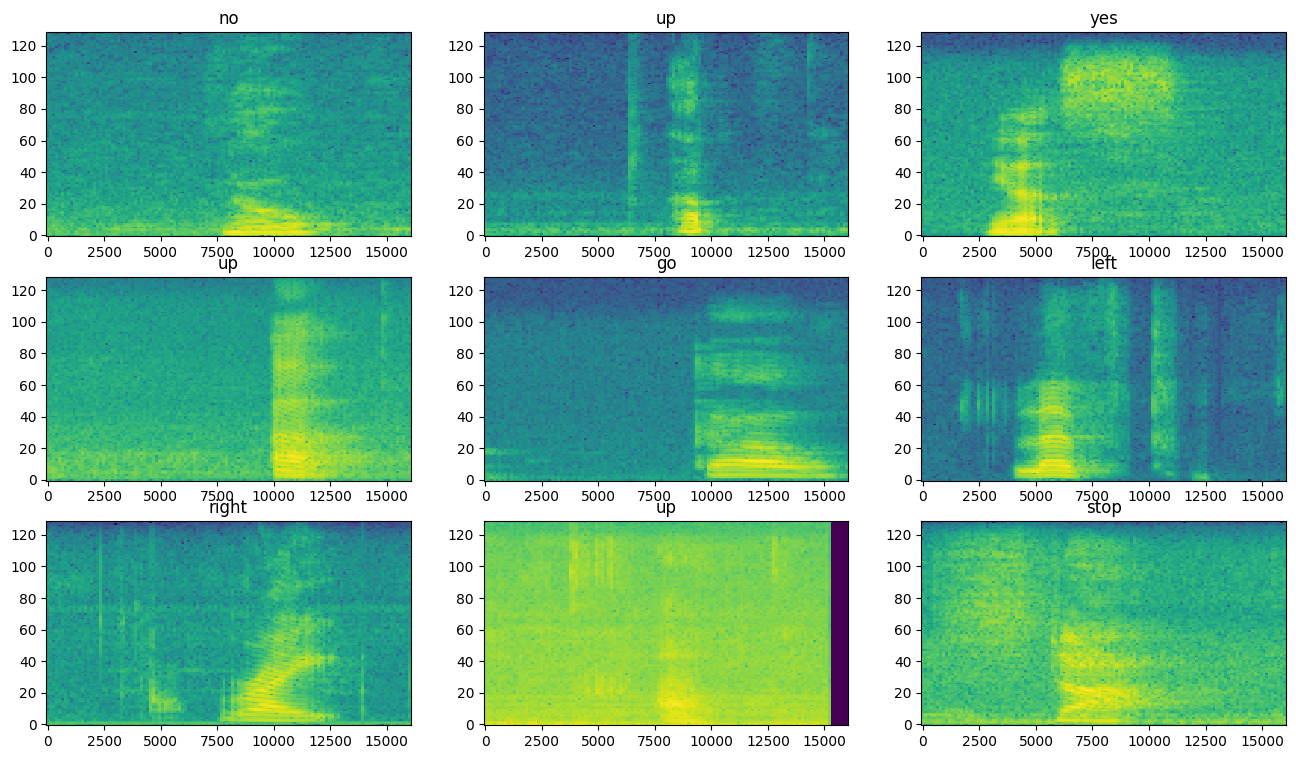
检查数据集不同示例的频谱图
for example_spectrograms, example_spect_labels in train_spectrogram_ds.take(1):
  break
rows = 3
cols = 3
n = rows*cols
fig, axes = plt.subplots(rows, cols, figsize=(16, 9))

for i in range(n):
    r = i // cols
    c = i % cols
    ax = axes[r][c]
    plot_spectrogram(example_spectrograms[i].numpy(), ax)
    ax.set_title(label_names[example_spect_labels[i].numpy()])

plt.show()
构建并训练模型
添加 Dataset.cache 和 Dataset.prefetch 操作以减少训练模型时的读取延迟
train_spectrogram_ds = train_spectrogram_ds.cache().shuffle(10000).prefetch(tf.data.AUTOTUNE)
val_spectrogram_ds = val_spectrogram_ds.cache().prefetch(tf.data.AUTOTUNE)
test_spectrogram_ds = test_spectrogram_ds.cache().prefetch(tf.data.AUTOTUNE)
对于模型,您将使用一个简单的卷积神经网络 (CNN),因为您已将音频文件转换为频谱图图像。
您的 tf.keras.Sequential 模型将使用以下 Keras 预处理层
tf.keras.layers.Resizing:对输入进行下采样,使模型能够更快地训练。tf.keras.layers.Normalization:根据图像的均值和标准差对图像中的每个像素进行归一化。
对于 Normalization 层,首先需要在训练数据上调用其 adapt 方法,以便计算聚合统计信息(即均值和标准差)。
input_shape = example_spectrograms.shape[1:]
print('Input shape:', input_shape)
num_labels = len(label_names)

# Instantiate the `tf.keras.layers.Normalization` layer.
norm_layer = layers.Normalization()
# Fit the state of the layer to the spectrograms
# with `Normalization.adapt`.
norm_layer.adapt(data=train_spectrogram_ds.map(map_func=lambda spec, label: spec))

model = models.Sequential([
    layers.Input(shape=input_shape),
    # Downsample the input.
    layers.Resizing(32, 32),
    # Normalize.
    norm_layer,
    layers.Conv2D(32, 3, activation='relu'),
    layers.Conv2D(64, 3, activation='relu'),
    layers.MaxPooling2D(),
    layers.Dropout(0.25),
    layers.Flatten(),
    layers.Dense(128, activation='relu'),
    layers.Dropout(0.5),
    layers.Dense(num_labels),
])

model.summary()
Input shape: (124, 129, 1)
使用 Adam 优化器和交叉熵损失配置 Keras 模型
model.compile(
    optimizer=tf.keras.optimizers.Adam(),
    loss=tf.keras.losses.SparseCategoricalCrossentropy(from_logits=True),
    metrics=['accuracy'],
)
为了演示目的,在 10 个 epoch 上训练模型
EPOCHS = 10
history = model.fit(
    train_spectrogram_ds,
    validation_data=val_spectrogram_ds,
    epochs=EPOCHS,
    callbacks=tf.keras.callbacks.EarlyStopping(verbose=1, patience=2),
)
Epoch 1/10
WARNING: All log messages before absl::InitializeLog() is called are written to STDERR
I0000 00:00:1720850876.943102  506216 service.cc:146] XLA service 0x7ff53c00c2d0 initialized for platform CUDA (this does not guarantee that XLA will be used). Devices:
I0000 00:00:1720850876.943133  506216 service.cc:154]   StreamExecutor device (0): Tesla T4, Compute Capability 7.5
I0000 00:00:1720850876.943137  506216 service.cc:154]   StreamExecutor device (1): Tesla T4, Compute Capability 7.5
I0000 00:00:1720850876.943140  506216 service.cc:154]   StreamExecutor device (2): Tesla T4, Compute Capability 7.5
I0000 00:00:1720850876.943142  506216 service.cc:154]   StreamExecutor device (3): Tesla T4, Compute Capability 7.5
28/100 ━━━━━━━━━━━━━━━━━━━━ 0s 6ms/step - accuracy: 0.2050 - loss: 2.0550
I0000 00:00:1720850879.533199  506216 device_compiler.h:188] Compiled cluster using XLA!  This line is logged at most once for the lifetime of the process.
100/100 ━━━━━━━━━━━━━━━━━━━━ 5s 15ms/step - accuracy: 0.2877 - loss: 1.9045 - val_accuracy: 0.5964 - val_loss: 1.3098
Epoch 2/10
100/100 ━━━━━━━━━━━━━━━━━━━━ 1s 6ms/step - accuracy: 0.5353 - loss: 1.2888 - val_accuracy: 0.7318 - val_loss: 0.9494
Epoch 3/10
100/100 ━━━━━━━━━━━━━━━━━━━━ 1s 6ms/step - accuracy: 0.6576 - loss: 0.9511 - val_accuracy: 0.7747 - val_loss: 0.7721
Epoch 4/10
100/100 ━━━━━━━━━━━━━━━━━━━━ 1s 6ms/step - accuracy: 0.7326 - loss: 0.7459 - val_accuracy: 0.7799 - val_loss: 0.6771
Epoch 5/10
100/100 ━━━━━━━━━━━━━━━━━━━━ 1s 6ms/step - accuracy: 0.7708 - loss: 0.6354 - val_accuracy: 0.8255 - val_loss: 0.5870
Epoch 6/10
100/100 ━━━━━━━━━━━━━━━━━━━━ 1s 6ms/step - accuracy: 0.8000 - loss: 0.5556 - val_accuracy: 0.8281 - val_loss: 0.5324
Epoch 7/10
100/100 ━━━━━━━━━━━━━━━━━━━━ 1s 6ms/step - accuracy: 0.8250 - loss: 0.5008 - val_accuracy: 0.8451 - val_loss: 0.5141
Epoch 8/10
100/100 ━━━━━━━━━━━━━━━━━━━━ 1s 6ms/step - accuracy: 0.8397 - loss: 0.4387 - val_accuracy: 0.8346 - val_loss: 0.4986
Epoch 9/10
100/100 ━━━━━━━━━━━━━━━━━━━━ 1s 6ms/step - accuracy: 0.8653 - loss: 0.3894 - val_accuracy: 0.8542 - val_loss: 0.4660
Epoch 10/10
100/100 ━━━━━━━━━━━━━━━━━━━━ 1s 6ms/step - accuracy: 0.8866 - loss: 0.3403 - val_accuracy: 0.8555 - val_loss: 0.4425
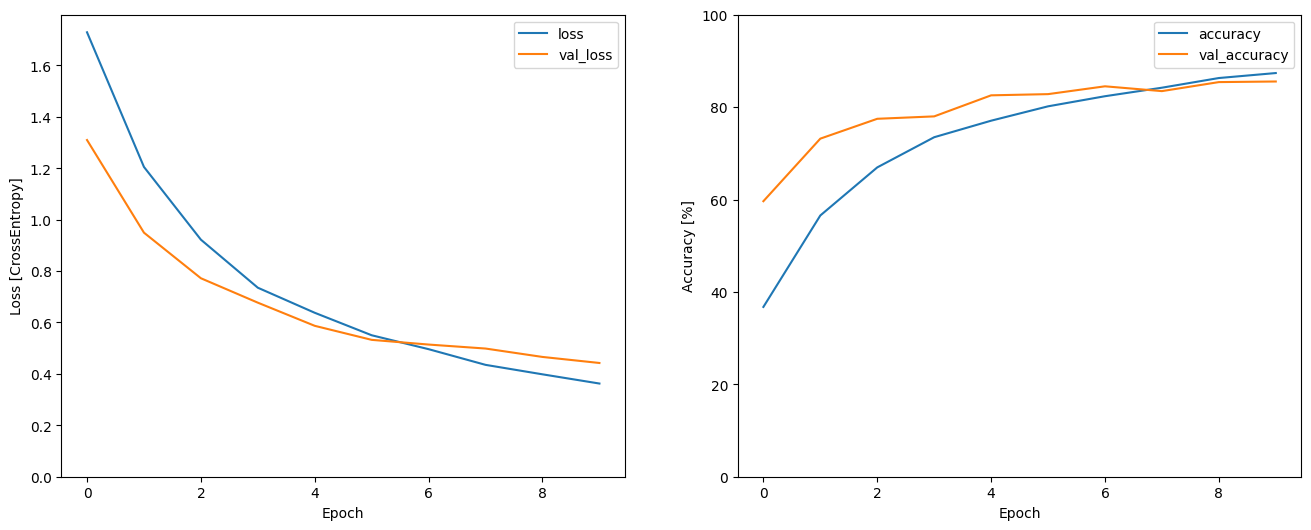
让我们绘制训练和验证损失曲线,以检查模型在训练期间的改进情况
metrics = history.history
plt.figure(figsize=(16,6))
plt.subplot(1,2,1)
plt.plot(history.epoch, metrics['loss'], metrics['val_loss'])
plt.legend(['loss', 'val_loss'])
plt.ylim([0, max(plt.ylim())])
plt.xlabel('Epoch')
plt.ylabel('Loss [CrossEntropy]')

plt.subplot(1,2,2)
plt.plot(history.epoch, 100*np.array(metrics['accuracy']), 100*np.array(metrics['val_accuracy']))
plt.legend(['accuracy', 'val_accuracy'])
plt.ylim([0, 100])
plt.xlabel('Epoch')
plt.ylabel('Accuracy [%]')
Text(0, 0.5, 'Accuracy [%]')
评估模型性能
在测试集上运行模型,并检查模型的性能
model.evaluate(test_spectrogram_ds, return_dict=True)
13/13 ━━━━━━━━━━━━━━━━━━━━ 0s 4ms/step - accuracy: 0.8300 - loss: 0.4642
{'accuracy': 0.8353365659713745, 'loss': 0.4780646562576294}
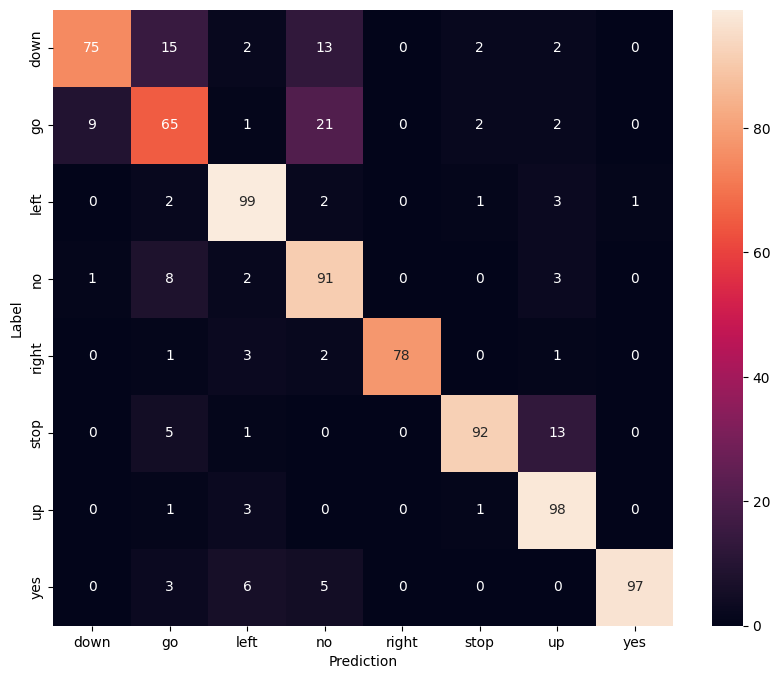
显示混淆矩阵
使用 混淆矩阵 检查模型在对测试集中的每个命令进行分类时的表现
y_pred = model.predict(test_spectrogram_ds)
13/13 ━━━━━━━━━━━━━━━━━━━━ 0s 3ms/step
y_pred = tf.argmax(y_pred, axis=1)
y_true = tf.concat(list(test_spectrogram_ds.map(lambda s,lab: lab)), axis=0)
confusion_mtx = tf.math.confusion_matrix(y_true, y_pred)
plt.figure(figsize=(10, 8))
sns.heatmap(confusion_mtx,
            xticklabels=label_names,
            yticklabels=label_names,
            annot=True, fmt='g')
plt.xlabel('Prediction')
plt.ylabel('Label')
plt.show()
对音频文件运行推理
最后,使用有人说“no”的输入音频文件验证模型的预测输出。您的模型表现如何?
x = data_dir/'no/01bb6a2a_nohash_0.wav'
x = tf.io.read_file(str(x))
x, sample_rate = tf.audio.decode_wav(x, desired_channels=1, desired_samples=16000,)
x = tf.squeeze(x, axis=-1)
waveform = x
x = get_spectrogram(x)
x = x[tf.newaxis,...]

prediction = model(x)
x_labels = ['no', 'yes', 'down', 'go', 'left', 'up', 'right', 'stop']
plt.bar(x_labels, tf.nn.softmax(prediction[0]))
plt.title('No')
plt.show()

display.display(display.Audio(waveform, rate=16000))
W0000 00:00:1720850888.403731  506001 gpu_timer.cc:114] Skipping the delay kernel, measurement accuracy will be reduced
W0000 00:00:1720850888.422412  506001 gpu_timer.cc:114] Skipping the delay kernel, measurement accuracy will be reduced
W0000 00:00:1720850888.423612  506001 gpu_timer.cc:114] Skipping the delay kernel, measurement accuracy will be reduced
W0000 00:00:1720850888.424744  506001 gpu_timer.cc:114] Skipping the delay kernel, measurement accuracy will be reduced
W0000 00:00:1720850888.425873  506001 gpu_timer.cc:114] Skipping the delay kernel, measurement accuracy will be reduced
W0000 00:00:1720850888.427028  506001 gpu_timer.cc:114] Skipping the delay kernel, measurement accuracy will be reduced
W0000 00:00:1720850888.428159  506001 gpu_timer.cc:114] Skipping the delay kernel, measurement accuracy will be reduced
W0000 00:00:1720850888.429287  506001 gpu_timer.cc:114] Skipping the delay kernel, measurement accuracy will be reduced
W0000 00:00:1720850888.430423  506001 gpu_timer.cc:114] Skipping the delay kernel, measurement accuracy will be reduced
W0000 00:00:1720850888.431593  506001 gpu_timer.cc:114] Skipping the delay kernel, measurement accuracy will be reduced
W0000 00:00:1720850888.432713  506001 gpu_timer.cc:114] Skipping the delay kernel, measurement accuracy will be reduced
W0000 00:00:1720850888.433841  506001 gpu_timer.cc:114] Skipping the delay kernel, measurement accuracy will be reduced
W0000 00:00:1720850888.434996  506001 gpu_timer.cc:114] Skipping the delay kernel, measurement accuracy will be reduced
W0000 00:00:1720850888.436123  506001 gpu_timer.cc:114] Skipping the delay kernel, measurement accuracy will be reduced
W0000 00:00:1720850888.437266  506001 gpu_timer.cc:114] Skipping the delay kernel, measurement accuracy will be reduced
W0000 00:00:1720850888.438467  506001 gpu_timer.cc:114] Skipping the delay kernel, measurement accuracy will be reduced
W0000 00:00:1720850888.439755  506001 gpu_timer.cc:114] Skipping the delay kernel, measurement accuracy will be reduced
W0000 00:00:1720850888.516654  506001 gpu_timer.cc:114] Skipping the delay kernel, measurement accuracy will be reduced
W0000 00:00:1720850888.517867  506001 gpu_timer.cc:114] Skipping the delay kernel, measurement accuracy will be reduced
W0000 00:00:1720850888.519048  506001 gpu_timer.cc:114] Skipping the delay kernel, measurement accuracy will be reduced
W0000 00:00:1720850888.520252  506001 gpu_timer.cc:114] Skipping the delay kernel, measurement accuracy will be reduced
W0000 00:00:1720850888.521467  506001 gpu_timer.cc:114] Skipping the delay kernel, measurement accuracy will be reduced
W0000 00:00:1720850888.522671  506001 gpu_timer.cc:114] Skipping the delay kernel, measurement accuracy will be reduced
W0000 00:00:1720850888.523861  506001 gpu_timer.cc:114] Skipping the delay kernel, measurement accuracy will be reduced
W0000 00:00:1720850888.525071  506001 gpu_timer.cc:114] Skipping the delay kernel, measurement accuracy will be reduced
W0000 00:00:1720850888.526281  506001 gpu_timer.cc:114] Skipping the delay kernel, measurement accuracy will be reduced
W0000 00:00:1720850888.527517  506001 gpu_timer.cc:114] Skipping the delay kernel, measurement accuracy will be reduced
W0000 00:00:1720850888.528740  506001 gpu_timer.cc:114] Skipping the delay kernel, measurement accuracy will be reduced
W0000 00:00:1720850888.529965  506001 gpu_timer.cc:114] Skipping the delay kernel, measurement accuracy will be reduced
W0000 00:00:1720850888.531197  506001 gpu_timer.cc:114] Skipping the delay kernel, measurement accuracy will be reduced
W0000 00:00:1720850888.532455  506001 gpu_timer.cc:114] Skipping the delay kernel, measurement accuracy will be reduced
W0000 00:00:1720850888.533705  506001 gpu_timer.cc:114] Skipping the delay kernel, measurement accuracy will be reduced
W0000 00:00:1720850888.534856  506001 gpu_timer.cc:114] Skipping the delay kernel, measurement accuracy will be reduced
W0000 00:00:1720850888.536191  506001 gpu_timer.cc:114] Skipping the delay kernel, measurement accuracy will be reduced
W0000 00:00:1720850888.542140  506001 gpu_timer.cc:114] Skipping the delay kernel, measurement accuracy will be reduced
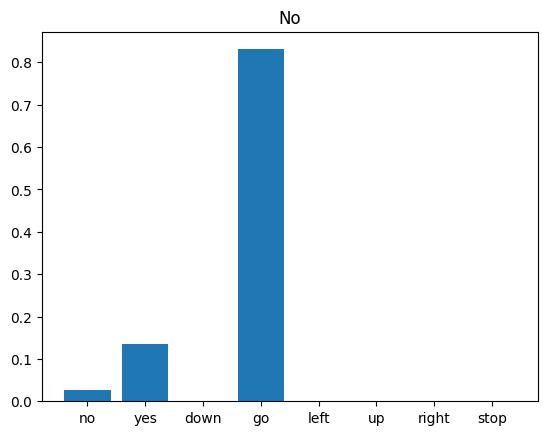
正如输出所示,您的模型应该已将音频命令识别为“no”。
导出带有预处理的模型
如果您必须在将数据传递到模型进行推理之前应用这些预处理步骤,那么模型将不太容易使用。因此,构建一个端到端的版本
class ExportModel(tf.Module):
  def __init__(self, model):
    self.model = model

    # Accept either a string-filename or a batch of waveforms.
    # YOu could add additional signatures for a single wave, or a ragged-batch.
    self.__call__.get_concrete_function(
        x=tf.TensorSpec(shape=(), dtype=tf.string))
    self.__call__.get_concrete_function(
       x=tf.TensorSpec(shape=[None, 16000], dtype=tf.float32))


  @tf.function
  def __call__(self, x):
    # If they pass a string, load the file and decode it.
    if x.dtype == tf.string:
      x = tf.io.read_file(x)
      x, _ = tf.audio.decode_wav(x, desired_channels=1, desired_samples=16000,)
      x = tf.squeeze(x, axis=-1)
      x = x[tf.newaxis, :]

    x = get_spectrogram(x)
    result = self.model(x, training=False)

    class_ids = tf.argmax(result, axis=-1)
    class_names = tf.gather(label_names, class_ids)
    return {'predictions':result,
            'class_ids': class_ids,
            'class_names': class_names}
测试运行“导出”模型
export = ExportModel(model)
export(tf.constant(str(data_dir/'no/01bb6a2a_nohash_0.wav')))
{'predictions': <tf.Tensor: shape=(1, 8), dtype=float32, numpy=
 array([[ 1.097185 ,  2.7130916, -1.6795217,  4.521124 , -2.5609438,
         -1.7273165, -1.7834837, -2.6008315]], dtype=float32)>,
 'class_ids': <tf.Tensor: shape=(1,), dtype=int64, numpy=array([3])>,
 'class_names': <tf.Tensor: shape=(1,), dtype=string, numpy=array([b'no'], dtype=object)>}
保存并重新加载模型,重新加载的模型会给出相同的输出
tf.saved_model.save(export, "saved")
imported = tf.saved_model.load("saved")
imported(waveform[tf.newaxis, :])
INFO:tensorflow:Assets written to: saved/assets
INFO:tensorflow:Assets written to: saved/assets
{'class_names': <tf.Tensor: shape=(1,), dtype=string, numpy=array([b'no'], dtype=object)>,
 'predictions': <tf.Tensor: shape=(1, 8), dtype=float32, numpy=
 array([[ 1.097185 ,  2.7130916, -1.6795217,  4.521124 , -2.5609438,
         -1.7273165, -1.7834837, -2.6008315]], dtype=float32)>,
 'class_ids': <tf.Tensor: shape=(1,), dtype=int64, numpy=array([3])>}
后续步骤
本教程演示了如何使用 TensorFlow 和 Python 中的卷积神经网络进行简单的音频分类/自动语音识别。要了解更多信息,请考虑以下资源
- 使用 YAMNet 进行声音分类 教程展示了如何使用迁移学习进行音频分类。
- 来自 Kaggle 的 TensorFlow 语音识别挑战 的笔记本。
- TensorFlow.js - 使用迁移学习进行音频识别代码实验室 教授如何构建自己的交互式音频分类 Web 应用程序。
- 音乐信息检索的深度学习教程(Choi 等人,2017)在 arXiv 上。
- TensorFlow 还为 音频数据准备和增强 提供了额外的支持,以帮助您完成自己的基于音频的项目。
- 考虑使用 librosa 库进行音乐和音频分析。
