
 在 TensorFlow.org 上查看 在 TensorFlow.org 上查看
|
 在 Google Colab 中运行 在 Google Colab 中运行
|
 在 GitHub 上查看源代码 在 GitHub 上查看源代码
|
 下载笔记本 下载笔记本
|
本教程重点介绍使用修改后的 U-Net 进行图像分割的任务。
什么是图像分割?
在图像分类任务中,网络会为每个输入图像分配一个标签(或类别)。但是,假设您想知道该物体的形状,哪个像素属于哪个物体等等。在这种情况下,您需要为图像的每个像素分配一个类别 - 这项任务称为分割。分割模型会返回有关图像的更多详细信息。图像分割在医学成像、自动驾驶汽车和卫星成像等许多领域都有应用,仅举几例。
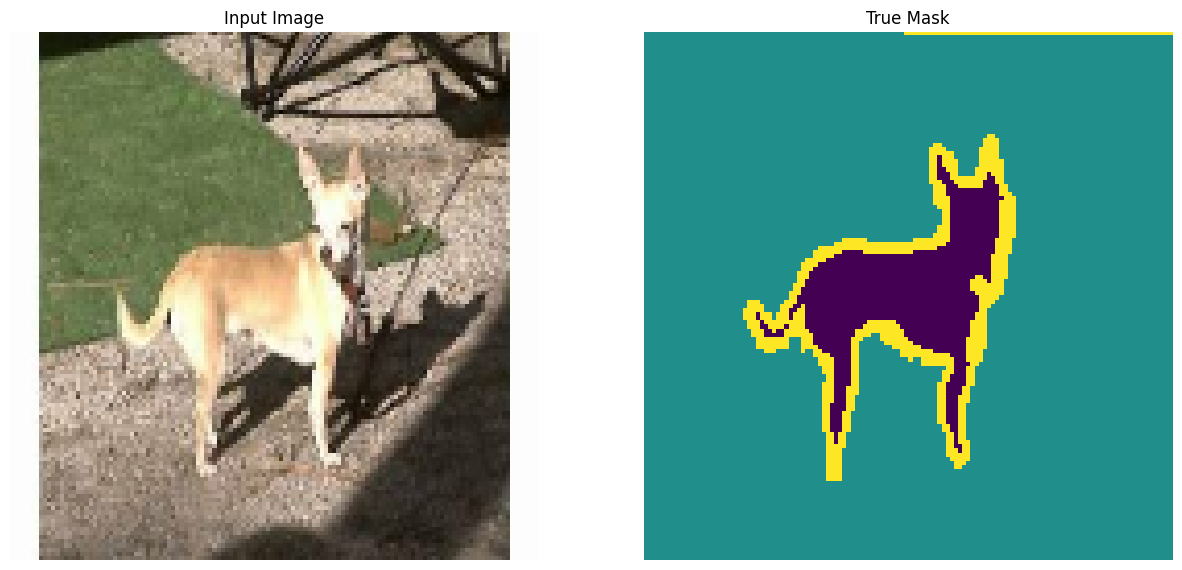
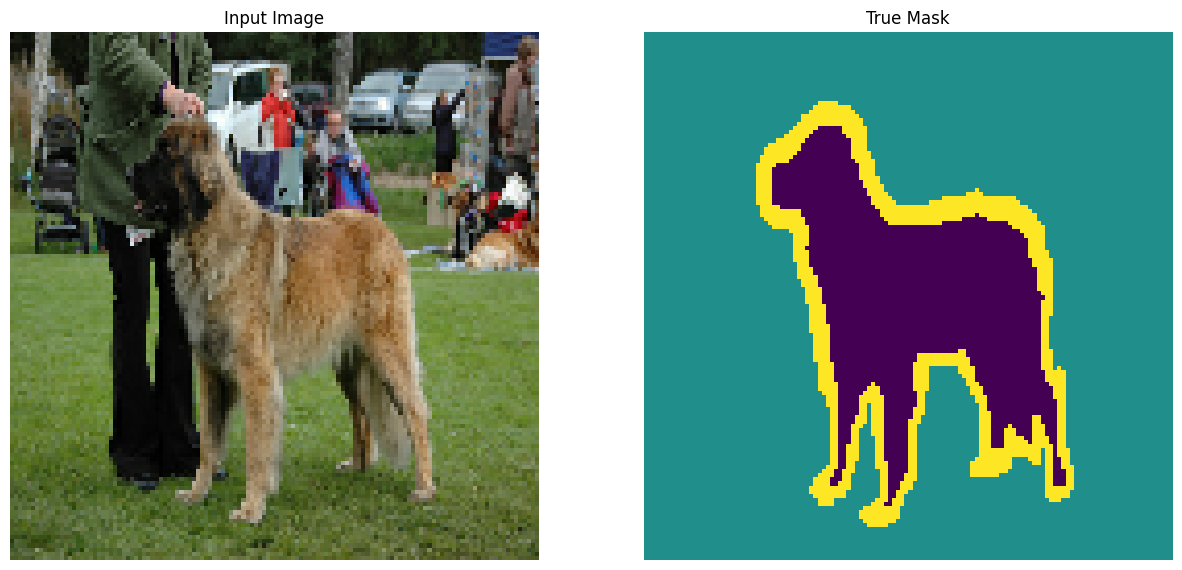
本教程使用 牛津-IIIT宠物数据集 (Parkhi 等人,2012)。该数据集包含 37 种宠物品种的图像,每个品种有 200 张图像(训练和测试拆分中大约各 100 张)。每张图像都包含相应的标签和像素级掩码。掩码是每个像素的类别标签。每个像素被赋予以下三个类别之一
- 类别 1:属于宠物的像素。
- 类别 2:与宠物接壤的像素。
- 类别 3:以上都不是/周围的像素。
pip install git+https://github.com/tensorflow/examples.gitpip install -U keraspip install -q tensorflow_datasetspip install -q -U tensorflow-text tensorflow
import numpy as np

import tensorflow as tf
import tensorflow_datasets as tfds
from tensorflow_examples.models.pix2pix import pix2pix

from IPython.display import clear_output
import matplotlib.pyplot as plt
下载牛津-IIIT宠物数据集
该数据集 可从 TensorFlow 数据集获取。分割掩码包含在版本 3+ 中。
dataset, info = tfds.load('oxford_iiit_pet:3.*.*', with_info=True)
此外,图像颜色值被归一化到 [0, 1] 范围内。最后,如上所述,分割掩码中的像素被标记为 {1, 2, 3}。为了方便起见,从分割掩码中减去 1,导致标签为:{0, 1, 2}。
def normalize(input_image, input_mask):
  input_image = tf.cast(input_image, tf.float32) / 255.0
  input_mask -= 1
  return input_image, input_mask
def load_image(datapoint):
  input_image = tf.image.resize(datapoint['image'], (128, 128))
  input_mask = tf.image.resize(
    datapoint['segmentation_mask'],
    (128, 128),
    method = tf.image.ResizeMethod.NEAREST_NEIGHBOR,
  )

  input_image, input_mask = normalize(input_image, input_mask)

  return input_image, input_mask
该数据集已经包含了所需的训练和测试拆分,因此继续使用相同的拆分
TRAIN_LENGTH = info.splits['train'].num_examples
BATCH_SIZE = 64
BUFFER_SIZE = 1000
STEPS_PER_EPOCH = TRAIN_LENGTH // BATCH_SIZE
train_images = dataset['train'].map(load_image, num_parallel_calls=tf.data.AUTOTUNE)
test_images = dataset['test'].map(load_image, num_parallel_calls=tf.data.AUTOTUNE)
以下类通过随机翻转图像来执行简单的增强。转到 图像增强 教程以了解更多信息。
class Augment(tf.keras.layers.Layer):
  def __init__(self, seed=42):
    super().__init__()
    # both use the same seed, so they'll make the same random changes.
    self.augment_inputs = tf.keras.layers.RandomFlip(mode="horizontal", seed=seed)
    self.augment_labels = tf.keras.layers.RandomFlip(mode="horizontal", seed=seed)

  def call(self, inputs, labels):
    inputs = self.augment_inputs(inputs)
    labels = self.augment_labels(labels)
    return inputs, labels
构建输入管道,在对输入进行批处理后应用增强
train_batches = (
    train_images
    .cache()
    .shuffle(BUFFER_SIZE)
    .batch(BATCH_SIZE)
    .repeat()
    .map(Augment())
    .prefetch(buffer_size=tf.data.AUTOTUNE))

test_batches = test_images.batch(BATCH_SIZE)
可视化数据集中的图像示例及其相应的掩码
def display(display_list):
  plt.figure(figsize=(15, 15))

  title = ['Input Image', 'True Mask', 'Predicted Mask']

  for i in range(len(display_list)):
    plt.subplot(1, len(display_list), i+1)
    plt.title(title[i])
    plt.imshow(tf.keras.utils.array_to_img(display_list[i]))
    plt.axis('off')
  plt.show()
for images, masks in train_batches.take(2):
  sample_image, sample_mask = images[0], masks[0]
  display([sample_image, sample_mask])
Corrupt JPEG data: 240 extraneous bytes before marker 0xd9
Corrupt JPEG data: premature end of data segment
2024-04-13 01:21:27.796241: W tensorflow/core/kernels/data/cache_dataset_ops.cc:858] The calling iterator did not fully read the dataset being cached. In order to avoid unexpected truncation of the dataset, the partially cached contents of the dataset will be discarded. This can happen if you have an input pipeline similar to `dataset.cache().take(k).repeat()`. You should use `dataset.take(k).cache().repeat()` instead.
2024-04-13 01:21:27.964240: W tensorflow/core/framework/local_rendezvous.cc:404] Local rendezvous is aborting with status: OUT_OF_RANGE: End of sequence
定义模型
这里使用的模型是修改后的 U-Net。U-Net 由编码器(降采样器)和解码器(上采样器)组成。为了学习鲁棒特征并减少可训练参数的数量,使用预训练模型——MobileNetV2——作为编码器。对于解码器,您将使用上采样块,该块已在 TensorFlow Examples 存储库中的 pix2pix 示例中实现。(查看笔记本中的 pix2pix:使用条件 GAN 进行图像到图像的转换 教程。)
如前所述,编码器是预训练的 MobileNetV2 模型。您将使用来自 tf.keras.applications 的模型。编码器由模型中中间层的特定输出组成。请注意,编码器在训练过程中不会被训练。
base_model = tf.keras.applications.MobileNetV2(input_shape=[128, 128, 3], include_top=False)

# Use the activations of these layers
layer_names = [
    'block_1_expand_relu',   # 64x64
    'block_3_expand_relu',   # 32x32
    'block_6_expand_relu',   # 16x16
    'block_13_expand_relu',  # 8x8
    'block_16_project',      # 4x4
]
base_model_outputs = [base_model.get_layer(name).output for name in layer_names]

# Create the feature extraction model
down_stack = tf.keras.Model(inputs=base_model.input, outputs=base_model_outputs)

down_stack.trainable = False
Downloading data from https://storage.googleapis.com/tensorflow/keras-applications/mobilenet_v2/mobilenet_v2_weights_tf_dim_ordering_tf_kernels_1.0_128_no_top.h5
9406464/9406464 ━━━━━━━━━━━━━━━━━━━━ 0s 0us/step
解码器/上采样器只是一系列在 TensorFlow 示例中实现的上采样块
up_stack = [
    pix2pix.upsample(512, 3),  # 4x4 -> 8x8
    pix2pix.upsample(256, 3),  # 8x8 -> 16x16
    pix2pix.upsample(128, 3),  # 16x16 -> 32x32
    pix2pix.upsample(64, 3),   # 32x32 -> 64x64
]
def unet_model(output_channels:int):
  inputs = tf.keras.layers.Input(shape=[128, 128, 3])

  # Downsampling through the model
  skips = down_stack(inputs)
  x = skips[-1]
  skips = reversed(skips[:-1])

  # Upsampling and establishing the skip connections
  for up, skip in zip(up_stack, skips):
    x = up(x)
    concat = tf.keras.layers.Concatenate()
    x = concat([x, skip])

  # This is the last layer of the model
  last = tf.keras.layers.Conv2DTranspose(
      filters=output_channels, kernel_size=3, strides=2,
      padding='same')  #64x64 -> 128x128

  x = last(x)

  return tf.keras.Model(inputs=inputs, outputs=x)
请注意,最后一层的过滤器数量设置为 output_channels 的数量。这将是每个类别的输出通道。
训练模型
现在,剩下的就是编译和训练模型。
由于这是一个多类分类问题,因此使用 tf.keras.losses.SparseCategoricalCrossentropy 损失函数,并将 from_logits 参数设置为 True,因为标签是标量整数,而不是每个类别的每个像素的得分向量。
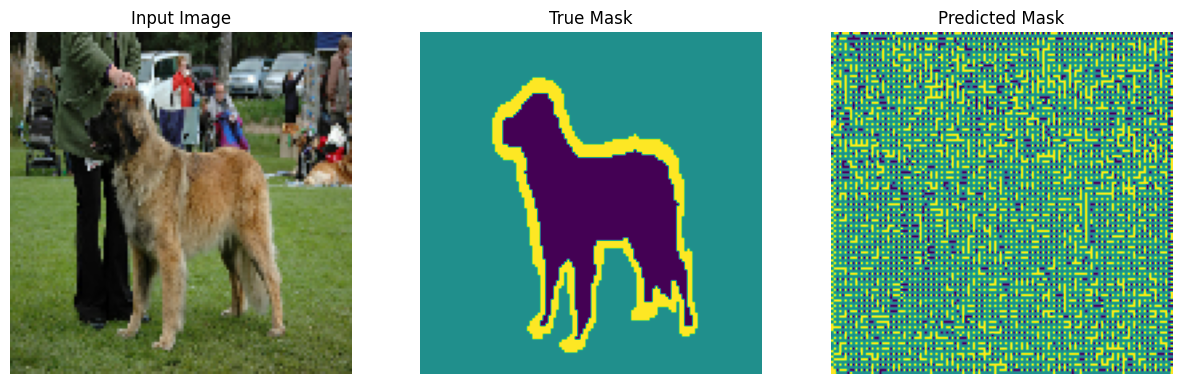
在运行推理时,分配给像素的标签是具有最高值的通道。这就是 create_mask 函数的作用。
OUTPUT_CLASSES = 3

model = unet_model(output_channels=OUTPUT_CLASSES)
model.compile(optimizer='adam',
              loss=tf.keras.losses.SparseCategoricalCrossentropy(from_logits=True),
              metrics=['accuracy'])
绘制生成的模型架构
tf.keras.utils.plot_model(model, show_shapes=True, expand_nested=True, dpi=64)

尝试使用该模型来检查它在训练之前的预测结果
def create_mask(pred_mask):
  pred_mask = tf.math.argmax(pred_mask, axis=-1)
  pred_mask = pred_mask[..., tf.newaxis]
  return pred_mask[0]
def show_predictions(dataset=None, num=1):
  if dataset:
    for image, mask in dataset.take(num):
      pred_mask = model.predict(image)
      display([image[0], mask[0], create_mask(pred_mask)])
  else:
    display([sample_image, sample_mask,
             create_mask(model.predict(sample_image[tf.newaxis, ...]))])
show_predictions()
WARNING: All log messages before absl::InitializeLog() is called are written to STDERR
I0000 00:00:1712971291.476380   10584 service.cc:145] XLA service 0x7f59b0002000 initialized for platform CUDA (this does not guarantee that XLA will be used). Devices:
I0000 00:00:1712971291.476433   10584 service.cc:153]   StreamExecutor device (0): Tesla T4, Compute Capability 7.5
I0000 00:00:1712971291.476437   10584 service.cc:153]   StreamExecutor device (1): Tesla T4, Compute Capability 7.5
I0000 00:00:1712971291.476440   10584 service.cc:153]   StreamExecutor device (2): Tesla T4, Compute Capability 7.5
I0000 00:00:1712971291.476443   10584 service.cc:153]   StreamExecutor device (3): Tesla T4, Compute Capability 7.5
1/1 ━━━━━━━━━━━━━━━━━━━━ 5s 5s/step
I0000 00:00:1712971295.614196   10584 device_compiler.h:188] Compiled cluster using XLA!  This line is logged at most once for the lifetime of the process.
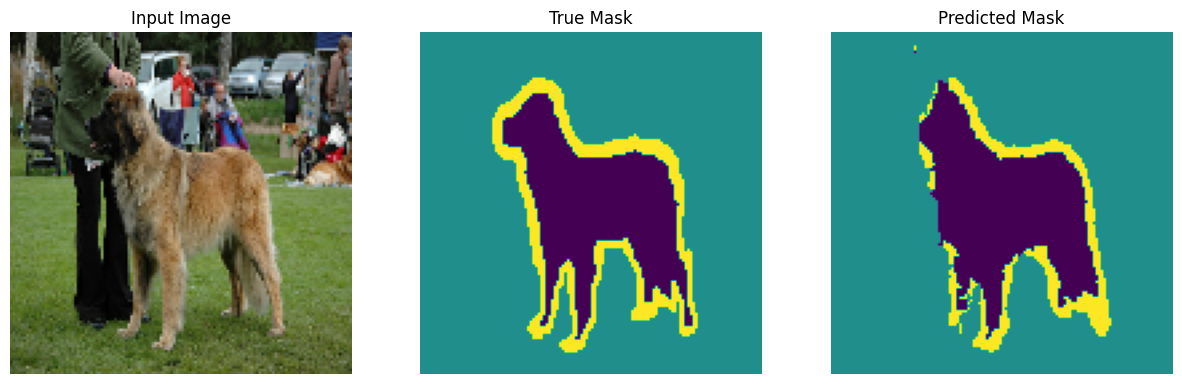
下面定义的回调用于观察模型在训练过程中的改进情况
class DisplayCallback(tf.keras.callbacks.Callback):
  def on_epoch_end(self, epoch, logs=None):
    clear_output(wait=True)
    show_predictions()
    print ('\nSample Prediction after epoch {}\n'.format(epoch+1))
EPOCHS = 20
VAL_SUBSPLITS = 5
VALIDATION_STEPS = info.splits['test'].num_examples//BATCH_SIZE//VAL_SUBSPLITS

model_history = model.fit(train_batches, epochs=EPOCHS,
                          steps_per_epoch=STEPS_PER_EPOCH,
                          validation_steps=VALIDATION_STEPS,
                          validation_data=test_batches,
                          callbacks=[DisplayCallback()])
1/1 ━━━━━━━━━━━━━━━━━━━━ 0s 46ms/step
Sample Prediction after epoch 20

57/57 ━━━━━━━━━━━━━━━━━━━━ 6s 109ms/step - accuracy: 0.9271 - loss: 0.1783 - val_accuracy: 0.9080 - val_loss: 0.2467
loss = model_history.history['loss']
val_loss = model_history.history['val_loss']

plt.figure()
plt.plot(model_history.epoch, loss, 'r', label='Training loss')
plt.plot(model_history.epoch, val_loss, 'bo', label='Validation loss')
plt.title('Training and Validation Loss')
plt.xlabel('Epoch')
plt.ylabel('Loss Value')
plt.ylim([0, 1])
plt.legend()
plt.show()
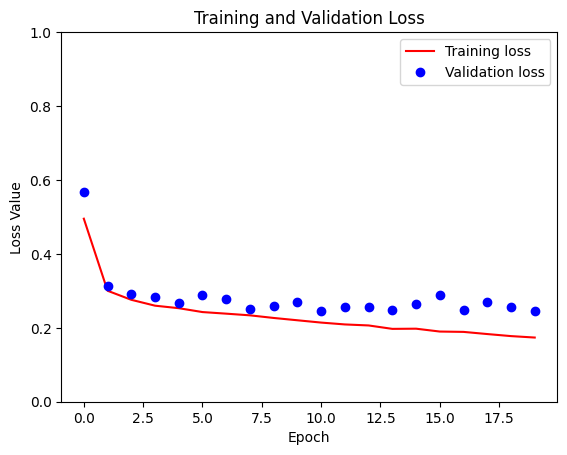
进行预测
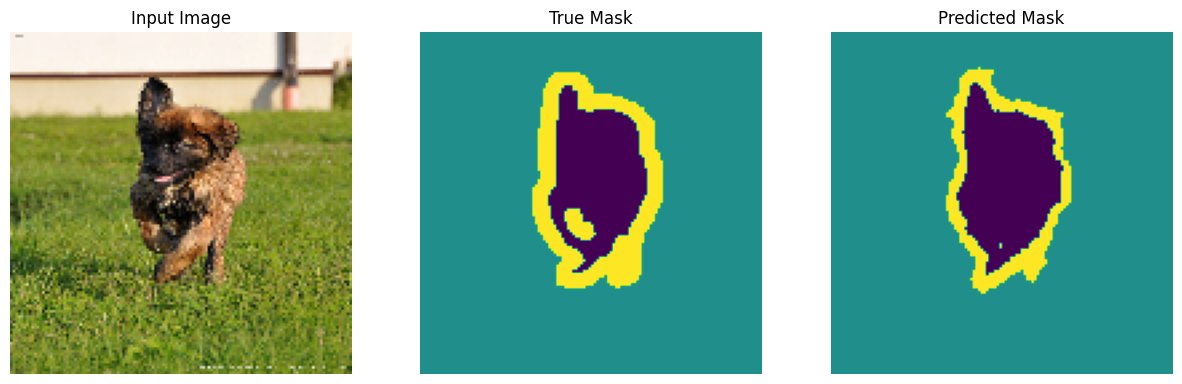
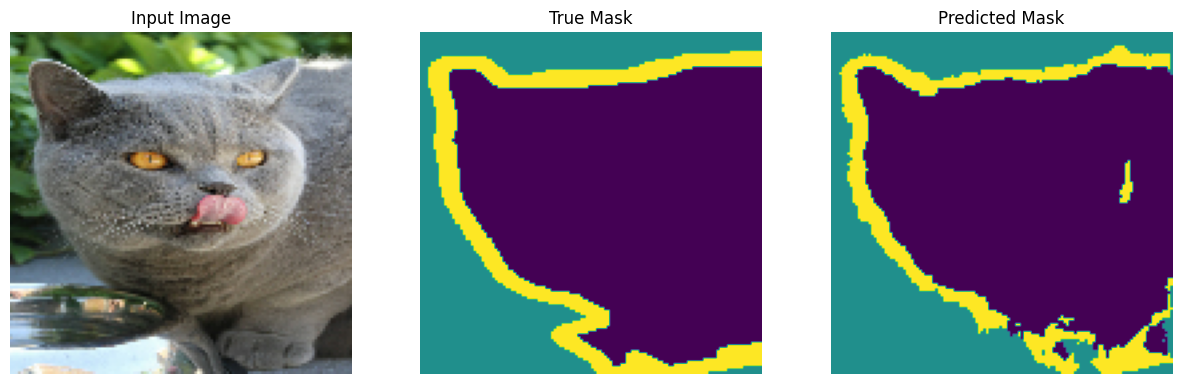
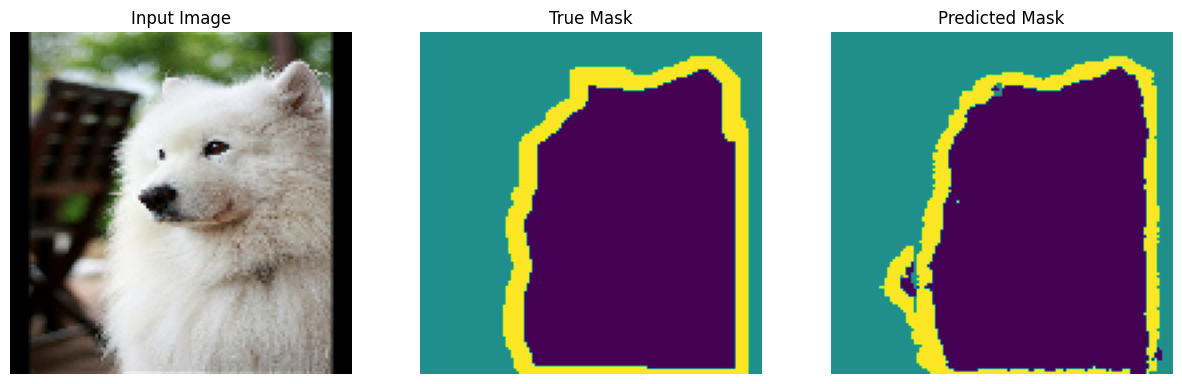
现在,进行一些预测。为了节省时间,将时期数保持较小,但您可以将其设置得更高以获得更准确的结果。
show_predictions(test_batches, 3)
2/2 ━━━━━━━━━━━━━━━━━━━━ 2s 27ms/step
2/2 ━━━━━━━━━━━━━━━━━━━━ 0s 34ms/step
2/2 ━━━━━━━━━━━━━━━━━━━━ 0s 33ms/step
2024-04-13 01:24:26.351284: W tensorflow/core/framework/local_rendezvous.cc:404] Local rendezvous is aborting with status: OUT_OF_RANGE: End of sequence
可选:不平衡类和类权重
语义分割数据集可能高度不平衡,这意味着特定类别的像素可能比其他类别在图像中出现得更多。由于分割问题可以被视为逐像素分类问题,因此您可以通过对损失函数进行加权来处理不平衡问题,以考虑这一点。这是一种简单而优雅的解决此问题的方法。请参考 不平衡数据上的分类 教程以了解更多信息。
为了 避免歧义,Model.fit 不支持针对具有 3 个以上维度的目标的 class_weight 参数。
try:
  model_history = model.fit(train_batches, epochs=EPOCHS,
                            steps_per_epoch=STEPS_PER_EPOCH,
                            class_weight = {0:2.0, 1:2.0, 2:1.0})
  assert False
except Exception as e:
  print(f"Expected {type(e).__name__}: {e}")
Epoch 1/20
W0000 00:00:1712971470.137772   10583 assert_op.cc:38] Ignoring Assert operator compile_loss/sparse_categorical_crossentropy/SparseSoftmaxCrossEntropyWithLogits/assert_equal_1/Assert/Assert
57/57 ━━━━━━━━━━━━━━━━━━━━ 12s 96ms/step - accuracy: 0.9248 - loss: 0.2493
Epoch 2/20
W0000 00:00:1712971478.676844   10582 assert_op.cc:38] Ignoring Assert operator compile_loss/sparse_categorical_crossentropy/SparseSoftmaxCrossEntropyWithLogits/assert_equal_1/Assert/Assert
57/57 ━━━━━━━━━━━━━━━━━━━━ 8s 97ms/step - accuracy: 0.9208 - loss: 0.2617
Epoch 3/20
57/57 ━━━━━━━━━━━━━━━━━━━━ 5s 97ms/step - accuracy: 0.9250 - loss: 0.2464
Epoch 4/20
57/57 ━━━━━━━━━━━━━━━━━━━━ 6s 98ms/step - accuracy: 0.9275 - loss: 0.2350
Epoch 5/20
57/57 ━━━━━━━━━━━━━━━━━━━━ 6s 98ms/step - accuracy: 0.9289 - loss: 0.2300
Epoch 6/20
57/57 ━━━━━━━━━━━━━━━━━━━━ 6s 98ms/step - accuracy: 0.9305 - loss: 0.2217
Epoch 7/20
57/57 ━━━━━━━━━━━━━━━━━━━━ 6s 97ms/step - accuracy: 0.9340 - loss: 0.2095
Epoch 8/20
57/57 ━━━━━━━━━━━━━━━━━━━━ 5s 96ms/step - accuracy: 0.9349 - loss: 0.2075
Epoch 9/20
57/57 ━━━━━━━━━━━━━━━━━━━━ 5s 96ms/step - accuracy: 0.9344 - loss: 0.2091
Epoch 10/20
57/57 ━━━━━━━━━━━━━━━━━━━━ 5s 95ms/step - accuracy: 0.9380 - loss: 0.1949
Epoch 11/20
57/57 ━━━━━━━━━━━━━━━━━━━━ 5s 95ms/step - accuracy: 0.9379 - loss: 0.1953
Epoch 12/20
57/57 ━━━━━━━━━━━━━━━━━━━━ 5s 94ms/step - accuracy: 0.9409 - loss: 0.1839
Epoch 13/20
57/57 ━━━━━━━━━━━━━━━━━━━━ 5s 94ms/step - accuracy: 0.9421 - loss: 0.1816
Epoch 14/20
57/57 ━━━━━━━━━━━━━━━━━━━━ 5s 94ms/step - accuracy: 0.9437 - loss: 0.1737
Epoch 15/20
57/57 ━━━━━━━━━━━━━━━━━━━━ 5s 95ms/step - accuracy: 0.9446 - loss: 0.1724
Epoch 16/20
57/57 ━━━━━━━━━━━━━━━━━━━━ 5s 95ms/step - accuracy: 0.9459 - loss: 0.1675
Epoch 17/20
57/57 ━━━━━━━━━━━━━━━━━━━━ 5s 95ms/step - accuracy: 0.9479 - loss: 0.1616
Epoch 18/20
57/57 ━━━━━━━━━━━━━━━━━━━━ 5s 95ms/step - accuracy: 0.9484 - loss: 0.1588
Epoch 19/20
57/57 ━━━━━━━━━━━━━━━━━━━━ 5s 95ms/step - accuracy: 0.9484 - loss: 0.1599
Epoch 20/20
57/57 ━━━━━━━━━━━━━━━━━━━━ 5s 96ms/step - accuracy: 0.9496 - loss: 0.1564
Expected AssertionError:
因此,在这种情况下,您需要自己实现加权。您将使用样本权重来实现这一点:除了 (data, label) 对之外,Model.fit 还接受 (data, label, sample_weight) 三元组。
Keras Model.fit 将 sample_weight 传播到损失和指标,它们也接受 sample_weight 参数。样本权重在减少步骤之前乘以样本的值。例如
label = np.array([0,0])
prediction = np.array([[-3., 0], [-3, 0]])
sample_weight = [1, 10]

loss = tf.keras.losses.SparseCategoricalCrossentropy(
    from_logits=True,
    reduction=tf.keras.losses.Reduction.NONE
)
loss(label, prediction, sample_weight).numpy()
array([ 3.0485873, 30.485874 ], dtype=float32)
因此,要为本教程创建样本权重,您需要一个函数,该函数接受一个 (data, label) 对,并返回一个 (data, label, sample_weight) 三元组,其中 sample_weight 是一个包含每个像素的类权重的单通道图像。
最简单的实现是使用标签作为 class_weight 列表的索引
def add_sample_weights(image, label):
  # The weights for each class, with the constraint that:
  #     sum(class_weights) == 1.0
  class_weights = tf.constant([2.0, 2.0, 1.0])
  class_weights = class_weights/tf.reduce_sum(class_weights)

  # Create an image of `sample_weights` by using the label at each pixel as an
  # index into the `class weights` .
  sample_weights = tf.gather(class_weights, indices=tf.cast(label, tf.int32))

  return image, label, sample_weights
生成的 dataset 元素包含 3 张图像
train_batches.map(add_sample_weights).element_spec
(TensorSpec(shape=(None, 128, 128, 3), dtype=tf.float32, name=None),
 TensorSpec(shape=(None, 128, 128, 1), dtype=tf.float32, name=None),
 TensorSpec(shape=(None, 128, 128, 1), dtype=tf.float32, name=None))
现在,您可以在此加权数据集上训练模型
weighted_model = unet_model(OUTPUT_CLASSES)
weighted_model.compile(
    optimizer='adam',
    loss=tf.keras.losses.SparseCategoricalCrossentropy(from_logits=True),
    metrics=['accuracy'])
weighted_model.fit(
    train_batches.map(add_sample_weights),
    epochs=1,
    steps_per_epoch=10)
W0000 00:00:1712971591.144762   10585 assert_op.cc:38] Ignoring Assert operator compile_loss/sparse_categorical_crossentropy/SparseSoftmaxCrossEntropyWithLogits/assert_equal_1/Assert/Assert
10/10 ━━━━━━━━━━━━━━━━━━━━ 9s 100ms/step - accuracy: 0.5474 - loss: 0.3538
<keras.src.callbacks.history.History at 0x7f5ac8738550>
后续步骤
现在您已经了解了图像分割是什么以及它是如何工作的,您可以尝试使用不同的中间层输出,甚至使用不同的预训练模型来尝试本教程。您还可以尝试在 Kaggle 上举办的 Carvana 图像掩码挑战赛来挑战自己。
您可能还想查看 Tensorflow 对象检测 API,以了解您可以使用自己的数据重新训练的另一个模型。预训练模型可在 TensorFlow Hub 上获得。