
|
|
|
 在 GitHub 上查看源代码 在 GitHub 上查看源代码
|
|
本教程将向您展示如何使用自定义训练循环训练机器学习模型以分类企鹅的物种。在本笔记本中,您将使用 TensorFlow 完成以下操作
- 导入数据集
- 构建一个简单的线性模型
- 训练模型
- 评估模型的有效性
- 使用训练后的模型进行预测
TensorFlow 编程
本教程演示了以下 TensorFlow 编程任务
- 使用 TensorFlow Datasets API 导入数据
- 使用 Keras API 构建模型和层
企鹅分类问题
想象一下,您是一位鸟类学家,正在寻找一种自动分类您发现的每只企鹅的方法。机器学习提供了许多算法来对企鹅进行统计分类。例如,一个复杂的机器学习程序可以根据照片对企鹅进行分类。您在本教程中构建的模型要简单一些。它根据企鹅的体重、鳍状肢长度和喙来对企鹅进行分类,特别是它们 喙 的长度和宽度测量值。
企鹅有 18 种,但本教程只尝试对以下三种进行分类
- 帽带企鹅
- 巴布亚企鹅
- 阿德利企鹅

|
|
图 1. 帽带企鹅、巴布亚企鹅 和 阿德利企鹅(@allison_horst 的插图,CC BY-SA 2.0)。 |
幸运的是,一个研究小组已经创建并共享了一个包含 334 只企鹅的 数据集,其中包含体重、鳍状肢长度、喙测量值和其他数据。此数据集也方便地作为 penguins TensorFlow 数据集提供。
设置
安装 tfds-nightly 包以获取企鹅数据集。 tfds-nightly 包是 TensorFlow Datasets (TFDS) 的夜间发布版本。有关 TFDS 的更多信息,请参阅 TensorFlow Datasets 概述。
pip install -q tfds-nightly
然后从 Colab 菜单中选择运行时 > 重新启动运行时以重新启动 Colab 运行时。
在重新启动运行时之前,请勿继续本教程的其余部分。
导入 TensorFlow 和其他必需的 Python 模块。
import os
import tensorflow as tf
import tensorflow_datasets as tfds
import matplotlib.pyplot as plt

print("TensorFlow version: {}".format(tf.__version__))
print("TensorFlow Datasets version: ",tfds.__version__)
2023-10-04 01:38:42.243833: E tensorflow/compiler/xla/stream_executor/cuda/cuda_dnn.cc:9342] Unable to register cuDNN factory: Attempting to register factory for plugin cuDNN when one has already been registered
2023-10-04 01:38:42.243876: E tensorflow/compiler/xla/stream_executor/cuda/cuda_fft.cc:609] Unable to register cuFFT factory: Attempting to register factory for plugin cuFFT when one has already been registered
2023-10-04 01:38:42.243916: E tensorflow/compiler/xla/stream_executor/cuda/cuda_blas.cc:1518] Unable to register cuBLAS factory: Attempting to register factory for plugin cuBLAS when one has already been registered
TensorFlow version: 2.14.0
TensorFlow Datasets version:  4.9.3+nightly
导入数据集
默认的 penguins/processed TensorFlow 数据集已经过清理、规范化,并已准备好用于构建模型。在您下载处理后的数据之前,请预览一个简化版本以熟悉原始企鹅调查数据。
预览数据
使用 TensorFlow Datasets 的 tfds.load 方法下载企鹅数据集的简化版本 (penguins/simple)。此数据集中有 344 条数据记录。将前五条记录提取到一个 DataFrame 对象中,以检查此数据集中值的样本
ds_preview, info = tfds.load('penguins/simple', split='train', with_info=True)
df = tfds.as_dataframe(ds_preview.take(5), info)
print(df)
print(info.features)
2023-10-04 01:38:46.464244: W tensorflow/core/common_runtime/gpu/gpu_device.cc:2211] Cannot dlopen some GPU libraries. Please make sure the missing libraries mentioned above are installed properly if you would like to use GPU. Follow the guide at https://tensorflowcn.cn/install/gpu for how to download and setup the required libraries for your platform.
Skipping registering GPU devices...
body_mass_g  culmen_depth_mm  culmen_length_mm  flipper_length_mm  island  \
0       4200.0             13.9         45.500000              210.0       0
1       4650.0             13.7         40.900002              214.0       0
2       5300.0             14.2         51.299999              218.0       0
3       5650.0             15.0         47.799999              215.0       0
4       5050.0             15.8         46.299999              215.0       0

   sex  species
0    0        2
1    0        2
2    1        2
3    1        2
4    1        2
FeaturesDict({
    'body_mass_g': float32,
    'culmen_depth_mm': float32,
    'culmen_length_mm': float32,
    'flipper_length_mm': float32,
    'island': ClassLabel(shape=(), dtype=int64, num_classes=3),
    'sex': ClassLabel(shape=(), dtype=int64, num_classes=3),
    'species': ClassLabel(shape=(), dtype=int64, num_classes=3),
})
2023-10-04 01:38:46.724179: W tensorflow/core/kernels/data/cache_dataset_ops.cc:854] The calling iterator did not fully read the dataset being cached. In order to avoid unexpected truncation of the dataset, the partially cached contents of the dataset  will be discarded. This can happen if you have an input pipeline similar to `dataset.cache().take(k).repeat()`. You should use `dataset.take(k).cache().repeat()` instead.
编号行是数据记录,每行一个示例,其中
在数据集中,企鹅物种的标签以数字表示,以便在您正在构建的模型中更容易使用。这些数字对应于以下企鹅物种
0:阿德利企鹅1:帽带企鹅2:巴布亚企鹅
创建一个包含此顺序的企鹅物种名称的列表。您将使用此列表来解释分类模型的输出
class_names = ['Adélie', 'Chinstrap', 'Gentoo']
有关特征和标签的更多信息,请参阅 机器学习速成课程的 ML 术语部分。
下载预处理后的数据集
现在,使用 tfds.load 方法下载预处理后的企鹅数据集 (penguins/processed),该方法返回一个 tf.data.Dataset 对象列表。请注意,penguins/processed 数据集没有自己的测试集,因此使用 80:20 分割来 切片完整数据集,将其分成训练集和测试集。您将在稍后使用测试数据集来验证您的模型。
ds_split, info = tfds.load("penguins/processed", split=['train[:20%]', 'train[20%:]'], as_supervised=True, with_info=True)

ds_test = ds_split[0]
ds_train = ds_split[1]
assert isinstance(ds_test, tf.data.Dataset)

print(info.features)
df_test = tfds.as_dataframe(ds_test.take(5), info)
print("Test dataset sample: ")
print(df_test)

df_train = tfds.as_dataframe(ds_train.take(5), info)
print("Train dataset sample: ")
print(df_train)

ds_train_batch = ds_train.batch(32)
FeaturesDict({
    'features': Tensor(shape=(4,), dtype=float32),
    'species': ClassLabel(shape=(), dtype=int64, num_classes=3),
})
Test dataset sample:
                                         features  species
0  [0.6545454, 0.22619048, 0.89830506, 0.6388889]        2
1        [0.36, 0.04761905, 0.6440678, 0.4027778]        2
2       [0.68, 0.30952382, 0.91525424, 0.6944444]        2
3   [0.6181818, 0.20238096, 0.8135593, 0.6805556]        2
4  [0.5527273, 0.26190478, 0.84745765, 0.7083333]        2
Train dataset sample:
                                         features  species
0  [0.49818182, 0.6904762, 0.42372882, 0.4027778]        0
1      [0.48, 0.071428575, 0.6440678, 0.44444445]        2
2    [0.7236364, 0.9047619, 0.6440678, 0.5833333]        1
3  [0.34545454, 0.5833333, 0.33898306, 0.3472222]        0
4       [0.10909091, 0.75, 0.3559322, 0.41666666]        0
2023-10-04 01:38:47.763232: W tensorflow/core/kernels/data/cache_dataset_ops.cc:854] The calling iterator did not fully read the dataset being cached. In order to avoid unexpected truncation of the dataset, the partially cached contents of the dataset  will be discarded. This can happen if you have an input pipeline similar to `dataset.cache().take(k).repeat()`. You should use `dataset.take(k).cache().repeat()` instead.
2023-10-04 01:38:47.911328: W tensorflow/core/kernels/data/cache_dataset_ops.cc:854] The calling iterator did not fully read the dataset being cached. In order to avoid unexpected truncation of the dataset, the partially cached contents of the dataset  will be discarded. This can happen if you have an input pipeline similar to `dataset.cache().take(k).repeat()`. You should use `dataset.take(k).cache().repeat()` instead.
请注意,此版本的数据集已通过将数据减少到四个规范化特征和一个物种标签来进行处理。在此格式中,数据可以快速用于训练模型,而无需进一步处理。
features, labels = next(iter(ds_train_batch))

print(features)
print(labels)
tf.Tensor(
[[0.49818182 0.6904762  0.42372882 0.4027778 ]
 [0.48       0.07142857 0.6440678  0.44444445]
 [0.7236364  0.9047619  0.6440678  0.5833333 ]
 [0.34545454 0.5833333  0.33898306 0.3472222 ]
 [0.10909091 0.75       0.3559322  0.41666666]
 [0.6690909  0.63095236 0.47457626 0.19444445]
 [0.8036364  0.9166667  0.4915254  0.44444445]
 [0.4909091  0.75       0.37288135 0.22916667]
 [0.33454546 0.85714287 0.37288135 0.2361111 ]
 [0.32       0.41666666 0.2542373  0.1388889 ]
 [0.41454545 0.5952381  0.5084746  0.19444445]
 [0.14909092 0.48809522 0.2542373  0.125     ]
 [0.23636363 0.4642857  0.27118644 0.05555556]
 [0.22181818 0.5952381  0.22033899 0.3472222 ]
 [0.24727273 0.5595238  0.15254237 0.25694445]
 [0.63272727 0.35714287 0.88135594 0.8194444 ]
 [0.47272727 0.15476191 0.6440678  0.4722222 ]
 [0.6036364  0.23809524 0.84745765 0.7361111 ]
 [0.26909092 0.5595238  0.27118644 0.16666667]
 [0.28       0.71428573 0.20338982 0.5416667 ]
 [0.10545454 0.5714286  0.33898306 0.2847222 ]
 [0.18545455 0.5952381  0.10169491 0.33333334]
 [0.47272727 0.16666667 0.7288136  0.6388889 ]
 [0.45090908 0.1904762  0.7118644  0.5972222 ]
 [0.49454546 0.5        0.3559322  0.25      ]
 [0.6363636  0.22619048 0.7457627  0.5694444 ]
 [0.08727273 0.5952381  0.2542373  0.05555556]
 [0.52       0.22619048 0.7457627  0.5555556 ]
 [0.5090909  0.23809524 0.7288136  0.6666667 ]
 [0.56       0.22619048 0.779661   0.625     ]
 [0.6363636  0.3452381  0.89830506 0.8333333 ]
 [0.15636364 0.47619048 0.20338982 0.04166667]], shape=(32, 4), dtype=float32)
tf.Tensor([0 2 1 0 0 1 1 1 0 1 1 0 0 0 0 2 2 2 0 0 0 0 2 2 1 2 0 2 2 2 2 0], shape=(32,), dtype=int64)
2023-10-04 01:38:48.063769: W tensorflow/core/kernels/data/cache_dataset_ops.cc:854] The calling iterator did not fully read the dataset being cached. In order to avoid unexpected truncation of the dataset, the partially cached contents of the dataset  will be discarded. This can happen if you have an input pipeline similar to `dataset.cache().take(k).repeat()`. You should use `dataset.take(k).cache().repeat()` instead.
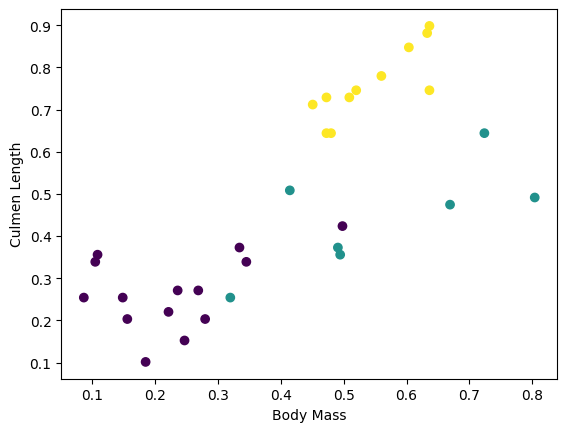
您可以通过绘制批次中的几个特征来可视化一些集群
plt.scatter(features[:,0],
            features[:,2],
            c=labels,
            cmap='viridis')

plt.xlabel("Body Mass")
plt.ylabel("Culmen Length")
plt.show()
构建一个简单的线性模型
为什么要建模?
模型 是特征和标签之间的关系。对于企鹅分类问题,模型定义了体重、鳍状肢和喙测量值与预测的企鹅物种之间的关系。一些简单的模型可以用几行代数来描述,但复杂的机器学习模型具有大量难以总结的参数。
您可以在不使用机器学习的情况下确定四个特征和企鹅物种之间的关系吗?也就是说,您可以使用传统的编程技术(例如,大量的条件语句)来创建模型吗?也许可以——如果您分析了数据集足够长的时间来确定体重和喙测量值与特定物种之间的关系。而这在更复杂的数据集上变得很困难——甚至不可能。一个好的机器学习方法为您确定模型。如果您将足够多的代表性示例输入到正确的机器学习模型类型中,该程序会为您找出关系。
选择模型
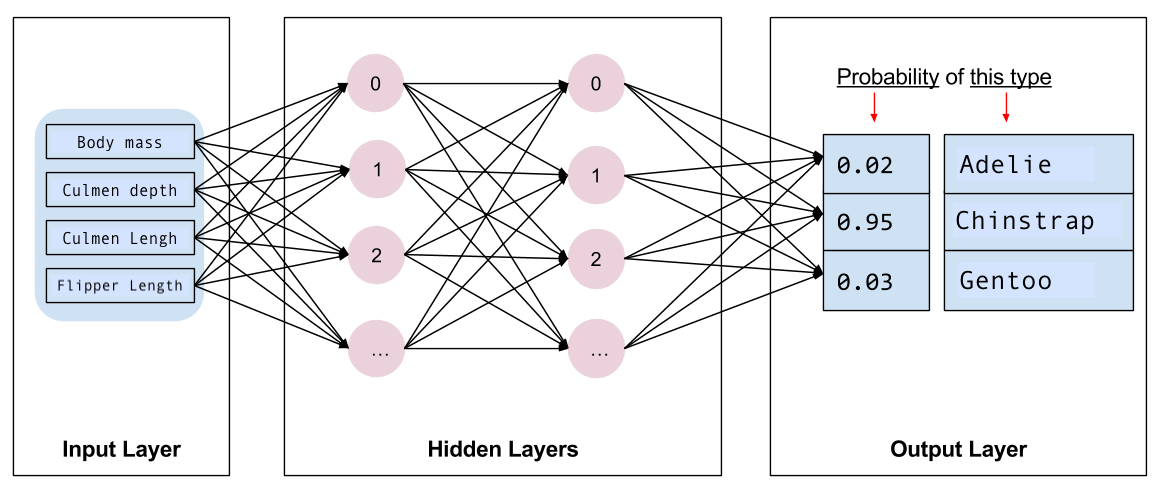
接下来,您需要选择要训练的模型类型。模型类型很多,选择一个好的模型需要经验。本教程使用神经网络来解决企鹅分类问题。 神经网络 可以找到特征和标签之间的复杂关系。它是一个高度结构化的图,组织成一个或多个 隐藏层。每个隐藏层包含一个或多个 神经元。神经网络有几种类别,该程序使用密集型或 全连接神经网络:一层中的神经元从前一层中的每个神经元接收输入连接。例如,图 2 说明了一个由输入层、两个隐藏层和输出层组成的密集神经网络
|
|
图 2. 具有特征、隐藏层和预测的神经网络。 |
当您训练图 2 中的模型并向其提供一个未标记的示例时,它会产生三个预测:该企鹅是给定企鹅物种的可能性。此预测称为 推理。对于此示例,输出预测的总和为 1.0。在图 2 中,此预测分解为:Adelie 为 0.02、Chinstrap 为 0.95 和 Gentoo 为 0.03。这意味着该模型预测——以 95% 的概率——一个未标记的示例企鹅是帽带企鹅。
使用 Keras 创建模型
TensorFlow 的 tf.keras API 是创建模型和层的首选方法。这使得构建模型和进行实验变得容易,而 Keras 处理将所有内容连接在一起的复杂性。
tf.keras.Sequential 模型是层的线性堆栈。它的构造函数接受一个层实例列表,在本例中,是两个具有 10 个节点的 tf.keras.layers.Dense 层,以及一个具有 3 个节点的输出层,代表您的标签预测。第一层的 input_shape 参数对应于数据集中的特征数量,并且是必需的
model = tf.keras.Sequential([
  tf.keras.layers.Dense(10, activation=tf.nn.relu, input_shape=(4,)),  # input shape required
  tf.keras.layers.Dense(10, activation=tf.nn.relu),
  tf.keras.layers.Dense(3)
])
激活函数 确定层中每个节点的输出形状。这些非线性很重要——如果没有它们,模型将等效于单层。有许多 tf.keras.activations,但 ReLU 对于隐藏层很常见。
隐藏层和神经元的理想数量取决于问题和数据集。与机器学习的许多方面一样,选择最佳神经网络形状需要知识和实验的结合。作为经验法则,增加隐藏层和神经元的数量通常会创建一个更强大的模型,这需要更多数据才能有效地进行训练。
使用模型
让我们快速了解一下此模型对一批特征做了什么
predictions = model(features)
predictions[:5]
<tf.Tensor: shape=(5, 3), dtype=float32, numpy=
array([[-0.02415227,  0.04778093, -0.54650617],
       [-0.04896604, -0.00673792, -0.49251765],
       [-0.03878566,  0.06066278, -0.78274006],
       [-0.01548526,  0.0427432 , -0.42849454],
       [ 0.01124369,  0.06327108, -0.39197594]], dtype=float32)>
在这里,每个示例都返回每个类的 logit。
要将这些 logits 转换为每个类的概率,请使用 softmax 函数
tf.nn.softmax(predictions[:5])
<tf.Tensor: shape=(5, 3), dtype=float32, numpy=
array([[0.37485388, 0.4028118 , 0.22233434],
       [0.37245536, 0.38852027, 0.23902439],
       [0.38762808, 0.42815906, 0.18421285],
       [0.36742914, 0.38945913, 0.24311174],
       [0.36743495, 0.38705766, 0.2455073 ]], dtype=float32)>
在所有类中取 tf.math.argmax 会给我们预测的类索引。但是,模型尚未经过训练,因此这些不是好的预测
print("Prediction: {}".format(tf.math.argmax(predictions, axis=1)))
print("    Labels: {}".format(labels))
Prediction: [1 1 1 1 1 1 1 1 1 1 1 1 1 1 1 1 1 1 1 1 1 1 1 1 1 1 1 1 1 1 1 1]
    Labels: [0 2 1 0 0 1 1 1 0 1 1 0 0 0 0 2 2 2 0 0 0 0 2 2 1 2 0 2 2 2 2 0]
训练模型
训练 是机器学习的阶段,在此阶段模型会逐渐优化,或者模型学习数据集。目标是学习有关训练数据集结构的足够信息,以便对看不见的数据进行预测。如果您过度学习训练数据集,那么预测只适用于它所看到的数据,并且不会具有普遍性。此问题称为 过拟合——这就像记住答案而不是理解如何解决问题。
企鹅分类问题是 监督式机器学习 的一个示例:模型是从包含标签的示例中训练的。在 无监督式机器学习 中,示例不包含标签。相反,模型通常在特征之间找到模式。
定义损失和梯度函数
训练和评估阶段都需要计算模型的损失。这衡量了模型预测与所需标签的偏差程度,换句话说,衡量了模型的性能差劲程度。您需要最小化或优化此值。
您的模型将使用tf.keras.losses.SparseCategoricalCrossentropy函数来计算其损失,该函数接受模型的类别概率预测和所需标签,并返回所有示例的平均损失。
loss_object = tf.keras.losses.SparseCategoricalCrossentropy(from_logits=True)
def loss(model, x, y, training):
  # training=training is needed only if there are layers with different
  # behavior during training versus inference (e.g. Dropout).
  y_ = model(x, training=training)

  return loss_object(y_true=y, y_pred=y_)

l = loss(model, features, labels, training=False)
print("Loss test: {}".format(l))
Loss test: 1.1675868034362793
使用tf.GradientTape上下文来计算用于优化模型的梯度
def grad(model, inputs, targets):
  with tf.GradientTape() as tape:
    loss_value = loss(model, inputs, targets, training=True)
  return loss_value, tape.gradient(loss_value, model.trainable_variables)
创建优化器
一个优化器将计算出的梯度应用于模型的参数,以最小化损失函数。您可以将损失函数视为一个弯曲的曲面(参见图 3),您需要找到它的最低点,方法是四处走动。梯度指向最陡峭的上升方向,因此您将朝相反的方向移动,向下走。通过迭代地计算每个批次的损失和梯度,您将在训练期间调整模型。逐渐地,模型将找到权重和偏差的最佳组合,以最小化损失。损失越低,模型的预测就越好。
|
|
图 3. 优化算法在 3D 空间中随时间的可视化。 (来源:斯坦福大学 CS231n 课程,MIT 许可,图片版权:Alec Radford) |
TensorFlow 提供了许多用于训练的优化算法。在本教程中,您将使用tf.keras.optimizers.SGD,它实现了随机梯度下降 (SGD) 算法。learning_rate参数设置每次迭代向下走时要采取的步长。此速率是一个超参数,您通常会调整它以获得更好的结果。
使用学习率为0.01(一个在训练的每次迭代中乘以梯度的标量值)实例化优化器
optimizer = tf.keras.optimizers.SGD(learning_rate=0.01)
然后使用此对象计算单个优化步骤
loss_value, grads = grad(model, features, labels)

print("Step: {}, Initial Loss: {}".format(optimizer.iterations.numpy(),
                                          loss_value.numpy()))

optimizer.apply_gradients(zip(grads, model.trainable_variables))

print("Step: {},         Loss: {}".format(optimizer.iterations.numpy(),
                                          loss(model, features, labels, training=True).numpy()))
Step: 0, Initial Loss: 1.1675868034362793
Step: 1,         Loss: 1.1655302047729492
训练循环
所有部分都到位后,模型就可以进行训练了!训练循环将数据集示例馈送到模型中,以帮助它做出更好的预测。以下代码块设置了这些训练步骤
- 迭代每个时期。一个时期是指对数据集进行一次遍历。
- 在一个时期内,迭代训练
Dataset中的每个示例,获取其特征 (x) 和标签 (y)。 - 使用示例的特征进行预测,并将预测结果与标签进行比较。衡量预测的准确性,并使用它来计算模型的损失和梯度。
- 使用
optimizer更新模型的参数。 - 跟踪一些用于可视化的统计信息。
- 对每个时期重复上述步骤。
num_epochs变量是遍历数据集集合的次数。在下面的代码中,num_epochs设置为 201,这意味着此训练循环将运行 201 次。与直觉相反,训练模型的时间更长并不一定能保证模型更好。num_epochs是一个超参数,您可以对其进行调整。选择合适的数字通常需要经验和实验
## Note: Rerunning this cell uses the same model parameters

# Keep results for plotting
train_loss_results = []
train_accuracy_results = []

num_epochs = 201

for epoch in range(num_epochs):
  epoch_loss_avg = tf.keras.metrics.Mean()
  epoch_accuracy = tf.keras.metrics.SparseCategoricalAccuracy()

  # Training loop - using batches of 32
  for x, y in ds_train_batch:
    # Optimize the model
    loss_value, grads = grad(model, x, y)
    optimizer.apply_gradients(zip(grads, model.trainable_variables))

    # Track progress
    epoch_loss_avg.update_state(loss_value)  # Add current batch loss
    # Compare predicted label to actual label
    # training=True is needed only if there are layers with different
    # behavior during training versus inference (e.g. Dropout).
    epoch_accuracy.update_state(y, model(x, training=True))

  # End epoch
  train_loss_results.append(epoch_loss_avg.result())
  train_accuracy_results.append(epoch_accuracy.result())

  if epoch % 50 == 0:
    print("Epoch {:03d}: Loss: {:.3f}, Accuracy: {:.3%}".format(epoch,
                                                                epoch_loss_avg.result(),
                                                                epoch_accuracy.result()))
Epoch 000: Loss: 1.161, Accuracy: 26.217%
Epoch 050: Loss: 0.769, Accuracy: 80.524%
Epoch 100: Loss: 0.410, Accuracy: 83.895%
Epoch 150: Loss: 0.275, Accuracy: 92.135%
Epoch 200: Loss: 0.198, Accuracy: 95.880%
或者,您可以使用内置的 Keras Model.fit(ds_train_batch)方法来训练您的模型。
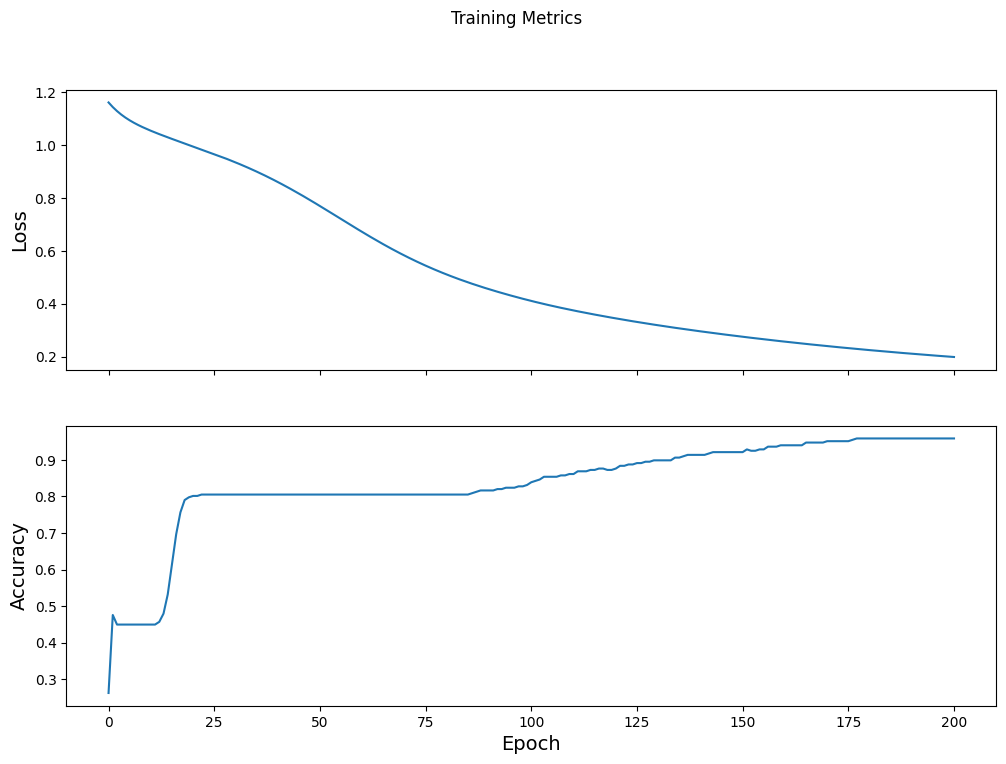
可视化损失函数随时间的变化
虽然打印出模型的训练进度很有帮助,但您可以使用TensorBoard(一个与 TensorFlow 打包在一起的可视化和指标工具)来可视化进度。对于这个简单的示例,您将使用matplotlib模块创建基本图表。
解释这些图表需要一些经验,但总的来说,您希望看到损失减少,准确率提高
fig, axes = plt.subplots(2, sharex=True, figsize=(12, 8))
fig.suptitle('Training Metrics')

axes[0].set_ylabel("Loss", fontsize=14)
axes[0].plot(train_loss_results)

axes[1].set_ylabel("Accuracy", fontsize=14)
axes[1].set_xlabel("Epoch", fontsize=14)
axes[1].plot(train_accuracy_results)
plt.show()
评估模型的有效性
现在模型已经训练好了,您可以获取一些关于其性能的统计信息。
评估是指确定模型进行预测的有效性。为了确定模型在企鹅分类方面的有效性,将一些测量值传递给模型,并要求模型预测它们代表什么企鹅物种。然后将模型的预测结果与实际标签进行比较。例如,一个在一半输入示例中选择了正确物种的模型的准确率为0.5。图 4 显示了一个稍微更有效的模型,它在 5 个预测中获得了 4 个正确的结果,准确率为 80%
| 示例特征 | 标签 | 模型预测 | |||
|---|---|---|---|---|---|
| 5.9 | 3.0 | 4.3 | 1.5 | 1 | 1 |
| 6.9 | 3.1 | 5.4 | 2.1 | 2 | 2 |
| 5.1 | 3.3 | 1.7 | 0.5 | 0 | 0 |
| 6.0 | 3.4 | 4.5 | 1.6 | 1 | 2 |
| 5.5 | 2.5 | 4.0 | 1.3 | 1 | 1 |
|
图 4. 准确率为 80% 的企鹅分类器。 | |||||
设置测试集
评估模型类似于训练模型。最大的区别在于,用于评估模型的示例来自一个单独的测试集,而不是训练集。为了公平地评估模型的有效性,用于评估模型的示例必须与用于训练模型的示例不同。
企鹅数据集没有单独的测试数据集,因此在之前的下载数据集部分中,您将原始数据集拆分为测试数据集和训练数据集。使用ds_test_batch数据集进行评估。
在测试数据集上评估模型
与训练阶段不同,模型只评估测试数据的单个时期。以下代码迭代测试集中的每个示例,并将模型的预测结果与实际标签进行比较。此比较用于衡量模型在整个测试集上的准确率
test_accuracy = tf.keras.metrics.Accuracy()
ds_test_batch = ds_test.batch(10)

for (x, y) in ds_test_batch:
  # training=False is needed only if there are layers with different
  # behavior during training versus inference (e.g. Dropout).
  logits = model(x, training=False)
  prediction = tf.math.argmax(logits, axis=1, output_type=tf.int64)
  test_accuracy(prediction, y)

print("Test set accuracy: {:.3%}".format(test_accuracy.result()))
Test set accuracy: 97.015%
您还可以使用model.evaluate(ds_test, return_dict=True) keras 函数来获取测试数据集上的准确率信息。
通过检查最后一个批次,例如,您可以观察到模型预测通常是正确的。
tf.stack([y,prediction],axis=1)
<tf.Tensor: shape=(7, 2), dtype=int64, numpy=
array([[1, 1],
       [0, 0],
       [2, 2],
       [0, 0],
       [1, 1],
       [2, 2],
       [0, 0]])>
使用训练后的模型进行预测
您已经训练了一个模型,并“证明”它在对企鹅物种进行分类方面很有效,但并不完美。现在让我们使用训练好的模型对未标记的示例进行一些预测;也就是说,对包含特征但不包含标签的示例进行预测。
在现实生活中,未标记的示例可能来自许多不同的来源,包括应用程序、CSV 文件和数据馈送。在本教程中,手动提供三个未标记的示例来预测它们的标签。请记住,标签编号映射到一个命名的表示形式,如下所示
0:阿德利企鹅1:帽带企鹅2:巴布亚企鹅
predict_dataset = tf.convert_to_tensor([
    [0.3, 0.8, 0.4, 0.5,],
    [0.4, 0.1, 0.8, 0.5,],
    [0.7, 0.9, 0.8, 0.4]
])

# training=False is needed only if there are layers with different
# behavior during training versus inference (e.g. Dropout).
predictions = model(predict_dataset, training=False)

for i, logits in enumerate(predictions):
  class_idx = tf.math.argmax(logits).numpy()
  p = tf.nn.softmax(logits)[class_idx]
  name = class_names[class_idx]
  print("Example {} prediction: {} ({:4.1f}%)".format(i, name, 100*p))
Example 0 prediction: Adélie (84.3%)
Example 1 prediction: Gentoo (96.6%)
Example 2 prediction: Chinstrap (86.1%)