
 在 TensorFlow.org 上查看 在 TensorFlow.org 上查看
|
 在 Google Colab 中运行 在 Google Colab 中运行
|
 在 GitHub 上查看 在 GitHub 上查看
|
 下载笔记本 下载笔记本
|
word2vec 不是一种单一的算法,而是一系列模型架构和优化方法,可用于从大型数据集中学习词嵌入。通过 word2vec 学习到的嵌入在各种下游自然语言处理任务中都取得了成功。
这些论文提出了两种学习词表示的方法
- 连续词袋模型:根据周围的上下文词预测中间词。上下文包含当前(中间)词之前和之后的一些词。这种架构被称为词袋模型,因为上下文中的词序并不重要。
- 连续跳字模型:预测同一句话中当前词之前和之后一定范围内的词。下面给出了一个工作示例。
在本教程中,您将使用跳字方法。首先,您将使用单个句子来说明跳字和其他概念。接下来,您将在一个小数据集上训练自己的 word2vec 模型。本教程还包含用于导出训练后的嵌入并在 TensorFlow 嵌入投影仪 中可视化的代码。
跳字和负采样
虽然词袋模型根据相邻上下文预测一个词,但跳字模型根据词本身预测一个词的上下文(或邻居)。该模型在跳字上进行训练,跳字是允许跳过标记的 n 元语法(请参见下图以了解示例)。一个词的上下文可以通过一组跳字对 (目标词, 上下文词) 来表示,其中 上下文词 出现在 目标词 的相邻上下文中。
考虑以下包含八个词的句子
宽阔的道路在炎热的阳光下闪耀。
每个词的上下文词由窗口大小定义。窗口大小决定了 目标词 两侧可以被视为 上下文词 的词的跨度。下面是基于不同窗口大小的目标词的跳字表。

跳字模型的训练目标是最大化给定目标词预测上下文词的概率。对于一系列词 w1, w2, ... wT,目标可以写成平均对数概率

其中 c 是训练上下文的尺寸。基本的跳字公式使用 softmax 函数定义此概率。

其中 v 和 v' 是词的目标和上下文向量表示,W 是词汇量。
计算此公式的分母涉及对整个词汇词进行完全 softmax,这些词通常很大(105-107)项。
The 噪声对比估计 (NCE) 损失函数是对完全 softmax 的有效近似。为了学习词嵌入而不是对词分布进行建模,NCE 损失可以 简化 为使用负采样。
对于目标词,简化的负采样目标是区分上下文词和从噪声分布 Pn(w) 中抽取的 num_ns 个负样本。更准确地说,对整个词汇的完全 softmax 的有效近似是,对于一个跳字对,将目标词的损失设定为上下文词和 num_ns 个负样本之间的分类问题。
负样本定义为 (目标词, 上下文词) 对,使得 上下文词 不出现在 目标词 的 窗口大小 邻域中。对于示例句子,以下是一些潜在的负样本(当 窗口大小 为 2 时)。
(hot, shimmered)
(wide, hot)
(wide, sun)
在下一节中,您将为单个句子生成跳字和负样本。您还将了解子采样技术,并在本教程的后面训练一个用于正负训练示例的分类模型。
设置
import io
import re
import string
import tqdm

import numpy as np

import tensorflow as tf
from tensorflow.keras import layers
# Load the TensorBoard notebook extension
%load_ext tensorboard
SEED = 42
AUTOTUNE = tf.data.AUTOTUNE
将示例句子向量化
考虑以下句子
宽阔的道路在炎热的阳光下闪耀。
对句子进行分词
sentence = "The wide road shimmered in the hot sun"
tokens = list(sentence.lower().split())
print(len(tokens))
8
创建一个词汇表以保存从标记到整数索引的映射
vocab, index = {}, 1  # start indexing from 1
vocab['<pad>'] = 0  # add a padding token
for token in tokens:
  if token not in vocab:
    vocab[token] = index
    index += 1
vocab_size = len(vocab)
print(vocab)
{'<pad>': 0, 'the': 1, 'wide': 2, 'road': 3, 'shimmered': 4, 'in': 5, 'hot': 6, 'sun': 7}
创建一个反向词汇表以保存从整数索引到标记的映射
inverse_vocab = {index: token for token, index in vocab.items()}
print(inverse_vocab)
{0: '<pad>', 1: 'the', 2: 'wide', 3: 'road', 4: 'shimmered', 5: 'in', 6: 'hot', 7: 'sun'}
将您的句子向量化
example_sequence = [vocab[word] for word in tokens]
print(example_sequence)
[1, 2, 3, 4, 5, 1, 6, 7]
从一个句子中生成跳字
The tf.keras.preprocessing.sequence 模块提供了一些有用的函数,可以简化 word2vec 的数据准备工作。您可以使用 tf.keras.preprocessing.sequence.skipgrams 从 example_sequence 中生成跳字对,其中给定 窗口大小 来自范围 [0, vocab_size) 中的标记。
window_size = 2
positive_skip_grams, _ = tf.keras.preprocessing.sequence.skipgrams(
      example_sequence,
      vocabulary_size=vocab_size,
      window_size=window_size,
      negative_samples=0)
print(len(positive_skip_grams))
26
打印一些正跳字
for target, context in positive_skip_grams[:5]:
  print(f"({target}, {context}): ({inverse_vocab[target]}, {inverse_vocab[context]})")
(6, 1): (hot, the)
(3, 5): (road, in)
(1, 6): (the, hot)
(4, 3): (shimmered, road)
(5, 6): (in, hot)
一个跳字的负采样
函数 skipgrams 通过滑动给定窗口跨度来返回所有正向跳跃词对。为了生成更多用作训练负样本的跳跃词对,您需要从词汇表中随机抽取单词。使用 tf.random.log_uniform_candidate_sampler 函数为窗口中的给定目标词抽取 num_ns 个负样本。您可以对一个跳跃词的目标词调用该函数,并将上下文词作为真类传递,以将其排除在抽样之外。
# Get target and context words for one positive skip-gram.
target_word, context_word = positive_skip_grams[0]

# Set the number of negative samples per positive context.
num_ns = 4

context_class = tf.reshape(tf.constant(context_word, dtype="int64"), (1, 1))
negative_sampling_candidates, _, _ = tf.random.log_uniform_candidate_sampler(
    true_classes=context_class,  # class that should be sampled as 'positive'
    num_true=1,  # each positive skip-gram has 1 positive context class
    num_sampled=num_ns,  # number of negative context words to sample
    unique=True,  # all the negative samples should be unique
    range_max=vocab_size,  # pick index of the samples from [0, vocab_size]
    seed=SEED,  # seed for reproducibility
    name="negative_sampling"  # name of this operation
)
print(negative_sampling_candidates)
print([inverse_vocab[index.numpy()] for index in negative_sampling_candidates])
tf.Tensor([2 1 4 3], shape=(4,), dtype=int64)
['wide', 'the', 'shimmered', 'road']
构建一个训练示例
对于给定的正向 (target_word, context_word) 跳跃词,您现在还有 num_ns 个负样本上下文词,这些词不会出现在 target_word 的窗口大小邻域中。将 1 个正向 context_word 和 num_ns 个负样本上下文词批处理到一个张量中。这会为每个目标词生成一组正向跳跃词(标记为 1)和负样本(标记为 0)。
# Reduce a dimension so you can use concatenation (in the next step).
squeezed_context_class = tf.squeeze(context_class, 1)

# Concatenate a positive context word with negative sampled words.
context = tf.concat([squeezed_context_class, negative_sampling_candidates], 0)

# Label the first context word as `1` (positive) followed by `num_ns` `0`s (negative).
label = tf.constant([1] + [0]*num_ns, dtype="int64")
target = target_word
查看跳跃词示例中目标词的上下文和相应的标签
print(f"target_index    : {target}")
print(f"target_word     : {inverse_vocab[target_word]}")
print(f"context_indices : {context}")
print(f"context_words   : {[inverse_vocab[c.numpy()] for c in context]}")
print(f"label           : {label}")
target_index    : 6
target_word     : hot
context_indices : [1 2 1 4 3]
context_words   : ['the', 'wide', 'the', 'shimmered', 'road']
label           : [1 0 0 0 0]
一个 (target, context, label) 张量元组构成训练您的跳跃词负样本 word2vec 模型的一个训练示例。请注意,目标的形状为 (1,),而上下文和标签的形状为 (1+num_ns,)
print("target  :", target)
print("context :", context)
print("label   :", label)
target  : 6
context : tf.Tensor([1 2 1 4 3], shape=(5,), dtype=int64)
label   : tf.Tensor([1 0 0 0 0], shape=(5,), dtype=int64)
总结
此图总结了从句子生成训练示例的过程

请注意,单词 temperature 和 code 不是输入句子的一部分。它们属于词汇表,就像上面图表中使用的某些其他索引一样。
将所有步骤编译成一个函数
跳跃词抽样表
大型数据集意味着更大的词汇表,其中包含更多更频繁的单词,例如停用词。从抽取常见词(例如 the、is、on)获得的训练示例不会为模型提供太多有用的信息供其学习。 Mikolov 等人 建议对频繁词进行子抽样,作为一种有助于提高嵌入质量的有效做法。
函数 tf.keras.preprocessing.sequence.skipgrams 接受一个抽样表参数,用于对抽取任何标记的概率进行编码。您可以使用 tf.keras.preprocessing.sequence.make_sampling_table 生成一个基于词频等级的概率抽样表,并将其传递给 skipgrams 函数。检查 vocab_size 为 10 的抽样概率。
sampling_table = tf.keras.preprocessing.sequence.make_sampling_table(size=10)
print(sampling_table)
[0.00315225 0.00315225 0.00547597 0.00741556 0.00912817 0.01068435
 0.01212381 0.01347162 0.01474487 0.0159558 ]
sampling_table[i] 表示在数据集中抽取第 i 个最常见词的概率。该函数假设抽样时词频遵循 齐夫定律。
生成训练数据
将上面描述的所有步骤编译成一个函数,该函数可以对从任何文本数据集中获得的向量化句子列表进行调用。请注意,抽样表是在抽取跳跃词对之前构建的。您将在后面的部分中使用此函数。
# Generates skip-gram pairs with negative sampling for a list of sequences
# (int-encoded sentences) based on window size, number of negative samples
# and vocabulary size.
def generate_training_data(sequences, window_size, num_ns, vocab_size, seed):
  # Elements of each training example are appended to these lists.
  targets, contexts, labels = [], [], []

  # Build the sampling table for `vocab_size` tokens.
  sampling_table = tf.keras.preprocessing.sequence.make_sampling_table(vocab_size)

  # Iterate over all sequences (sentences) in the dataset.
  for sequence in tqdm.tqdm(sequences):

    # Generate positive skip-gram pairs for a sequence (sentence).
    positive_skip_grams, _ = tf.keras.preprocessing.sequence.skipgrams(
          sequence,
          vocabulary_size=vocab_size,
          sampling_table=sampling_table,
          window_size=window_size,
          negative_samples=0)

    # Iterate over each positive skip-gram pair to produce training examples
    # with a positive context word and negative samples.
    for target_word, context_word in positive_skip_grams:
      context_class = tf.expand_dims(
          tf.constant([context_word], dtype="int64"), 1)
      negative_sampling_candidates, _, _ = tf.random.log_uniform_candidate_sampler(
          true_classes=context_class,
          num_true=1,
          num_sampled=num_ns,
          unique=True,
          range_max=vocab_size,
          seed=seed,
          name="negative_sampling")

      # Build context and label vectors (for one target word)
      context = tf.concat([tf.squeeze(context_class,1), negative_sampling_candidates], 0)
      label = tf.constant([1] + [0]*num_ns, dtype="int64")

      # Append each element from the training example to global lists.
      targets.append(target_word)
      contexts.append(context)
      labels.append(label)

  return targets, contexts, labels
为 word2vec 准备训练数据
了解了如何处理一个句子以用于基于跳跃词负样本的 word2vec 模型后,您可以继续从更大的句子列表中生成训练示例!
下载文本语料库
在本教程中,您将使用莎士比亚作品的文本文件。更改以下行以在您自己的数据上运行此代码。
path_to_file = tf.keras.utils.get_file('shakespeare.txt', 'https://storage.googleapis.com/download.tensorflow.org/data/shakespeare.txt')
Downloading data from https://storage.googleapis.com/download.tensorflow.org/data/shakespeare.txt
1115394/1115394 ━━━━━━━━━━━━━━━━━━━━ 0s 0us/step
从文件中读取文本并打印前几行
with open(path_to_file) as f:
  lines = f.read().splitlines()
for line in lines[:20]:
  print(line)
First Citizen:
Before we proceed any further, hear me speak.

All:
Speak, speak.

First Citizen:
You are all resolved rather to die than to famish?

All:
Resolved. resolved.

First Citizen:
First, you know Caius Marcius is chief enemy to the people.

All:
We know't, we know't.

First Citizen:
Let us kill him, and we'll have corn at our own price.
使用非空行构建一个 tf.data.TextLineDataset 对象,用于接下来的步骤
text_ds = tf.data.TextLineDataset(path_to_file).filter(lambda x: tf.cast(tf.strings.length(x), bool))
将语料库中的句子向量化
您可以使用 TextVectorization 层将语料库中的句子向量化。在此 文本分类 教程中了解有关使用此层的更多信息。请注意,从上面的前几句话可以看出,文本需要统一大小写,并且需要删除标点符号。为此,请定义一个 custom_standardization 函数,该函数可以在 TextVectorization 层中使用。
# Now, create a custom standardization function to lowercase the text and
# remove punctuation.
def custom_standardization(input_data):
  lowercase = tf.strings.lower(input_data)
  return tf.strings.regex_replace(lowercase,
                                  '[%s]' % re.escape(string.punctuation), '')


# Define the vocabulary size and the number of words in a sequence.
vocab_size = 4096
sequence_length = 10

# Use the `TextVectorization` layer to normalize, split, and map strings to
# integers. Set the `output_sequence_length` length to pad all samples to the
# same length.
vectorize_layer = layers.TextVectorization(
    standardize=custom_standardization,
    max_tokens=vocab_size,
    output_mode='int',
    output_sequence_length=sequence_length)
在文本数据集中调用 TextVectorization.adapt 以创建词汇表。
vectorize_layer.adapt(text_ds.batch(1024))
2024-03-13 11:10:22.892874: W tensorflow/core/framework/local_rendezvous.cc:404] Local rendezvous is aborting with status: OUT_OF_RANGE: End of sequence
一旦层的状态已适应以表示文本语料库,就可以使用 TextVectorization.get_vocabulary 访问词汇表。此函数返回一个按频率(降序)排序的所有词汇表标记的列表。
# Save the created vocabulary for reference.
inverse_vocab = vectorize_layer.get_vocabulary()
print(inverse_vocab[:20])
['', '[UNK]', 'the', 'and', 'to', 'i', 'of', 'you', 'my', 'a', 'that', 'in', 'is', 'not', 'for', 'with', 'me', 'it', 'be', 'your']
现在,vectorize_layer 可用于为 text_ds(一个 tf.data.Dataset)中的每个元素生成向量。应用 Dataset.batch、Dataset.prefetch、Dataset.map 和 Dataset.unbatch。
# Vectorize the data in text_ds.
text_vector_ds = text_ds.batch(1024).prefetch(AUTOTUNE).map(vectorize_layer).unbatch()
从数据集中获取序列
您现在拥有一个包含整数编码句子的 tf.data.Dataset。为了准备数据集以训练 word2vec 模型,请将数据集展平成一个句子向量序列列表。此步骤是必需的,因为您将遍历数据集中的每个句子以生成正样本和负样本。
sequences = list(text_vector_ds.as_numpy_iterator())
print(len(sequences))
32777
2024-03-13 11:10:26.564811: W tensorflow/core/framework/local_rendezvous.cc:404] Local rendezvous is aborting with status: OUT_OF_RANGE: End of sequence
检查 sequences 中的几个示例
for seq in sequences[:5]:
  print(f"{seq} => {[inverse_vocab[i] for i in seq]}")
[ 89 270   0   0   0   0   0   0   0   0] => ['first', 'citizen', '', '', '', '', '', '', '', '']
[138  36 982 144 673 125  16 106   0   0] => ['before', 'we', 'proceed', 'any', 'further', 'hear', 'me', 'speak', '', '']
[34  0  0  0  0  0  0  0  0  0] => ['all', '', '', '', '', '', '', '', '', '']
[106 106   0   0   0   0   0   0   0   0] => ['speak', 'speak', '', '', '', '', '', '', '', '']
[ 89 270   0   0   0   0   0   0   0   0] => ['first', 'citizen', '', '', '', '', '', '', '', '']
从序列生成训练示例
sequences 现在是一个包含整数编码句子的列表。只需调用前面定义的 generate_training_data 函数即可为 word2vec 模型生成训练示例。回顾一下,该函数遍历每个序列中的每个词以收集正向和负向上下文词。目标、上下文和标签的长度应相同,表示训练示例的总数。
targets, contexts, labels = generate_training_data(
    sequences=sequences,
    window_size=2,
    num_ns=4,
    vocab_size=vocab_size,
    seed=SEED)

targets = np.array(targets)
contexts = np.array(contexts)
labels = np.array(labels)

print('\n')
print(f"targets.shape: {targets.shape}")
print(f"contexts.shape: {contexts.shape}")
print(f"labels.shape: {labels.shape}")
100%|██████████| 32777/32777 [00:37<00:00, 865.32it/s]
targets.shape: (65462,)
contexts.shape: (65462, 5)
labels.shape: (65462, 5)
配置数据集以提高性能
为了对可能大量的训练示例执行有效的批处理,请使用 tf.data.Dataset API。完成此步骤后,您将拥有一个 tf.data.Dataset 对象,其中包含 (target_word, context_word), (label) 元素,用于训练您的 word2vec 模型!
BATCH_SIZE = 1024
BUFFER_SIZE = 10000
dataset = tf.data.Dataset.from_tensor_slices(((targets, contexts), labels))
dataset = dataset.shuffle(BUFFER_SIZE).batch(BATCH_SIZE, drop_remainder=True)
print(dataset)
<_BatchDataset element_spec=((TensorSpec(shape=(1024,), dtype=tf.int64, name=None), TensorSpec(shape=(1024, 5), dtype=tf.int64, name=None)), TensorSpec(shape=(1024, 5), dtype=tf.int64, name=None))>
应用 Dataset.cache 和 Dataset.prefetch 以提高性能
dataset = dataset.cache().prefetch(buffer_size=AUTOTUNE)
print(dataset)
<_PrefetchDataset element_spec=((TensorSpec(shape=(1024,), dtype=tf.int64, name=None), TensorSpec(shape=(1024, 5), dtype=tf.int64, name=None)), TensorSpec(shape=(1024, 5), dtype=tf.int64, name=None))>
模型和训练
word2vec 模型可以实现为一个分类器,用于区分来自跳跃词的真实上下文词和通过负样本获得的虚假上下文词。您可以对目标词和上下文词的嵌入执行点积乘法,以获得标签的预测结果,并针对数据集中真实的标签计算损失函数。
子类化的 word2vec 模型
使用 Keras 子类化 API 定义您的 word2vec 模型,其中包含以下层
target_embedding:一个tf.keras.layers.Embedding层,当单词作为目标词出现时,它会查找该单词的嵌入。此层中的参数数量为(vocab_size * embedding_dim)。context_embedding:另一个tf.keras.layers.Embedding层,当单词作为上下文词出现时,它会查找该单词的嵌入。此层中的参数数量与target_embedding中的参数数量相同,即(vocab_size * embedding_dim)。dots:一个tf.keras.layers.Dot层,用于计算训练对中目标词和上下文词嵌入的点积。flatten:一个tf.keras.layers.Flatten层,用于将dots层的结果展平成 logits。
使用子类化模型,您可以定义 call() 函数,该函数接受 (target, context) 对,然后可以将其传递到相应的嵌入层中。重新整形 context_embedding 以执行与 target_embedding 的点积,并返回展平的结果。
class Word2Vec(tf.keras.Model):
  def __init__(self, vocab_size, embedding_dim):
    super(Word2Vec, self).__init__()
    self.target_embedding = layers.Embedding(vocab_size,
                                      embedding_dim,
                                      name="w2v_embedding")
    self.context_embedding = layers.Embedding(vocab_size,
                                       embedding_dim)

  def call(self, pair):
    target, context = pair
    # target: (batch, dummy?)  # The dummy axis doesn't exist in TF2.7+
    # context: (batch, context)
    if len(target.shape) == 2:
      target = tf.squeeze(target, axis=1)
    # target: (batch,)
    word_emb = self.target_embedding(target)
    # word_emb: (batch, embed)
    context_emb = self.context_embedding(context)
    # context_emb: (batch, context, embed)
    dots = tf.einsum('be,bce->bc', word_emb, context_emb)
    # dots: (batch, context)
    return dots
定义损失函数并编译模型
为简单起见,您可以使用 tf.keras.losses.CategoricalCrossEntropy 作为负样本损失的替代方案。如果您想编写自己的自定义损失函数,也可以按如下方式进行
def custom_loss(x_logit, y_true):
      return tf.nn.sigmoid_cross_entropy_with_logits(logits=x_logit, labels=y_true)
现在是构建模型的时候了!使用 128 的嵌入维度实例化您的 word2vec 类(您可以尝试不同的值)。使用 tf.keras.optimizers.Adam 优化器编译模型。
embedding_dim = 128
word2vec = Word2Vec(vocab_size, embedding_dim)
word2vec.compile(optimizer='adam',
                 loss=tf.keras.losses.CategoricalCrossentropy(from_logits=True),
                 metrics=['accuracy'])
还可以定义一个回调,用于记录 TensorBoard 的训练统计信息
tensorboard_callback = tf.keras.callbacks.TensorBoard(log_dir="logs")
在 dataset 上训练模型,持续一定数量的 epochs
word2vec.fit(dataset, epochs=20, callbacks=[tensorboard_callback])
Epoch 1/20
WARNING: All log messages before absl::InitializeLog() is called are written to STDERR
I0000 00:00:1710328268.494065   10203 service.cc:145] XLA service 0x7f0a6c03e960 initialized for platform CUDA (this does not guarantee that XLA will be used). Devices:
I0000 00:00:1710328268.494115   10203 service.cc:153]   StreamExecutor device (0): Tesla T4, Compute Capability 7.5
I0000 00:00:1710328268.494119   10203 service.cc:153]   StreamExecutor device (1): Tesla T4, Compute Capability 7.5
I0000 00:00:1710328268.494124   10203 service.cc:153]   StreamExecutor device (2): Tesla T4, Compute Capability 7.5
I0000 00:00:1710328268.494127   10203 service.cc:153]   StreamExecutor device (3): Tesla T4, Compute Capability 7.5
31/63 ━━━━━━━━━━━━━━━━━━━━ 0s 3ms/step - accuracy: 0.2072 - loss: 1.6092
I0000 00:00:1710328269.065899   10203 device_compiler.h:188] Compiled cluster using XLA!  This line is logged at most once for the lifetime of the process.
63/63 ━━━━━━━━━━━━━━━━━━━━ 2s 8ms/step - accuracy: 0.2166 - loss: 1.6088
Epoch 2/20
63/63 ━━━━━━━━━━━━━━━━━━━━ 0s 2ms/step - accuracy: 0.5957 - loss: 1.5886
Epoch 3/20
63/63 ━━━━━━━━━━━━━━━━━━━━ 0s 2ms/step - accuracy: 0.5979 - loss: 1.5287
Epoch 4/20
63/63 ━━━━━━━━━━━━━━━━━━━━ 0s 2ms/step - accuracy: 0.5498 - loss: 1.4396
Epoch 5/20
63/63 ━━━━━━━━━━━━━━━━━━━━ 0s 2ms/step - accuracy: 0.5653 - loss: 1.3426
Epoch 6/20
63/63 ━━━━━━━━━━━━━━━━━━━━ 0s 2ms/step - accuracy: 0.6005 - loss: 1.2460
Epoch 7/20
63/63 ━━━━━━━━━━━━━━━━━━━━ 0s 2ms/step - accuracy: 0.6369 - loss: 1.1562
Epoch 8/20
63/63 ━━━━━━━━━━━━━━━━━━━━ 0s 2ms/step - accuracy: 0.6744 - loss: 1.0735
Epoch 9/20
63/63 ━━━━━━━━━━━━━━━━━━━━ 0s 2ms/step - accuracy: 0.7076 - loss: 0.9972
Epoch 10/20
63/63 ━━━━━━━━━━━━━━━━━━━━ 0s 2ms/step - accuracy: 0.7377 - loss: 0.9267
Epoch 11/20
63/63 ━━━━━━━━━━━━━━━━━━━━ 0s 2ms/step - accuracy: 0.7628 - loss: 0.8615
Epoch 12/20
63/63 ━━━━━━━━━━━━━━━━━━━━ 0s 2ms/step - accuracy: 0.7838 - loss: 0.8014
Epoch 13/20
63/63 ━━━━━━━━━━━━━━━━━━━━ 0s 2ms/step - accuracy: 0.8037 - loss: 0.7460
Epoch 14/20
63/63 ━━━━━━━━━━━━━━━━━━━━ 0s 2ms/step - accuracy: 0.8198 - loss: 0.6952
Epoch 15/20
63/63 ━━━━━━━━━━━━━━━━━━━━ 0s 2ms/step - accuracy: 0.8354 - loss: 0.6486
Epoch 16/20
63/63 ━━━━━━━━━━━━━━━━━━━━ 0s 2ms/step - accuracy: 0.8497 - loss: 0.6060
Epoch 17/20
63/63 ━━━━━━━━━━━━━━━━━━━━ 0s 2ms/step - accuracy: 0.8613 - loss: 0.5670
Epoch 18/20
63/63 ━━━━━━━━━━━━━━━━━━━━ 0s 2ms/step - accuracy: 0.8727 - loss: 0.5315
Epoch 19/20
63/63 ━━━━━━━━━━━━━━━━━━━━ 0s 2ms/step - accuracy: 0.8836 - loss: 0.4990
Epoch 20/20
63/63 ━━━━━━━━━━━━━━━━━━━━ 0s 2ms/step - accuracy: 0.8918 - loss: 0.4693
<keras.src.callbacks.history.History at 0x7f0c199f7520>
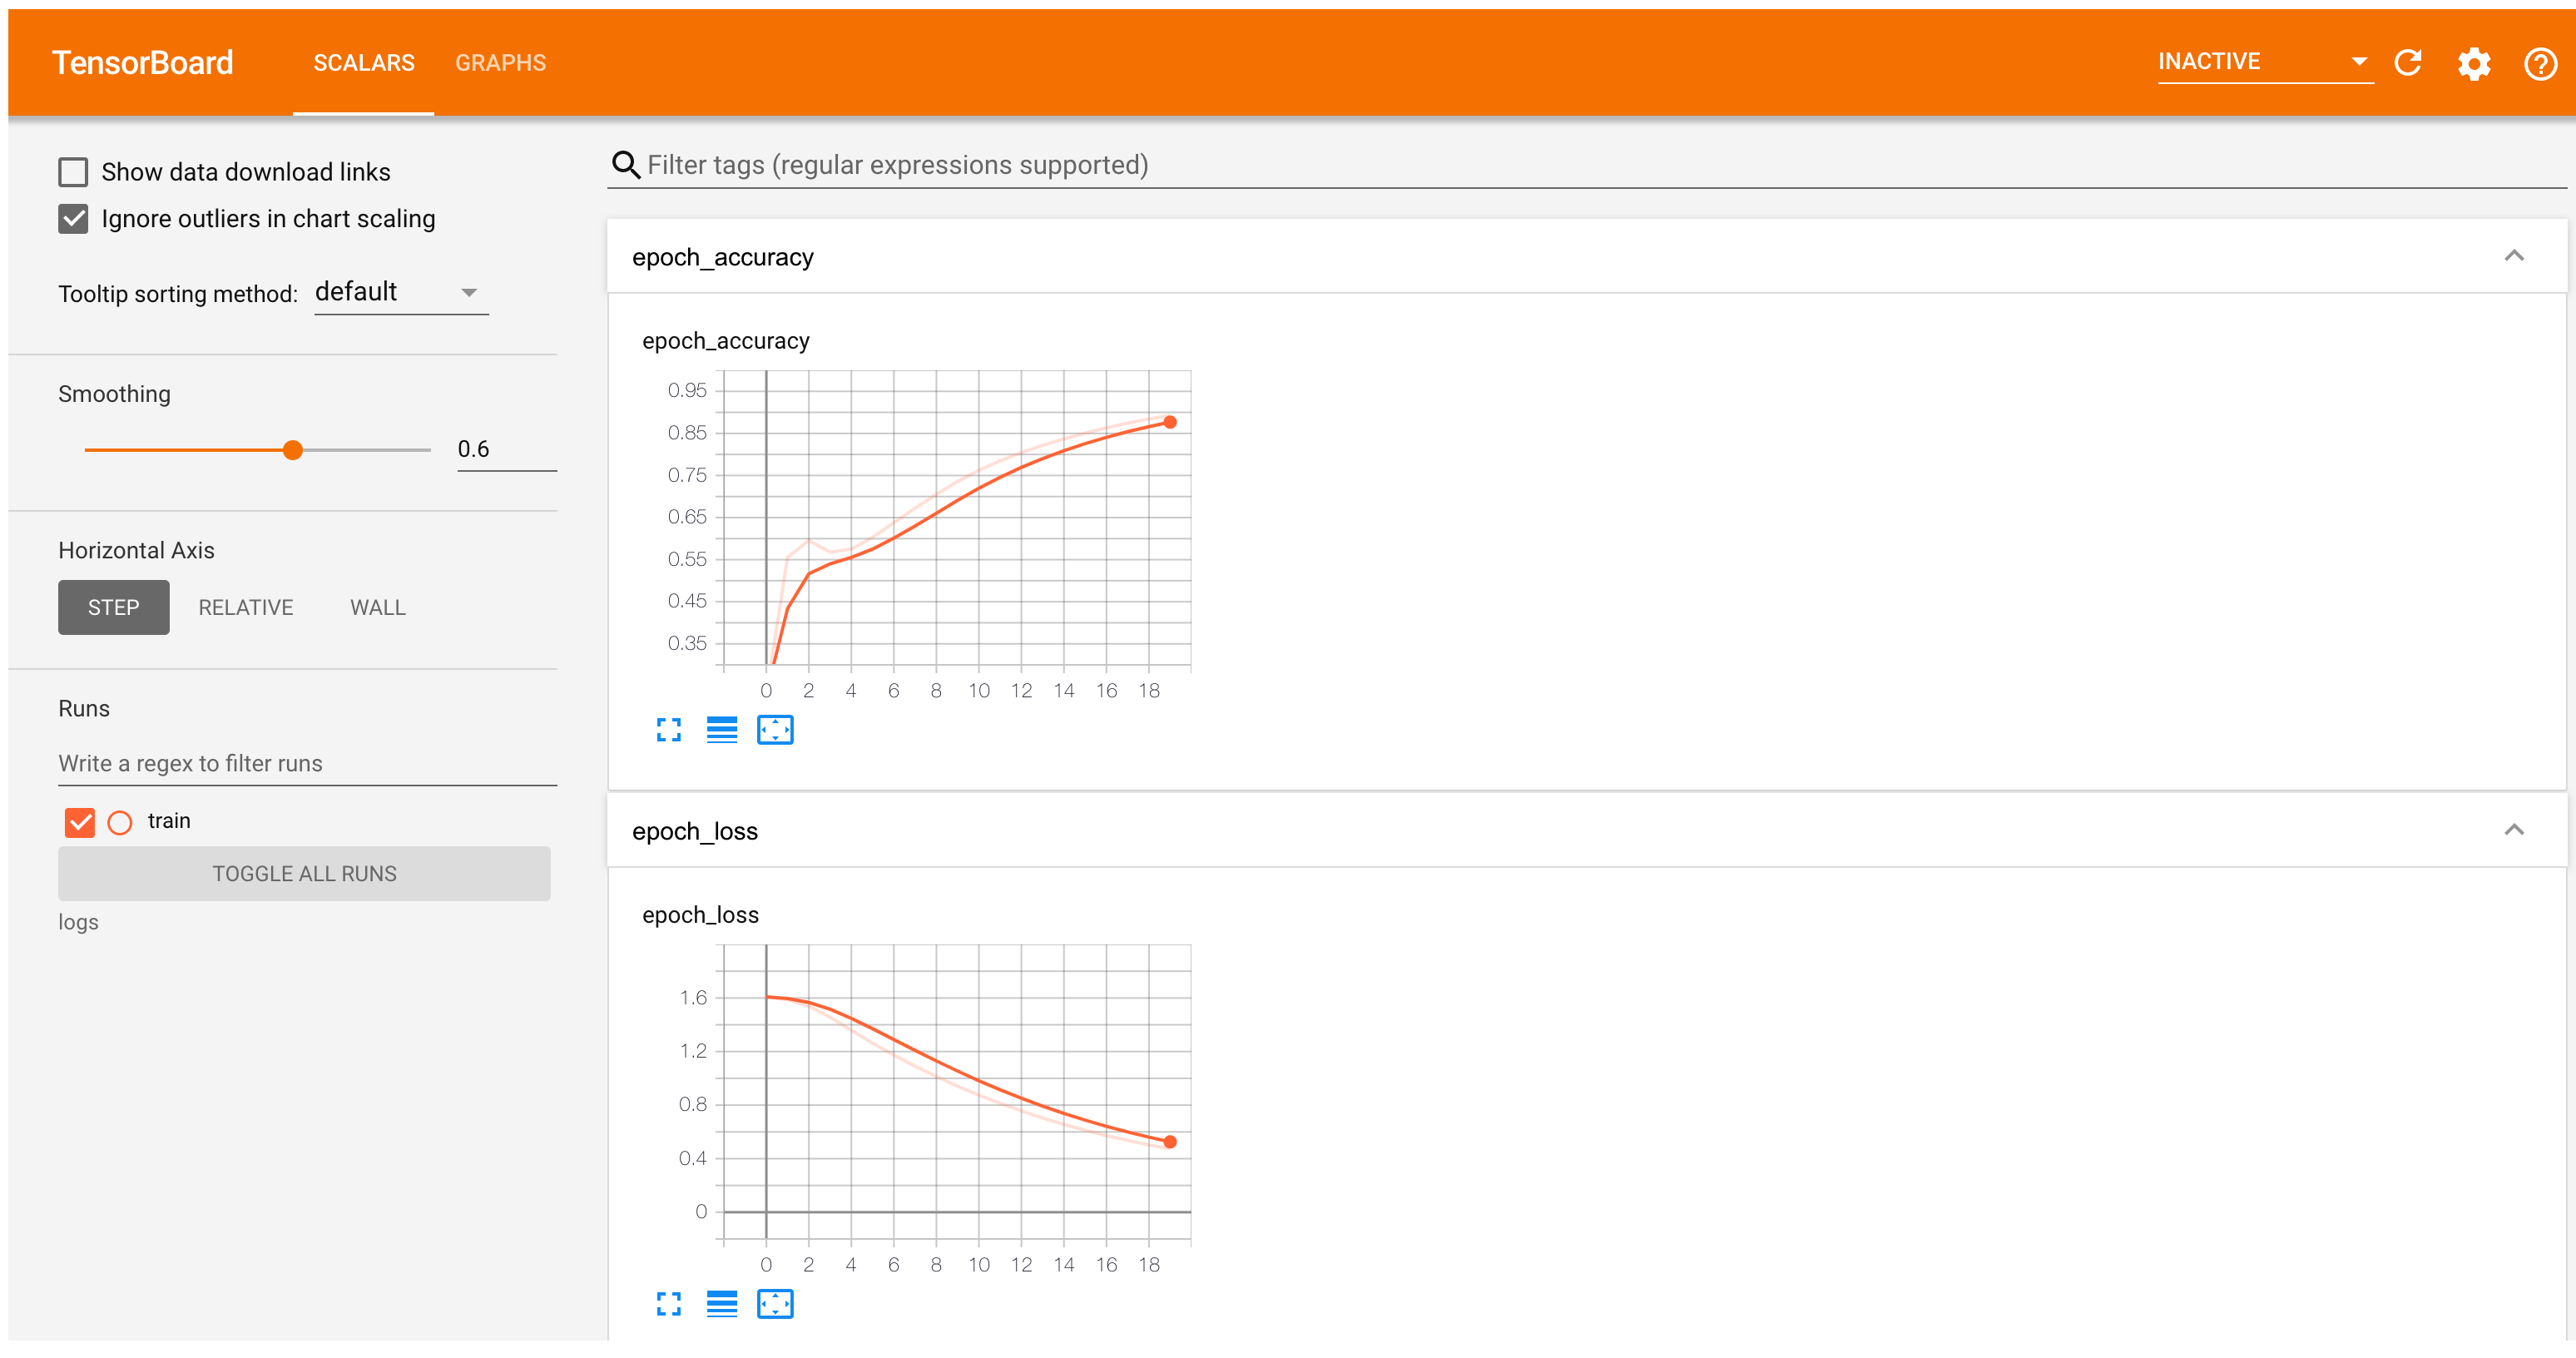
TensorBoard 现在显示了 word2vec 模型的准确率和损失
#docs_infra: no_execute
%tensorboard --logdir logs
嵌入查找和分析
使用 Model.get_layer 和 Layer.get_weights 从模型中获取权重。函数 TextVectorization.get_vocabulary 提供词汇表,用于构建一个每行一个标记的元数据文件。
weights = word2vec.get_layer('w2v_embedding').get_weights()[0]
vocab = vectorize_layer.get_vocabulary()
创建并保存向量和元数据文件
out_v = io.open('vectors.tsv', 'w', encoding='utf-8')
out_m = io.open('metadata.tsv', 'w', encoding='utf-8')

for index, word in enumerate(vocab):
  if index == 0:
    continue  # skip 0, it's padding.
  vec = weights[index]
  out_v.write('\t'.join([str(x) for x in vec]) + "\n")
  out_m.write(word + "\n")
out_v.close()
out_m.close()
下载 vectors.tsv 和 metadata.tsv,以便在 嵌入投影仪 中分析获得的嵌入
try:
  from google.colab import files
  files.download('vectors.tsv')
  files.download('metadata.tsv')
except Exception:
  pass
后续步骤
本教程向您展示了如何从头开始实现一个带负样本的跳跃词 word2vec 模型,并可视化获得的词嵌入。
要了解更多关于词向量及其数学表示的信息,请参考这些笔记。
要了解更多关于高级文本处理的信息,请阅读用于语言理解的 Transformer 模型教程。
如果您对预训练的嵌入模型感兴趣,您可能还会对探索 TF-Hub CORD-19 枢纽嵌入或多语言通用句子编码器感兴趣。
您也可以选择在新的数据集上训练模型(在TensorFlow 数据集中有很多可用的数据集)。