
|
|
|
 在 GitHub 上查看源代码 在 GitHub 上查看源代码
|
|
本文本分类教程在 循环神经网络 上训练 IMDB 大型电影评论数据集,用于情感分析。
设置
import numpy as np

import tensorflow_datasets as tfds
import tensorflow as tf

tfds.disable_progress_bar()
导入 matplotlib 并创建一个辅助函数来绘制图表
import matplotlib.pyplot as plt


def plot_graphs(history, metric):
  plt.plot(history.history[metric])
  plt.plot(history.history['val_'+metric], '')
  plt.xlabel("Epochs")
  plt.ylabel(metric)
  plt.legend([metric, 'val_'+metric])
设置输入管道
IMDB 大型电影评论数据集是一个 *二元分类* 数据集 - 所有评论都具有 *正面* 或 *负面* 情感。
使用 TFDS 下载数据集。有关如何手动加载此类数据的详细信息,请参阅 加载文本教程。
dataset, info = tfds.load('imdb_reviews', with_info=True,
                          as_supervised=True)
train_dataset, test_dataset = dataset['train'], dataset['test']

train_dataset.element_spec
最初,这将返回一个 (文本、标签对) 数据集
for example, label in train_dataset.take(1):
  print('text: ', example.numpy())
  print('label: ', label.numpy())
接下来,对数据进行洗牌以进行训练,并创建这些 (文本、标签) 对的批次
BUFFER_SIZE = 10000
BATCH_SIZE = 64
train_dataset = train_dataset.shuffle(BUFFER_SIZE).batch(BATCH_SIZE).prefetch(tf.data.AUTOTUNE)
test_dataset = test_dataset.batch(BATCH_SIZE).prefetch(tf.data.AUTOTUNE)
for example, label in train_dataset.take(1):
  print('texts: ', example.numpy()[:3])
  print()
  print('labels: ', label.numpy()[:3])
创建文本编码器
由 tfds 加载的原始文本需要在模型中使用之前进行处理。使用 TextVectorization 层是处理训练文本的最简单方法。该层具有许多功能,但本教程将坚持使用默认行为。
创建该层,并将数据集的文本传递到该层的 .adapt 方法
VOCAB_SIZE = 1000
encoder = tf.keras.layers.TextVectorization(
    max_tokens=VOCAB_SIZE)
encoder.adapt(train_dataset.map(lambda text, label: text))
.adapt 方法设置该层的词汇表。以下是前 20 个标记。在填充和未知标记之后,它们按频率排序
vocab = np.array(encoder.get_vocabulary())
vocab[:20]
设置词汇表后,该层可以将文本编码为索引。索引张量会填充到批次中最长序列的 0(除非您设置了固定的 output_sequence_length)
encoded_example = encoder(example)[:3].numpy()
encoded_example
使用默认设置,该过程并非完全可逆。主要有三个原因
preprocessing.TextVectorization的standardize参数的默认值为"lower_and_strip_punctuation"。- 有限的词汇表大小和缺乏基于字符的回退会导致一些未知标记。
for n in range(3):
  print("Original: ", example[n].numpy())
  print("Round-trip: ", " ".join(vocab[encoded_example[n]]))
  print()
创建模型
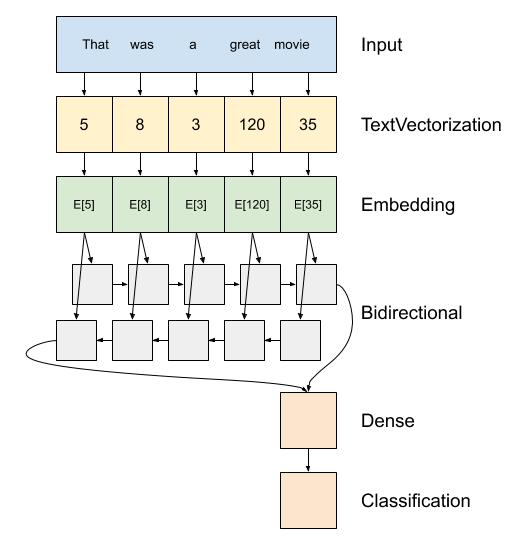
以上是模型的示意图。
此模型可以构建为
tf.keras.Sequential。第一层是
encoder,它将文本转换为标记索引序列。编码器之后是一个嵌入层。嵌入层为每个单词存储一个向量。调用时,它会将单词索引序列转换为向量序列。这些向量是可训练的。在训练(足够的数据)之后,具有相似含义的单词通常具有相似的向量。
这种索引查找比通过
tf.keras.layers.Dense层传递一个热编码向量更有效。循环神经网络 (RNN) 通过迭代元素来处理序列输入。RNN 将一个时间步的输出传递到下一个时间步的输入。
tf.keras.layers.Bidirectional包装器也可以与 RNN 层一起使用。这会将输入正向和反向传播到 RNN 层,然后连接最终输出。双向 RNN 的主要优点是,来自输入开头的信号不需要经过每个时间步才能影响输出。
双向 RNN 的主要缺点是,您无法在单词添加到末尾时有效地流式传输预测。
RNN 将序列转换为单个向量后,两个
layers.Dense会进行一些最终处理,并将此向量表示转换为单个 logits 作为分类输出。
实现此功能的代码如下
model = tf.keras.Sequential([
    encoder,
    tf.keras.layers.Embedding(
        input_dim=len(encoder.get_vocabulary()),
        output_dim=64,
        # Use masking to handle the variable sequence lengths
        mask_zero=True),
    tf.keras.layers.Bidirectional(tf.keras.layers.LSTM(64)),
    tf.keras.layers.Dense(64, activation='relu'),
    tf.keras.layers.Dense(1)
])
请注意,这里使用 Keras 顺序模型,因为模型中的所有层都只有一个输入并产生一个输出。如果您想使用有状态的 RNN 层,您可能需要使用 Keras 函数式 API 或模型子类化来构建模型,以便您可以检索和重用 RNN 层状态。有关更多详细信息,请查看 Keras RNN 指南。
嵌入层 使用掩码 来处理不同的序列长度。Embedding 之后的层都支持掩码
print([layer.supports_masking for layer in model.layers])
为了确认这按预期工作,请评估一个句子两次。首先,单独评估,这样就没有填充需要掩码
# predict on a sample text without padding.

sample_text = ('The movie was cool. The animation and the graphics '
               'were out of this world. I would recommend this movie.')
predictions = model.predict(np.array([sample_text]))
print(predictions[0])
现在,在包含更长句子的批次中再次评估它。结果应该相同
# predict on a sample text with padding

padding = "the " * 2000
predictions = model.predict(np.array([sample_text, padding]))
print(predictions[0])
编译 Keras 模型以配置训练过程
model.compile(loss=tf.keras.losses.BinaryCrossentropy(from_logits=True),
              optimizer=tf.keras.optimizers.Adam(1e-4),
              metrics=['accuracy'])
训练模型
history = model.fit(train_dataset, epochs=10,
                    validation_data=test_dataset,
                    validation_steps=30)
test_loss, test_acc = model.evaluate(test_dataset)

print('Test Loss:', test_loss)
print('Test Accuracy:', test_acc)
plt.figure(figsize=(16, 8))
plt.subplot(1, 2, 1)
plot_graphs(history, 'accuracy')
plt.ylim(None, 1)
plt.subplot(1, 2, 2)
plot_graphs(history, 'loss')
plt.ylim(0, None)
对新句子进行预测
如果预测值 >= 0.0,则为正面,否则为负面。
sample_text = ('The movie was cool. The animation and the graphics '
               'were out of this world. I would recommend this movie.')
predictions = model.predict(np.array([sample_text]))
堆叠两个或多个 LSTM 层
Keras 循环层有两种可用模式,由 return_sequences 构造函数参数控制
如果
False,它只返回每个输入序列的最后一个输出(一个形状为 (batch_size, output_features) 的二维张量)。这是默认值,在之前的模型中使用。如果
True,则返回每个时间步的连续输出的完整序列(一个形状为(batch_size, timesteps, output_features)的三维张量)。
以下是使用 return_sequences=True 时信息流的样子
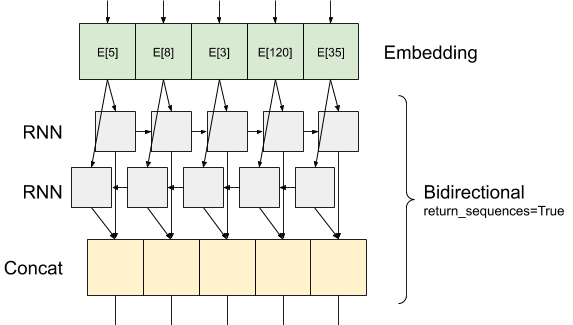
使用 RNN 和 return_sequences=True 的有趣之处在于,输出仍然具有 3 个轴,就像输入一样,因此可以将其传递给另一个 RNN 层,如下所示
model = tf.keras.Sequential([
    encoder,
    tf.keras.layers.Embedding(len(encoder.get_vocabulary()), 64, mask_zero=True),
    tf.keras.layers.Bidirectional(tf.keras.layers.LSTM(64,  return_sequences=True)),
    tf.keras.layers.Bidirectional(tf.keras.layers.LSTM(32)),
    tf.keras.layers.Dense(64, activation='relu'),
    tf.keras.layers.Dropout(0.5),
    tf.keras.layers.Dense(1)
])
model.compile(loss=tf.keras.losses.BinaryCrossentropy(from_logits=True),
              optimizer=tf.keras.optimizers.Adam(1e-4),
              metrics=['accuracy'])
history = model.fit(train_dataset, epochs=10,
                    validation_data=test_dataset,
                    validation_steps=30)
test_loss, test_acc = model.evaluate(test_dataset)

print('Test Loss:', test_loss)
print('Test Accuracy:', test_acc)
# predict on a sample text without padding.

sample_text = ('The movie was not good. The animation and the graphics '
               'were terrible. I would not recommend this movie.')
predictions = model.predict(np.array([sample_text]))
print(predictions)
plt.figure(figsize=(16, 6))
plt.subplot(1, 2, 1)
plot_graphs(history, 'accuracy')
plt.subplot(1, 2, 2)
plot_graphs(history, 'loss')
查看其他现有的循环层,例如 GRU 层。
如果您有兴趣构建自定义 RNN,请参阅 Keras RNN 指南。