
|
|
|
 在 GitHub 上查看源代码 在 GitHub 上查看源代码
|
|
本教程演示了如何使用基于字符的 RNN 生成文本。您将使用 Andrej Karpathy 的 循环神经网络的非凡有效性 中的莎士比亚作品数据集。给定来自此数据的一系列字符(“Shakespear”),训练一个模型来预测序列中的下一个字符(“e”)。通过反复调用模型,可以生成更长的文本序列。
本教程包括使用 tf.keras 和 急切执行 实现的可运行代码。以下是本教程中模型训练 30 个纪元后,以提示“Q”开头的示例输出
QUEENE:
I had thought thou hadst a Roman; for the oracle,
Thus by All bids the man against the word,
Which are so weak of care, by old care done;
Your children were in your holy love,
And the precipitation through the bleeding throne.

BISHOP OF ELY:
Marry, and will, my lord, to weep in such a one were prettiest;
Yet now I was adopted heir
Of the world's lamentable day,
To watch the next way with his father with his face?

ESCALUS:
The cause why then we are all resolved more sons.

VOLUMNIA:
O, no, no, no, no, no, no, no, no, no, no, no, no, no, no, no, no, no, no, no, no, it is no sin it should be dead,
And love and pale as any will to that word.

QUEEN ELIZABETH:
But how long have I heard the soul for this world,
And show his hands of life be proved to stand.

PETRUCHIO:
I say he look'd on, if I must be content
To stay him from the fatal of our country's bliss.
His lordship pluck'd from this sentence then for prey,
And then let us twain, being the moon,
were she such a case as fills m
虽然有些句子是语法正确的,但大多数句子没有意义。该模型尚未学习单词的含义,但请考虑
该模型是基于字符的。在训练开始时,该模型不知道如何拼写英语单词,也不知道单词甚至是一个文本单位。
输出的结构类似于剧本——文本块通常以说话者姓名开头,全部大写,类似于数据集。
如下所示,该模型在少量文本批次(每次 100 个字符)上进行训练,并且仍然能够生成具有连贯结构的更长文本序列。
设置
导入 TensorFlow 和其他库
import tensorflow as tf

import numpy as np
import os
import time
下载莎士比亚数据集
更改以下行以在您自己的数据上运行此代码。
path_to_file = tf.keras.utils.get_file('shakespeare.txt', 'https://storage.googleapis.com/download.tensorflow.org/data/shakespeare.txt')
读取数据
首先,查看文本
# Read, then decode for py2 compat.
text = open(path_to_file, 'rb').read().decode(encoding='utf-8')
# length of text is the number of characters in it
print(f'Length of text: {len(text)} characters')
# Take a look at the first 250 characters in text
print(text[:250])
# The unique characters in the file
vocab = sorted(set(text))
print(f'{len(vocab)} unique characters')
处理文本
将文本向量化
在训练之前,您需要将字符串转换为数值表示。
tf.keras.layers.StringLookup 层可以将每个字符转换为数值 ID。它只需要先将文本拆分为标记。
example_texts = ['abcdefg', 'xyz']

chars = tf.strings.unicode_split(example_texts, input_encoding='UTF-8')
chars
现在创建 tf.keras.layers.StringLookup 层
ids_from_chars = tf.keras.layers.StringLookup(
    vocabulary=list(vocab), mask_token=None)
它将标记转换为字符 ID
ids = ids_from_chars(chars)
ids
由于本教程的目标是生成文本,因此从该表示中恢复人类可读的字符串也很重要。为此,您可以使用 tf.keras.layers.StringLookup(..., invert=True)。
chars_from_ids = tf.keras.layers.StringLookup(
    vocabulary=ids_from_chars.get_vocabulary(), invert=True, mask_token=None)
此层从 ID 向量中恢复字符,并将它们作为 tf.RaggedTensor 字符返回
chars = chars_from_ids(ids)
chars
您可以使用 tf.strings.reduce_join 将字符重新连接成字符串。
tf.strings.reduce_join(chars, axis=-1).numpy()
def text_from_ids(ids):
  return tf.strings.reduce_join(chars_from_ids(ids), axis=-1)
预测任务
给定一个字符或一系列字符,下一个最可能的字符是什么?这是您训练模型执行的任务。模型的输入将是一系列字符,您训练模型来预测输出——每个时间步的下一个字符。
由于 RNN 保持一个内部状态,该状态取决于之前看到的元素,因此给定到目前为止计算的所有字符,下一个字符是什么?
创建训练示例和目标
接下来,将文本划分为示例序列。每个输入序列将包含来自文本的 seq_length 个字符。
对于每个输入序列,相应的目标包含相同长度的文本,只是向右移动了一个字符。
因此,将文本分成 seq_length+1 的块。例如,假设 seq_length 为 4,我们的文本为“Hello”。输入序列将是“Hell”,目标序列是“ello”。
为此,首先使用 tf.data.Dataset.from_tensor_slices 函数将文本向量转换为字符索引流。
all_ids = ids_from_chars(tf.strings.unicode_split(text, 'UTF-8'))
all_ids
ids_dataset = tf.data.Dataset.from_tensor_slices(all_ids)
for ids in ids_dataset.take(10):
    print(chars_from_ids(ids).numpy().decode('utf-8'))
seq_length = 100
batch 方法让您可以轻松地将这些单个字符转换为所需大小的序列。
sequences = ids_dataset.batch(seq_length+1, drop_remainder=True)

for seq in sequences.take(1):
  print(chars_from_ids(seq))
如果您将标记重新连接成字符串,则更容易看到这是在做什么
for seq in sequences.take(5):
  print(text_from_ids(seq).numpy())
对于训练,您将需要一个 (input, label) 对的数据集。其中 input 和 label 是序列。在每个时间步,输入是当前字符,标签是下一个字符。
这是一个函数,它以序列作为输入,进行复制,并将其移动以对齐每个时间步的输入和标签
def split_input_target(sequence):
    input_text = sequence[:-1]
    target_text = sequence[1:]
    return input_text, target_text
split_input_target(list("Tensorflow"))
dataset = sequences.map(split_input_target)
for input_example, target_example in dataset.take(1):
    print("Input :", text_from_ids(input_example).numpy())
    print("Target:", text_from_ids(target_example).numpy())
创建训练批次
您使用 tf.data 将文本拆分为可管理的序列。但在将此数据馈送到模型之前,您需要对数据进行混洗并将其打包成批次。
# Batch size
BATCH_SIZE = 64

# Buffer size to shuffle the dataset
# (TF data is designed to work with possibly infinite sequences,
# so it doesn't attempt to shuffle the entire sequence in memory. Instead,
# it maintains a buffer in which it shuffles elements).
BUFFER_SIZE = 10000

dataset = (
    dataset
    .shuffle(BUFFER_SIZE)
    .batch(BATCH_SIZE, drop_remainder=True)
    .prefetch(tf.data.experimental.AUTOTUNE))

dataset
构建模型
本节将模型定义为一个 keras.Model 子类(有关详细信息,请参阅 通过子类化创建新的层和模型)。
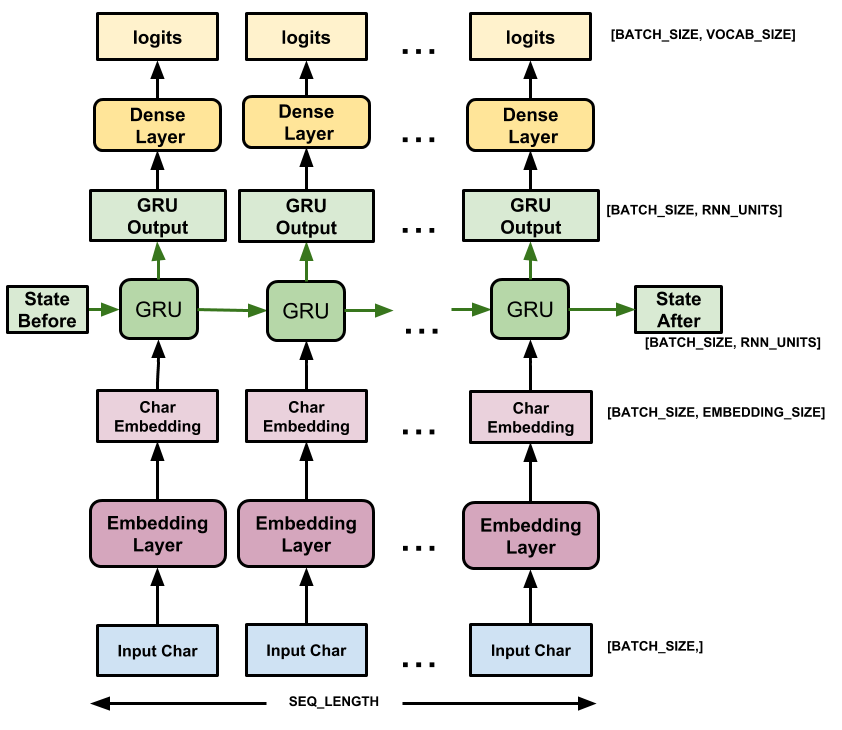
此模型包含三个层
tf.keras.layers.Embedding: 输入层。一个可训练的查找表,将每个字符 ID 映射到一个具有embedding_dim维度的向量;tf.keras.layers.GRU: 一种 RNN 类型,大小为units=rnn_units(您也可以在此处使用 LSTM 层)tf.keras.layers.Dense: 输出层,具有vocab_size个输出。它为词汇表中的每个字符输出一个 logits。这些是模型根据每个字符的 log-likelihood。
# Length of the vocabulary in StringLookup Layer
vocab_size = len(ids_from_chars.get_vocabulary())

# The embedding dimension
embedding_dim = 256

# Number of RNN units
rnn_units = 1024
class MyModel(tf.keras.Model):
  def __init__(self, vocab_size, embedding_dim, rnn_units):
    super().__init__(self)
    self.embedding = tf.keras.layers.Embedding(vocab_size, embedding_dim)
    self.gru = tf.keras.layers.GRU(rnn_units,
                                   return_sequences=True,
                                   return_state=True)
    self.dense = tf.keras.layers.Dense(vocab_size)

  def call(self, inputs, states=None, return_state=False, training=False):
    x = inputs
    x = self.embedding(x, training=training)
    if states is None:
      states = self.gru.get_initial_state(x)
    x, states = self.gru(x, initial_state=states, training=training)
    x = self.dense(x, training=training)

    if return_state:
      return x, states
    else:
      return x
model = MyModel(
    vocab_size=vocab_size,
    embedding_dim=embedding_dim,
    rnn_units=rnn_units)
对于每个字符,模型都会查找嵌入,使用嵌入作为输入运行 GRU 一次步长,并应用密集层以生成预测下一个字符的 log-likelihood 的 logits
尝试模型
现在运行模型以查看其是否按预期运行。
首先检查输出的形状
for input_example_batch, target_example_batch in dataset.take(1):
    example_batch_predictions = model(input_example_batch)
    print(example_batch_predictions.shape, "# (batch_size, sequence_length, vocab_size)")
在上面的示例中,输入的序列长度为 100,但模型可以在任何长度的输入上运行
model.summary()
要从模型中获取实际预测,您需要从输出分布中采样,以获取实际的字符索引。此分布由字符词汇表上的 logits 定义。
尝试批次中的第一个示例
sampled_indices = tf.random.categorical(example_batch_predictions[0], num_samples=1)
sampled_indices = tf.squeeze(sampled_indices, axis=-1).numpy()
这将在每个时间步长上为我们提供下一个字符索引的预测
sampled_indices
解码这些以查看此未经训练的模型预测的文本
print("Input:\n", text_from_ids(input_example_batch[0]).numpy())
print()
print("Next Char Predictions:\n", text_from_ids(sampled_indices).numpy())
训练模型
此时,问题可以被视为一个标准的分类问题。给定之前的 RNN 状态和本次步长的输入,预测下一个字符的类别。
附加一个优化器和一个损失函数
标准 tf.keras.losses.sparse_categorical_crossentropy 损失函数在这种情况下有效,因为它应用于预测的最后一个维度。
由于您的模型返回 logits,因此您需要设置 from_logits 标志。
loss = tf.losses.SparseCategoricalCrossentropy(from_logits=True)
example_batch_mean_loss = loss(target_example_batch, example_batch_predictions)
print("Prediction shape: ", example_batch_predictions.shape, " # (batch_size, sequence_length, vocab_size)")
print("Mean loss:        ", example_batch_mean_loss)
一个新初始化的模型不应该太自信,输出 logits 应该都具有相似的幅度。为了确认这一点,您可以检查平均损失的指数是否近似等于词汇表的大小。更高的损失意味着模型对其错误答案很自信,并且初始化不佳
tf.exp(example_batch_mean_loss).numpy()
使用 tf.keras.Model.compile 方法配置训练过程。使用具有默认参数的 tf.keras.optimizers.Adam 和损失函数。
model.compile(optimizer='adam', loss=loss)
配置检查点
使用 tf.keras.callbacks.ModelCheckpoint 确保在训练期间保存检查点
# Directory where the checkpoints will be saved
checkpoint_dir = './training_checkpoints'
# Name of the checkpoint files
checkpoint_prefix = os.path.join(checkpoint_dir, "ckpt_{epoch}")

checkpoint_callback = tf.keras.callbacks.ModelCheckpoint(
    filepath=checkpoint_prefix,
    save_weights_only=True)
执行训练
为了使训练时间合理,使用 10 个 epoch 来训练模型。在 Colab 中,将运行时设置为 GPU 以加快训练速度。
EPOCHS = 20
history = model.fit(dataset, epochs=EPOCHS, callbacks=[checkpoint_callback])
生成文本
使用此模型生成文本的最简单方法是在循环中运行它,并在执行它时跟踪模型的内部状态。
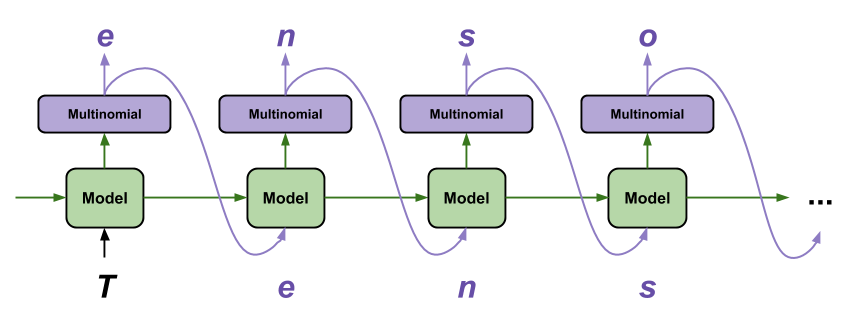
每次调用模型时,您都会传入一些文本和一个内部状态。模型会返回对下一个字符的预测及其新状态。将预测和状态传回以继续生成文本。
以下是执行单步预测的方法
class OneStep(tf.keras.Model):
  def __init__(self, model, chars_from_ids, ids_from_chars, temperature=1.0):
    super().__init__()
    self.temperature = temperature
    self.model = model
    self.chars_from_ids = chars_from_ids
    self.ids_from_chars = ids_from_chars

    # Create a mask to prevent "[UNK]" from being generated.
    skip_ids = self.ids_from_chars(['[UNK]'])[:, None]
    sparse_mask = tf.SparseTensor(
        # Put a -inf at each bad index.
        values=[-float('inf')]*len(skip_ids),
        indices=skip_ids,
        # Match the shape to the vocabulary
        dense_shape=[len(ids_from_chars.get_vocabulary())])
    self.prediction_mask = tf.sparse.to_dense(sparse_mask)

  @tf.function
  def generate_one_step(self, inputs, states=None):
    # Convert strings to token IDs.
    input_chars = tf.strings.unicode_split(inputs, 'UTF-8')
    input_ids = self.ids_from_chars(input_chars).to_tensor()

    # Run the model.
    # predicted_logits.shape is [batch, char, next_char_logits]
    predicted_logits, states = self.model(inputs=input_ids, states=states,
                                          return_state=True)
    # Only use the last prediction.
    predicted_logits = predicted_logits[:, -1, :]
    predicted_logits = predicted_logits/self.temperature
    # Apply the prediction mask: prevent "[UNK]" from being generated.
    predicted_logits = predicted_logits + self.prediction_mask

    # Sample the output logits to generate token IDs.
    predicted_ids = tf.random.categorical(predicted_logits, num_samples=1)
    predicted_ids = tf.squeeze(predicted_ids, axis=-1)

    # Convert from token ids to characters
    predicted_chars = self.chars_from_ids(predicted_ids)

    # Return the characters and model state.
    return predicted_chars, states
one_step_model = OneStep(model, chars_from_ids, ids_from_chars)
在循环中运行它以生成一些文本。查看生成的文本,您会发现模型知道何时大写、制作段落并模仿莎士比亚式的写作词汇。由于训练 epoch 数量很少,它还没有学会形成连贯的句子。
start = time.time()
states = None
next_char = tf.constant(['ROMEO:'])
result = [next_char]

for n in range(1000):
  next_char, states = one_step_model.generate_one_step(next_char, states=states)
  result.append(next_char)

result = tf.strings.join(result)
end = time.time()
print(result[0].numpy().decode('utf-8'), '\n\n' + '_'*80)
print('\nRun time:', end - start)
您可以做到的最简单的事情是延长训练时间(尝试 EPOCHS = 30)。
您还可以尝试不同的起始字符串,尝试添加另一个 RNN 层以提高模型的准确性,或调整温度参数以生成更多或更少的随机预测。
如果您希望模型更快地生成文本,您可以做到的最简单的事情是批处理文本生成。在下面的示例中,模型在生成 1 个输出所需的大致相同时间内生成了 5 个输出。
start = time.time()
states = None
next_char = tf.constant(['ROMEO:', 'ROMEO:', 'ROMEO:', 'ROMEO:', 'ROMEO:'])
result = [next_char]

for n in range(1000):
  next_char, states = one_step_model.generate_one_step(next_char, states=states)
  result.append(next_char)

result = tf.strings.join(result)
end = time.time()
print(result, '\n\n' + '_'*80)
print('\nRun time:', end - start)
导出生成器
此单步模型可以轻松地 保存和恢复,允许您在接受 tf.saved_model 的任何地方使用它。
tf.saved_model.save(one_step_model, 'one_step')
one_step_reloaded = tf.saved_model.load('one_step')
states = None
next_char = tf.constant(['ROMEO:'])
result = [next_char]

for n in range(100):
  next_char, states = one_step_reloaded.generate_one_step(next_char, states=states)
  result.append(next_char)

print(tf.strings.join(result)[0].numpy().decode("utf-8"))
高级:自定义训练
上面的训练过程很简单,但没有给您太多控制权。它使用教师强迫,这可以防止错误预测被反馈到模型中,因此模型永远不会学会从错误中恢复。
因此,既然您已经了解了如何手动运行模型,接下来您将实现训练循环。例如,如果您想实现课程学习以帮助稳定模型的开环输出,这将提供一个起点。
自定义训练循环中最重要的部分是训练步骤函数。
使用 tf.GradientTape 跟踪梯度。您可以通过阅读 急切执行指南 来了解更多有关此方法的信息。
基本过程是
- 在
tf.GradientTape下执行模型并计算损失。 - 计算更新并将它们应用于使用优化器的模型。
class CustomTraining(MyModel):
  @tf.function
  def train_step(self, inputs):
      inputs, labels = inputs
      with tf.GradientTape() as tape:
          predictions = self(inputs, training=True)
          loss = self.loss(labels, predictions)
      grads = tape.gradient(loss, model.trainable_variables)
      self.optimizer.apply_gradients(zip(grads, model.trainable_variables))

      return {'loss': loss}
上面 train_step 方法的实现遵循 Keras 的 train_step 约定。这是可选的,但它允许您更改训练步骤的行为,并仍然使用 keras 的 Model.compile 和 Model.fit 方法。
model = CustomTraining(
    vocab_size=len(ids_from_chars.get_vocabulary()),
    embedding_dim=embedding_dim,
    rnn_units=rnn_units)
model.compile(optimizer = tf.keras.optimizers.Adam(),
              loss=tf.keras.losses.SparseCategoricalCrossentropy(from_logits=True))
model.fit(dataset, epochs=1)
或者,如果您需要更多控制,您可以编写自己的完整自定义训练循环
EPOCHS = 10

mean = tf.metrics.Mean()

for epoch in range(EPOCHS):
    start = time.time()

    mean.reset_states()
    for (batch_n, (inp, target)) in enumerate(dataset):
        logs = model.train_step([inp, target])
        mean.update_state(logs['loss'])

        if batch_n % 50 == 0:
            template = f"Epoch {epoch+1} Batch {batch_n} Loss {logs['loss']:.4f}"
            print(template)

    # saving (checkpoint) the model every 5 epochs
    if (epoch + 1) % 5 == 0:
        model.save_weights(checkpoint_prefix.format(epoch=epoch))

    print()
    print(f'Epoch {epoch+1} Loss: {mean.result().numpy():.4f}')
    print(f'Time taken for 1 epoch {time.time() - start:.2f} sec')
    print("_"*80)

model.save_weights(checkpoint_prefix.format(epoch=epoch))