 在 TensorFlow.org 上查看 在 TensorFlow.org 上查看
|
 在 Google Colab 中运行 在 Google Colab 中运行
|
 在 GitHub 上查看源代码 在 GitHub 上查看源代码
|
 下载笔记本 下载笔记本
|
概述
TFL 预制聚合函数模型是构建 TFL keras.Model 实例以学习复杂聚合函数的快速简便方法。本指南概述了构建 TFL 预制聚合函数模型并对其进行训练/测试所需的步骤。
设置
安装 TF 格子包
pip install --pre -U tensorflow tf-keras tensorflow-lattice pydot graphviz
导入所需的包
import tensorflow as tf

import collections
import logging
import numpy as np
import pandas as pd
import sys
import tensorflow_lattice as tfl
logging.disable(sys.maxsize)
# Use Keras 2.
version_fn = getattr(tf.keras, "version", None)
if version_fn and version_fn().startswith("3."):
  import tf_keras as keras
else:
  keras = tf.keras
下载拼图数据集
train_dataframe = pd.read_csv(
    'https://raw.githubusercontent.com/wbakst/puzzles_data/master/train.csv')
train_dataframe.head()
test_dataframe = pd.read_csv(
    'https://raw.githubusercontent.com/wbakst/puzzles_data/master/test.csv')
test_dataframe.head()
提取和转换特征和标签
# Features:
# - star_rating       rating out of 5 stars (1-5)
# - word_count        number of words in the review
# - is_amazon         1 = reviewed on amazon; 0 = reviewed on artifact website
# - includes_photo    if the review includes a photo of the puzzle
# - num_helpful       number of people that found this review helpful
# - num_reviews       total number of reviews for this puzzle (we construct)
#
# This ordering of feature names will be the exact same order that we construct
# our model to expect.
feature_names = [
    'star_rating', 'word_count', 'is_amazon', 'includes_photo', 'num_helpful',
    'num_reviews'
]
def extract_features(dataframe, label_name):
  # First we extract flattened features.
  flattened_features = {
      feature_name: dataframe[feature_name].values.astype(float)
      for feature_name in feature_names[:-1]
  }

  # Construct mapping from puzzle name to feature.
  star_rating = collections.defaultdict(list)
  word_count = collections.defaultdict(list)
  is_amazon = collections.defaultdict(list)
  includes_photo = collections.defaultdict(list)
  num_helpful = collections.defaultdict(list)
  labels = {}

  # Extract each review.
  for i in range(len(dataframe)):
    row = dataframe.iloc[i]
    puzzle_name = row['puzzle_name']
    star_rating[puzzle_name].append(float(row['star_rating']))
    word_count[puzzle_name].append(float(row['word_count']))
    is_amazon[puzzle_name].append(float(row['is_amazon']))
    includes_photo[puzzle_name].append(float(row['includes_photo']))
    num_helpful[puzzle_name].append(float(row['num_helpful']))
    labels[puzzle_name] = float(row[label_name])

  # Organize data into list of list of features.
  names = list(star_rating.keys())
  star_rating = [star_rating[name] for name in names]
  word_count = [word_count[name] for name in names]
  is_amazon = [is_amazon[name] for name in names]
  includes_photo = [includes_photo[name] for name in names]
  num_helpful = [num_helpful[name] for name in names]
  num_reviews = [[len(ratings)] * len(ratings) for ratings in star_rating]
  labels = [labels[name] for name in names]

  # Flatten num_reviews
  flattened_features['num_reviews'] = [len(reviews) for reviews in num_reviews]

  # Convert data into ragged tensors.
  star_rating = tf.ragged.constant(star_rating)
  word_count = tf.ragged.constant(word_count)
  is_amazon = tf.ragged.constant(is_amazon)
  includes_photo = tf.ragged.constant(includes_photo)
  num_helpful = tf.ragged.constant(num_helpful)
  num_reviews = tf.ragged.constant(num_reviews)
  labels = tf.constant(labels)

  # Now we can return our extracted data.
  return (star_rating, word_count, is_amazon, includes_photo, num_helpful,
          num_reviews), labels, flattened_features
train_xs, train_ys, flattened_features = extract_features(train_dataframe, 'Sales12-18MonthsAgo')
test_xs, test_ys, _ = extract_features(test_dataframe, 'SalesLastSixMonths')
2024-03-23 11:15:20.462626: E external/local_xla/xla/stream_executor/cuda/cuda_driver.cc:282] failed call to cuInit: CUDA_ERROR_NO_DEVICE: no CUDA-capable device is detected
# Let's define our label minimum and maximum.
min_label, max_label = float(np.min(train_ys)), float(np.max(train_ys))
min_label, max_label = float(np.min(train_ys)), float(np.max(train_ys))
设置本指南中用于训练的默认值
LEARNING_RATE = 0.1
BATCH_SIZE = 128
NUM_EPOCHS = 500
MIDDLE_DIM = 3
MIDDLE_LATTICE_SIZE = 2
MIDDLE_KEYPOINTS = 16
OUTPUT_KEYPOINTS = 8
特征配置
使用 tfl.configs.FeatureConfig 设置特征校准和每个特征的配置。特征配置包括单调性约束、每个特征的正则化(参见 tfl.configs.RegularizerConfig)以及格子模型的格子大小。
请注意,我们必须为模型要识别的任何特征完全指定特征配置。否则,模型将无法知道该特征的存在。对于聚合模型,这些特征将自动被视为和处理为不规则的。
计算分位数
虽然 tfl.configs.FeatureConfig 中 pwl_calibration_input_keypoints 的默认设置为“分位数”,但对于预制模型,我们必须手动定义输入关键点。为此,我们首先定义自己的辅助函数来计算分位数。
def compute_quantiles(features,
                      num_keypoints=10,
                      clip_min=None,
                      clip_max=None,
                      missing_value=None):
  # Clip min and max if desired.
  if clip_min is not None:
    features = np.maximum(features, clip_min)
    features = np.append(features, clip_min)
  if clip_max is not None:
    features = np.minimum(features, clip_max)
    features = np.append(features, clip_max)
  # Make features unique.
  unique_features = np.unique(features)
  # Remove missing values if specified.
  if missing_value is not None:
    unique_features = np.delete(unique_features,
                                np.where(unique_features == missing_value))
  # Compute and return quantiles over unique non-missing feature values.
  return np.quantile(
      unique_features,
      np.linspace(0., 1., num=num_keypoints),
      interpolation='nearest').astype(float)
定义我们的特征配置
现在我们能够计算分位数,我们可以为模型要作为输入的每个特征定义一个特征配置。
# Feature configs are used to specify how each feature is calibrated and used.
feature_configs = [
    tfl.configs.FeatureConfig(
        name='star_rating',
        lattice_size=2,
        monotonicity='increasing',
        pwl_calibration_num_keypoints=5,
        pwl_calibration_input_keypoints=compute_quantiles(
            flattened_features['star_rating'], num_keypoints=5),
    ),
    tfl.configs.FeatureConfig(
        name='word_count',
        lattice_size=2,
        monotonicity='increasing',
        pwl_calibration_num_keypoints=5,
        pwl_calibration_input_keypoints=compute_quantiles(
            flattened_features['word_count'], num_keypoints=5),
    ),
    tfl.configs.FeatureConfig(
        name='is_amazon',
        lattice_size=2,
        num_buckets=2,
    ),
    tfl.configs.FeatureConfig(
        name='includes_photo',
        lattice_size=2,
        num_buckets=2,
    ),
    tfl.configs.FeatureConfig(
        name='num_helpful',
        lattice_size=2,
        monotonicity='increasing',
        pwl_calibration_num_keypoints=5,
        pwl_calibration_input_keypoints=compute_quantiles(
            flattened_features['num_helpful'], num_keypoints=5),
        # Larger num_helpful indicating more trust in star_rating.
        reflects_trust_in=[
            tfl.configs.TrustConfig(
                feature_name="star_rating", trust_type="trapezoid"),
        ],
    ),
    tfl.configs.FeatureConfig(
        name='num_reviews',
        lattice_size=2,
        monotonicity='increasing',
        pwl_calibration_num_keypoints=5,
        pwl_calibration_input_keypoints=compute_quantiles(
            flattened_features['num_reviews'], num_keypoints=5),
    )
]
/tmpfs/tmp/ipykernel_9889/285458577.py:8: DeprecationWarning: the `interpolation=` argument to quantile was renamed to `method=`, which has additional options.
Users of the modes 'nearest', 'lower', 'higher', or 'midpoint' are encouraged to review the method they used. (Deprecated NumPy 1.22)
  pwl_calibration_input_keypoints=compute_quantiles(
/tmpfs/tmp/ipykernel_9889/285458577.py:16: DeprecationWarning: the `interpolation=` argument to quantile was renamed to `method=`, which has additional options.
Users of the modes 'nearest', 'lower', 'higher', or 'midpoint' are encouraged to review the method they used. (Deprecated NumPy 1.22)
  pwl_calibration_input_keypoints=compute_quantiles(
/tmpfs/tmp/ipykernel_9889/285458577.py:34: DeprecationWarning: the `interpolation=` argument to quantile was renamed to `method=`, which has additional options.
Users of the modes 'nearest', 'lower', 'higher', or 'midpoint' are encouraged to review the method they used. (Deprecated NumPy 1.22)
  pwl_calibration_input_keypoints=compute_quantiles(
/tmpfs/tmp/ipykernel_9889/285458577.py:47: DeprecationWarning: the `interpolation=` argument to quantile was renamed to `method=`, which has additional options.
Users of the modes 'nearest', 'lower', 'higher', or 'midpoint' are encouraged to review the method they used. (Deprecated NumPy 1.22)
  pwl_calibration_input_keypoints=compute_quantiles(
聚合函数模型
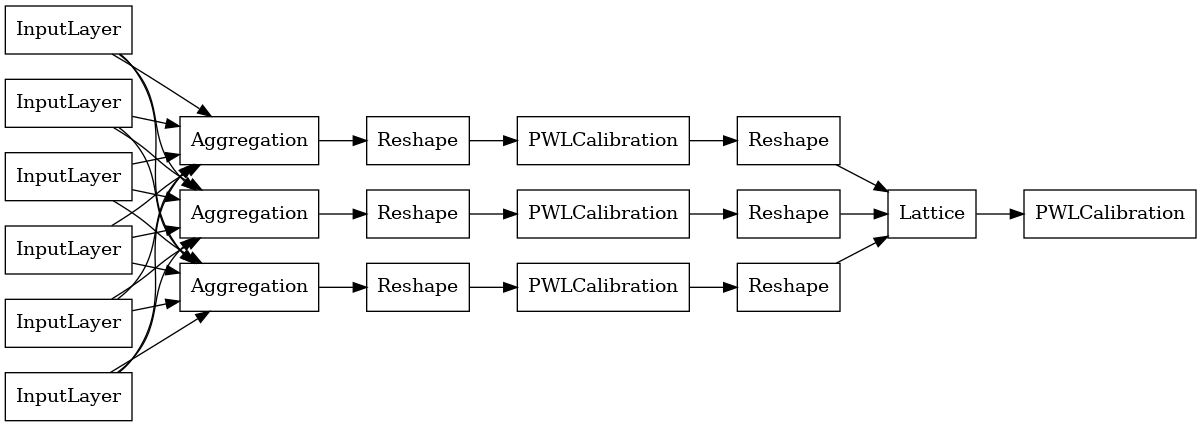
要构建 TFL 预制模型,首先从 tfl.configs 中构建模型配置。聚合函数模型是使用 tfl.configs.AggregateFunctionConfig 构建的。它应用分段线性校准和分类校准,然后在不规则输入的每个维度上应用格子模型。然后,它在每个维度的输出上应用聚合层。之后,可以选择应用输出分段线性校准。
# Model config defines the model structure for the aggregate function model.
aggregate_function_model_config = tfl.configs.AggregateFunctionConfig(
    feature_configs=feature_configs,
    middle_dimension=MIDDLE_DIM,
    middle_lattice_size=MIDDLE_LATTICE_SIZE,
    middle_calibration=True,
    middle_calibration_num_keypoints=MIDDLE_KEYPOINTS,
    middle_monotonicity='increasing',
    output_min=min_label,
    output_max=max_label,
    output_calibration=True,
    output_calibration_num_keypoints=OUTPUT_KEYPOINTS,
    output_initialization=np.linspace(
        min_label, max_label, num=OUTPUT_KEYPOINTS))
# An AggregateFunction premade model constructed from the given model config.
aggregate_function_model = tfl.premade.AggregateFunction(
    aggregate_function_model_config)
# Let's plot our model.
keras.utils.plot_model(
    aggregate_function_model, show_layer_names=False, rankdir='LR')

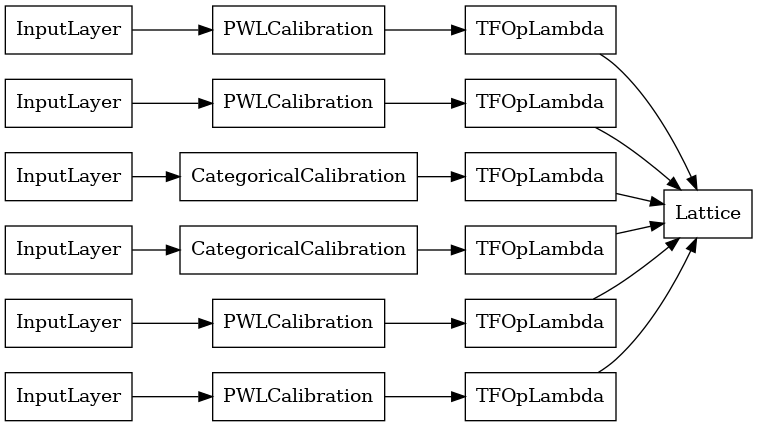
每个聚合层的输出是经过校准的格子在不规则输入上的平均输出。以下是第一个聚合层内部使用的模型
aggregation_layers = [
    layer for layer in aggregate_function_model.layers
    if isinstance(layer, tfl.layers.Aggregation)
]
keras.utils.plot_model(
    aggregation_layers[0].model, show_layer_names=False, rankdir='LR')

现在,与任何其他 keras.Model 一样,我们编译模型并将其拟合到我们的数据。
aggregate_function_model.compile(
    loss='mae',
    optimizer=keras.optimizers.Adam(LEARNING_RATE))
aggregate_function_model.fit(
    train_xs, train_ys, epochs=NUM_EPOCHS, batch_size=BATCH_SIZE, verbose=False)
<tf_keras.src.callbacks.History at 0x7ff66c544700>
训练完模型后,我们可以在测试集上对其进行评估。
print('Test Set Evaluation...')
print(aggregate_function_model.evaluate(test_xs, test_ys))
Test Set Evaluation...
7/7 [==============================] - 2s 3ms/step - loss: 47.7068
47.70683670043945
