 在 TensorFlow.org 上查看 在 TensorFlow.org 上查看
|
 在 Google Colab 中运行 在 Google Colab 中运行
|
 在 GitHub 上查看源代码 在 GitHub 上查看源代码
|
 下载笔记本 下载笔记本
|
本教程构建了一个量子神经网络 (QNN) 来对 MNIST 的简化版本进行分类,类似于 Farhi 等人 使用的方法。将量子神经网络在该经典数据问题上的性能与经典神经网络进行了比较。
设置
pip install tensorflow==2.15.0
安装 TensorFlow Quantum
pip install tensorflow-quantum==0.7.3
# Update package resources to account for version changes.
import importlib, pkg_resources
importlib.reload(pkg_resources)
/tmpfs/tmp/ipykernel_23360/1875984233.py:2: DeprecationWarning: pkg_resources is deprecated as an API. See https://setuptools.pypa.io/en/latest/pkg_resources.html
  import importlib, pkg_resources
<module 'pkg_resources' from '/tmpfs/src/tf_docs_env/lib/python3.9/site-packages/pkg_resources/__init__.py'>
现在导入 TensorFlow 和模块依赖项
import tensorflow as tf
import tensorflow_quantum as tfq

import cirq
import sympy
import numpy as np
import seaborn as sns
import collections

# visualization tools
%matplotlib inline
import matplotlib.pyplot as plt
from cirq.contrib.svg import SVGCircuit
2024-05-18 11:39:20.065737: E external/local_xla/xla/stream_executor/cuda/cuda_dnn.cc:9261] Unable to register cuDNN factory: Attempting to register factory for plugin cuDNN when one has already been registered
2024-05-18 11:39:20.065786: E external/local_xla/xla/stream_executor/cuda/cuda_fft.cc:607] Unable to register cuFFT factory: Attempting to register factory for plugin cuFFT when one has already been registered
2024-05-18 11:39:20.067281: E external/local_xla/xla/stream_executor/cuda/cuda_blas.cc:1515] Unable to register cuBLAS factory: Attempting to register factory for plugin cuBLAS when one has already been registered
2024-05-18 11:39:23.413260: E external/local_xla/xla/stream_executor/cuda/cuda_driver.cc:274] failed call to cuInit: CUDA_ERROR_NO_DEVICE: no CUDA-capable device is detected
1. 加载数据
在本教程中,您将构建一个二进制分类器来区分数字 3 和 6,按照 Farhi 等人 的方法。本节介绍了数据处理,该处理
- 从 Keras 加载原始数据。
- 将数据集筛选为仅包含 3 和 6。
- 缩小图像尺寸,以便它们适合量子计算机。
- 删除任何矛盾的示例。
- 将二进制图像转换为 Cirq 电路。
- 将 Cirq 电路转换为 TensorFlow Quantum 电路。
1.1 加载原始数据
加载与 Keras 一起分发的 MNIST 数据集。
(x_train, y_train), (x_test, y_test) = tf.keras.datasets.mnist.load_data()

# Rescale the images from [0,255] to the [0.0,1.0] range.
x_train, x_test = x_train[..., np.newaxis]/255.0, x_test[..., np.newaxis]/255.0

print("Number of original training examples:", len(x_train))
print("Number of original test examples:", len(x_test))
Downloading data from https://storage.googleapis.com/tensorflow/tf-keras-datasets/mnist.npz
11490434/11490434 [==============================] - 0s 0us/step
Number of original training examples: 60000
Number of original test examples: 10000
将数据集筛选为仅保留 3 和 6,删除其他类别。同时将标签 y 转换为布尔值:对于 3 为 True,对于 6 为 False。
def filter_36(x, y):
    keep = (y == 3) | (y == 6)
    x, y = x[keep], y[keep]
    y = y == 3
    return x,y
x_train, y_train = filter_36(x_train, y_train)
x_test, y_test = filter_36(x_test, y_test)

print("Number of filtered training examples:", len(x_train))
print("Number of filtered test examples:", len(x_test))
Number of filtered training examples: 12049
Number of filtered test examples: 1968
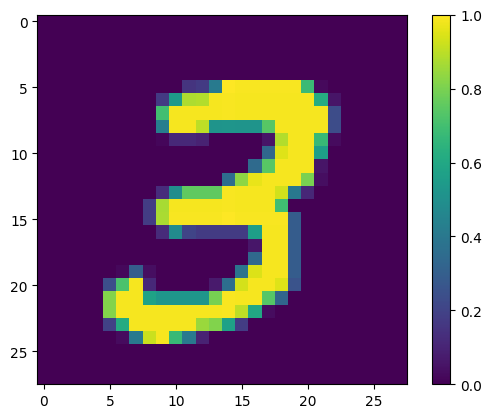
显示第一个示例
print(y_train[0])

plt.imshow(x_train[0, :, :, 0])
plt.colorbar()
True
<matplotlib.colorbar.Colorbar at 0x7f68721d07f0>

1.2 缩小图像尺寸
28x28 的图像尺寸对于当前的量子计算机来说太大了。将图像尺寸缩小到 4x4
x_train_small = tf.image.resize(x_train, (4,4)).numpy()
x_test_small = tf.image.resize(x_test, (4,4)).numpy()
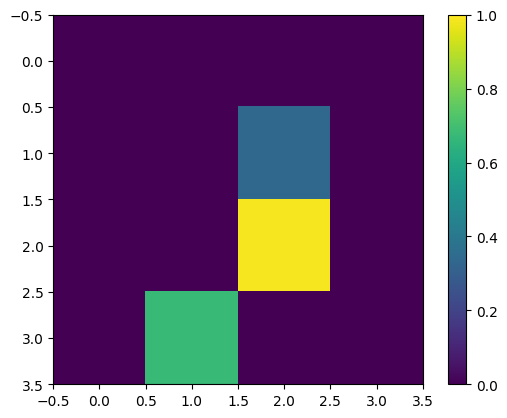
再次显示第一个训练示例 - 调整尺寸后
print(y_train[0])

plt.imshow(x_train_small[0,:,:,0], vmin=0, vmax=1)
plt.colorbar()
True
<matplotlib.colorbar.Colorbar at 0x7f6872141ca0>

1.3 删除矛盾的示例
从 Farhi 等人 的3.3 学习区分数字部分,筛选数据集以删除标记为属于两个类别的图像。
这不是标准机器学习过程,但为了遵循论文,将其包括在内。
def remove_contradicting(xs, ys):
    mapping = collections.defaultdict(set)
    orig_x = {}
    # Determine the set of labels for each unique image:
    for x,y in zip(xs,ys):
       orig_x[tuple(x.flatten())] = x
       mapping[tuple(x.flatten())].add(y)

    new_x = []
    new_y = []
    for flatten_x in mapping:
      x = orig_x[flatten_x]
      labels = mapping[flatten_x]
      if len(labels) == 1:
          new_x.append(x)
          new_y.append(next(iter(labels)))
      else:
          # Throw out images that match more than one label.
          pass

    num_uniq_3 = sum(1 for value in mapping.values() if len(value) == 1 and True in value)
    num_uniq_6 = sum(1 for value in mapping.values() if len(value) == 1 and False in value)
    num_uniq_both = sum(1 for value in mapping.values() if len(value) == 2)

    print("Number of unique images:", len(mapping.values()))
    print("Number of unique 3s: ", num_uniq_3)
    print("Number of unique 6s: ", num_uniq_6)
    print("Number of unique contradicting labels (both 3 and 6): ", num_uniq_both)
    print()
    print("Initial number of images: ", len(xs))
    print("Remaining non-contradicting unique images: ", len(new_x))

    return np.array(new_x), np.array(new_y)
结果计数与报告的值不完全匹配,但未指定确切过程。
还值得注意的是,在此处应用过滤矛盾示例并不能完全阻止模型接收矛盾的训练示例:下一步将数据二进制化,这将导致更多冲突。
x_train_nocon, y_train_nocon = remove_contradicting(x_train_small, y_train)
Number of unique images: 10387
Number of unique 3s:  4912
Number of unique 6s:  5426
Number of unique contradicting labels (both 3 and 6):  49

Initial number of images:  12049
Remaining non-contradicting unique images:  10338
1.4 将数据编码为量子电路
为了使用量子计算机处理图像,Farhi 等人 提议用量子比特表示每个像素,其状态取决于像素的值。第一步是转换为二进制编码。
THRESHOLD = 0.5

x_train_bin = np.array(x_train_nocon > THRESHOLD, dtype=np.float32)
x_test_bin = np.array(x_test_small > THRESHOLD, dtype=np.float32)
如果你此时删除矛盾的图像,你将只剩下 193 个图像,可能不足以进行有效训练。
_ = remove_contradicting(x_train_bin, y_train_nocon)
Number of unique images: 193
Number of unique 3s:  80
Number of unique 6s:  69
Number of unique contradicting labels (both 3 and 6):  44

Initial number of images:  10338
Remaining non-contradicting unique images:  149
像素索引上的量子比特的值超过阈值,通过 \(X\) 门旋转。
def convert_to_circuit(image):
    """Encode truncated classical image into quantum datapoint."""
    values = np.ndarray.flatten(image)
    qubits = cirq.GridQubit.rect(4, 4)
    circuit = cirq.Circuit()
    for i, value in enumerate(values):
        if value:
            circuit.append(cirq.X(qubits[i]))
    return circuit


x_train_circ = [convert_to_circuit(x) for x in x_train_bin]
x_test_circ = [convert_to_circuit(x) for x in x_test_bin]
这是为第一个示例创建的电路(电路图不显示具有零门的量子比特)
SVGCircuit(x_train_circ[0])
findfont: Font family 'Arial' not found.
findfont: Font family 'Arial' not found.
findfont: Font family 'Arial' not found.
findfont: Font family 'Arial' not found.
将此电路与图像值超过阈值的索引进行比较
bin_img = x_train_bin[0,:,:,0]
indices = np.array(np.where(bin_img)).T
indices
array([[2, 2],
       [3, 1]])
将这些 Cirq 电路转换为张量,用于 tfq
x_train_tfcirc = tfq.convert_to_tensor(x_train_circ)
x_test_tfcirc = tfq.convert_to_tensor(x_test_circ)
2. 量子神经网络
对于用于对图像进行分类的量子电路结构几乎没有指导。由于分类基于读出量子比特的期望,Farhi 等人 提议使用两个量子比特门,其中读出量子比特始终受到作用。这在某些方面类似于在像素上运行小型 酉 RNN。
2.1 构建模型电路
以下示例显示了这种分层方法。每一层使用相同门的 n 个实例,每个数据量子比特作用于读出量子比特。
从一个简单的类开始,它将一层这些门添加到电路中
class CircuitLayerBuilder():
    def __init__(self, data_qubits, readout):
        self.data_qubits = data_qubits
        self.readout = readout

    def add_layer(self, circuit, gate, prefix):
        for i, qubit in enumerate(self.data_qubits):
            symbol = sympy.Symbol(prefix + '-' + str(i))
            circuit.append(gate(qubit, self.readout)**symbol)
构建一个示例电路层以查看其外观
demo_builder = CircuitLayerBuilder(data_qubits = cirq.GridQubit.rect(4,1),
                                   readout=cirq.GridQubit(-1,-1))

circuit = cirq.Circuit()
demo_builder.add_layer(circuit, gate = cirq.XX, prefix='xx')
SVGCircuit(circuit)
findfont: Font family 'Arial' not found.
findfont: Font family 'Arial' not found.
findfont: Font family 'Arial' not found.
findfont: Font family 'Arial' not found.
findfont: Font family 'Arial' not found.
findfont: Font family 'Arial' not found.
findfont: Font family 'Arial' not found.
findfont: Font family 'Arial' not found.
findfont: Font family 'Arial' not found.
findfont: Font family 'Arial' not found.
findfont: Font family 'Arial' not found.
findfont: Font family 'Arial' not found.
findfont: Font family 'Arial' not found.
现在构建一个两层模型,匹配数据电路大小,并包括准备和读出操作。
def create_quantum_model():
    """Create a QNN model circuit and readout operation to go along with it."""
    data_qubits = cirq.GridQubit.rect(4, 4)  # a 4x4 grid.
    readout = cirq.GridQubit(-1, -1)         # a single qubit at [-1,-1]
    circuit = cirq.Circuit()

    # Prepare the readout qubit.
    circuit.append(cirq.X(readout))
    circuit.append(cirq.H(readout))

    builder = CircuitLayerBuilder(
        data_qubits = data_qubits,
        readout=readout)

    # Then add layers (experiment by adding more).
    builder.add_layer(circuit, cirq.XX, "xx1")
    builder.add_layer(circuit, cirq.ZZ, "zz1")

    # Finally, prepare the readout qubit.
    circuit.append(cirq.H(readout))

    return circuit, cirq.Z(readout)
model_circuit, model_readout = create_quantum_model()
2.2 将模型电路包装在 tfq-keras 模型中
使用量子组件构建 Keras 模型。此模型从 x_train_circ 中馈入“量子数据”,该数据对经典数据进行编码。它使用参数化量子电路层 tfq.layers.PQC,在量子数据上训练模型电路。
为了对这些图像进行分类,Farhi 等人 提议对参数化电路中的读出量子比特的期望值进行取值。期望值返回 1 到 -1 之间的值。
# Build the Keras model.
model = tf.keras.Sequential([
    # The input is the data-circuit, encoded as a tf.string
    tf.keras.layers.Input(shape=(), dtype=tf.string),
    # The PQC layer returns the expected value of the readout gate, range [-1,1].
    tfq.layers.PQC(model_circuit, model_readout),
])
接下来,使用 compile 方法向模型描述训练过程。
由于期望的读出值在 [-1,1] 范围内,因此优化铰链损失函数是一个比较自然的拟合。
要在此处使用铰链损失函数,您需要进行两处小调整。首先,将标签 y_train_nocon 从布尔值转换为 [-1,1],以符合铰链损失函数的期望。
y_train_hinge = 2.0*y_train_nocon-1.0
y_test_hinge = 2.0*y_test-1.0
其次,使用自定义 hinge_accuracy 指标,该指标正确处理 [-1, 1] 作为 y_true 标签参数。 tf.losses.BinaryAccuracy(threshold=0.0) 期望 y_true 为布尔值,因此不能与铰链损失函数一起使用)。
def hinge_accuracy(y_true, y_pred):
    y_true = tf.squeeze(y_true) > 0.0
    y_pred = tf.squeeze(y_pred) > 0.0
    result = tf.cast(y_true == y_pred, tf.float32)

    return tf.reduce_mean(result)
model.compile(
    loss=tf.keras.losses.Hinge(),
    optimizer=tf.keras.optimizers.Adam(),
    metrics=[hinge_accuracy])
print(model.summary())
Model: "sequential"
_________________________________________________________________
 Layer (type)                Output Shape              Param #
=================================================================
 pqc (PQC)                   (None, 1)                 32

=================================================================
Total params: 32 (128.00 Byte)
Trainable params: 32 (128.00 Byte)
Non-trainable params: 0 (0.00 Byte)
_________________________________________________________________
None
训练量子模型
现在训练模型,这需要大约 45 分钟。如果您不想等待这么长时间,请使用一小部分数据(将 NUM_EXAMPLES=500 设置为以下值)。这实际上不会影响模型在训练期间的进度(它只有 32 个参数,并且不需要太多数据来限制这些参数)。使用较少的示例只会使训练结束得更早(5 分钟),但运行时间足够长,可以表明它正在验证日志中取得进展。
EPOCHS = 3
BATCH_SIZE = 32

NUM_EXAMPLES = len(x_train_tfcirc)
x_train_tfcirc_sub = x_train_tfcirc[:NUM_EXAMPLES]
y_train_hinge_sub = y_train_hinge[:NUM_EXAMPLES]
将此模型训练到收敛应该可以在测试集上达到 >85% 的准确率。
qnn_history = model.fit(
      x_train_tfcirc_sub, y_train_hinge_sub,
      batch_size=32,
      epochs=EPOCHS,
      verbose=1,
      validation_data=(x_test_tfcirc, y_test_hinge))

qnn_results = model.evaluate(x_test_tfcirc, y_test)
Epoch 1/3
324/324 [==============================] - 56s 172ms/step - loss: 0.7905 - hinge_accuracy: 0.6830 - val_loss: 0.4799 - val_hinge_accuracy: 0.7666
Epoch 2/3
324/324 [==============================] - 55s 171ms/step - loss: 0.4111 - hinge_accuracy: 0.8091 - val_loss: 0.3706 - val_hinge_accuracy: 0.8266
Epoch 3/3
324/324 [==============================] - 55s 171ms/step - loss: 0.3588 - hinge_accuracy: 0.8801 - val_loss: 0.3472 - val_hinge_accuracy: 0.9042
62/62 [==============================] - 2s 32ms/step - loss: 0.3472 - hinge_accuracy: 0.9042
3. 经典神经网络
虽然量子神经网络适用于这个简化的 MNIST 问题,但基本的经典神经网络可以轻松地在这个任务上优于 QNN。在一个 epoch 之后,经典神经网络可以在保留集中达到 >98% 的准确率。
在以下示例中,经典神经网络用于 3-6 分类问题,使用整个 28x28 图像,而不是对图像进行子采样。这很容易收敛到测试集的近 100% 的准确率。
def create_classical_model():
    # A simple model based off LeNet from https://keras.org.cn/examples/mnist_cnn/
    model = tf.keras.Sequential()
    model.add(tf.keras.layers.Conv2D(32, [3, 3], activation='relu', input_shape=(28,28,1)))
    model.add(tf.keras.layers.Conv2D(64, [3, 3], activation='relu'))
    model.add(tf.keras.layers.MaxPooling2D(pool_size=(2, 2)))
    model.add(tf.keras.layers.Dropout(0.25))
    model.add(tf.keras.layers.Flatten())
    model.add(tf.keras.layers.Dense(128, activation='relu'))
    model.add(tf.keras.layers.Dropout(0.5))
    model.add(tf.keras.layers.Dense(1))
    return model


model = create_classical_model()
model.compile(loss=tf.keras.losses.BinaryCrossentropy(from_logits=True),
              optimizer=tf.keras.optimizers.Adam(),
              metrics=['accuracy'])

model.summary()
Model: "sequential_1"
_________________________________________________________________
 Layer (type)                Output Shape              Param #
=================================================================
 conv2d (Conv2D)             (None, 26, 26, 32)        320

 conv2d_1 (Conv2D)           (None, 24, 24, 64)        18496

 max_pooling2d (MaxPooling2  (None, 12, 12, 64)        0
 D)

 dropout (Dropout)           (None, 12, 12, 64)        0

 flatten (Flatten)           (None, 9216)              0

 dense (Dense)               (None, 128)               1179776

 dropout_1 (Dropout)         (None, 128)               0

 dense_1 (Dense)             (None, 1)                 129

=================================================================
Total params: 1198721 (4.57 MB)
Trainable params: 1198721 (4.57 MB)
Non-trainable params: 0 (0.00 Byte)
_________________________________________________________________
model.fit(x_train,
          y_train,
          batch_size=128,
          epochs=1,
          verbose=1,
          validation_data=(x_test, y_test))

cnn_results = model.evaluate(x_test, y_test)
95/95 [==============================] - 3s 27ms/step - loss: 0.0440 - accuracy: 0.9839 - val_loss: 0.0025 - val_accuracy: 0.9995
62/62 [==============================] - 0s 3ms/step - loss: 0.0025 - accuracy: 0.9995
上述模型有近 120 万个参数。为了进行更公平的比较,请在子采样图像上尝试一个 37 参数模型
def create_fair_classical_model():
    # A simple model based off LeNet from https://keras.org.cn/examples/mnist_cnn/
    model = tf.keras.Sequential()
    model.add(tf.keras.layers.Flatten(input_shape=(4,4,1)))
    model.add(tf.keras.layers.Dense(2, activation='relu'))
    model.add(tf.keras.layers.Dense(1))
    return model


model = create_fair_classical_model()
model.compile(loss=tf.keras.losses.BinaryCrossentropy(from_logits=True),
              optimizer=tf.keras.optimizers.Adam(),
              metrics=['accuracy'])

model.summary()
Model: "sequential_2"
_________________________________________________________________
 Layer (type)                Output Shape              Param #
=================================================================
 flatten_1 (Flatten)         (None, 16)                0

 dense_2 (Dense)             (None, 2)                 34

 dense_3 (Dense)             (None, 1)                 3

=================================================================
Total params: 37 (148.00 Byte)
Trainable params: 37 (148.00 Byte)
Non-trainable params: 0 (0.00 Byte)
_________________________________________________________________
model.fit(x_train_bin,
          y_train_nocon,
          batch_size=128,
          epochs=20,
          verbose=2,
          validation_data=(x_test_bin, y_test))

fair_nn_results = model.evaluate(x_test_bin, y_test)
Epoch 1/20
81/81 - 1s - loss: 0.7028 - accuracy: 0.4897 - val_loss: 0.6585 - val_accuracy: 0.4949 - 782ms/epoch - 10ms/step
Epoch 2/20
81/81 - 0s - loss: 0.6561 - accuracy: 0.5311 - val_loss: 0.6067 - val_accuracy: 0.4990 - 124ms/epoch - 2ms/step
Epoch 3/20
81/81 - 0s - loss: 0.5895 - accuracy: 0.5903 - val_loss: 0.5275 - val_accuracy: 0.6489 - 119ms/epoch - 1ms/step
Epoch 4/20
81/81 - 0s - loss: 0.5095 - accuracy: 0.7001 - val_loss: 0.4511 - val_accuracy: 0.7571 - 121ms/epoch - 1ms/step
Epoch 5/20
81/81 - 0s - loss: 0.4385 - accuracy: 0.7760 - val_loss: 0.3908 - val_accuracy: 0.7749 - 122ms/epoch - 2ms/step
Epoch 6/20
81/81 - 0s - loss: 0.3836 - accuracy: 0.8060 - val_loss: 0.3461 - val_accuracy: 0.8272 - 120ms/epoch - 1ms/step
Epoch 7/20
81/81 - 0s - loss: 0.3428 - accuracy: 0.8214 - val_loss: 0.3130 - val_accuracy: 0.8430 - 119ms/epoch - 1ms/step
Epoch 8/20
81/81 - 0s - loss: 0.3128 - accuracy: 0.8590 - val_loss: 0.2893 - val_accuracy: 0.8674 - 119ms/epoch - 1ms/step
Epoch 9/20
81/81 - 0s - loss: 0.2907 - accuracy: 0.8692 - val_loss: 0.2719 - val_accuracy: 0.8684 - 117ms/epoch - 1ms/step
Epoch 10/20
81/81 - 0s - loss: 0.2745 - accuracy: 0.8716 - val_loss: 0.2590 - val_accuracy: 0.8679 - 117ms/epoch - 1ms/step
Epoch 11/20
81/81 - 0s - loss: 0.2624 - accuracy: 0.8721 - val_loss: 0.2494 - val_accuracy: 0.8679 - 122ms/epoch - 2ms/step
Epoch 12/20
81/81 - 0s - loss: 0.2533 - accuracy: 0.8734 - val_loss: 0.2421 - val_accuracy: 0.8694 - 122ms/epoch - 2ms/step
Epoch 13/20
81/81 - 0s - loss: 0.2462 - accuracy: 0.8753 - val_loss: 0.2367 - val_accuracy: 0.8694 - 122ms/epoch - 2ms/step
Epoch 14/20
81/81 - 0s - loss: 0.2408 - accuracy: 0.8782 - val_loss: 0.2323 - val_accuracy: 0.8709 - 120ms/epoch - 1ms/step
Epoch 15/20
81/81 - 0s - loss: 0.2366 - accuracy: 0.8793 - val_loss: 0.2292 - val_accuracy: 0.8709 - 116ms/epoch - 1ms/step
Epoch 16/20
81/81 - 0s - loss: 0.2334 - accuracy: 0.8794 - val_loss: 0.2270 - val_accuracy: 0.8709 - 117ms/epoch - 1ms/step
Epoch 17/20
81/81 - 0s - loss: 0.2309 - accuracy: 0.8790 - val_loss: 0.2249 - val_accuracy: 0.8709 - 117ms/epoch - 1ms/step
Epoch 18/20
81/81 - 0s - loss: 0.2288 - accuracy: 0.8853 - val_loss: 0.2233 - val_accuracy: 0.9177 - 121ms/epoch - 1ms/step
Epoch 19/20
81/81 - 0s - loss: 0.2271 - accuracy: 0.8934 - val_loss: 0.2225 - val_accuracy: 0.8664 - 121ms/epoch - 1ms/step
Epoch 20/20
81/81 - 0s - loss: 0.2257 - accuracy: 0.8996 - val_loss: 0.2213 - val_accuracy: 0.9141 - 122ms/epoch - 2ms/step
62/62 [==============================] - 0s 1ms/step - loss: 0.2213 - accuracy: 0.9141
4. 比较
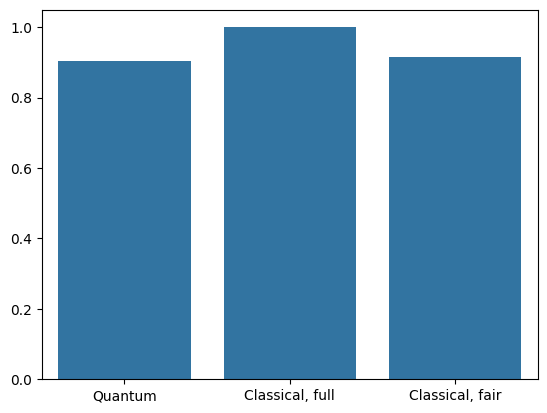
更高的分辨率输入和更强大的模型使 CNN 轻松解决此问题。而类似功能(~32 个参数)的经典模型在极短的时间内训练到类似的准确度。无论哪种方式,经典神经网络都轻松胜过量子神经网络。对于经典数据,很难胜过经典神经网络。
qnn_accuracy = qnn_results[1]
cnn_accuracy = cnn_results[1]
fair_nn_accuracy = fair_nn_results[1]

sns.barplot(x=["Quantum", "Classical, full", "Classical, fair"],
            y=[qnn_accuracy, cnn_accuracy, fair_nn_accuracy])
<Axes: >

