 在 TensorFlow.org 上查看 在 TensorFlow.org 上查看
|
 在 Google Colab 中运行 在 Google Colab 中运行
|
 在 GitHub 上查看源代码 在 GitHub 上查看源代码
|
 下载笔记本 下载笔记本
|
从您的模型中结构化剪枝权重以使其在特定模式下稀疏,可以借助适当的硬件支持加速模型推理时间。
本教程将向您展示如何
- 在 mnist 数据集上定义和训练具有特定结构化稀疏性的模型
- 将剪枝后的模型转换为 tflite 格式
- 可视化剪枝后的权重的结构
有关模型优化剪枝技术的概述,请参阅 剪枝概述。有关一般权重剪枝的教程,请参阅 Keras 中的剪枝。
权重的结构化剪枝
结构化剪枝在训练过程开始时系统地将模型权重归零。您可以将这种剪枝技术应用于规则的权重块,以加快支持硬件上的推理速度,例如:将模型中的权重分组为四个块,并将每个块中的两个权重归零,称为2 比 4 缩减。此技术仅适用于 TensorFlow Lite 转换的模型的权重张量的最后一个维度。例如,TensorFlow Lite 中的 Conv2D 层权重具有结构 [channel_out, height, width, channel_in],而 Dense 层权重具有结构 [channel_out, channel_in]。稀疏性模式应用于最后一个维度的权重:channel_in。
与随机稀疏性相比,结构化稀疏性通常由于结构限制而导致精度较低,但它可以在支持的硬件上显着减少推理时间。
剪枝可以与其他模型压缩技术一起应用于模型,以获得更好的压缩率。有关详细信息,请参阅 协作优化技术 中的量化和聚类示例。
设置
准备您的开发环境和数据。
pip install -q tensorflowpip install -q tensorflow-model-optimizationpip install -q matplotlib
import tensorflow as tf
from tensorflow import keras

import tensorflow_model_optimization as tfmot
prune_low_magnitude = tfmot.sparsity.keras.prune_low_magnitude
从 MNIST 数据集中下载并规范化图像数据
# Load MNIST dataset.
mnist = keras.datasets.mnist
(train_images, train_labels), (test_images, test_labels) = mnist.load_data()

# Normalize the input image so that each pixel value is between 0 and 1.
train_images = train_images / 255.0
test_images = test_images / 255.0
定义结构化剪枝参数
定义剪枝参数并指定结构化剪枝的类型。将剪枝参数设置为 (2, 4)。这些设置意味着在一个包含四个元素的块中,至少将两个幅度最小的元素设置为零。
您无需设置 pruning_schedule 参数。默认情况下,剪枝掩码在第一步定义,并且在训练期间不会更新。
pruning_params_2_by_4 = {
    'sparsity_m_by_n': (2, 4),
}
定义具有 50% 目标稀疏性的随机剪枝参数。
pruning_params_sparsity_0_5 = {
    'pruning_schedule': tfmot.sparsity.keras.ConstantSparsity(target_sparsity=0.5,
                                                              begin_step=0,
                                                              frequency=100)
}
定义模型架构并指定要剪枝的层。结构化剪枝是根据您选择的模型层应用的。
在下面的示例中,我们只剪枝了一些层。我们剪枝了第二个 Conv2D 层和第一个 Dense 层。
请注意,第一个 Conv2D 层无法进行结构化剪枝。要进行结构化剪枝,它应该具有多个输入通道。相反,我们使用随机剪枝来剪枝第一个 Conv2D 层。
model = keras.Sequential([
    prune_low_magnitude(
        keras.layers.Conv2D(
            32, 5, padding='same', activation='relu',
            input_shape=(28, 28, 1),
            name="pruning_sparsity_0_5"),
        **pruning_params_sparsity_0_5),
    keras.layers.MaxPooling2D((2, 2), (2, 2), padding='same'),
    prune_low_magnitude(
        keras.layers.Conv2D(
            64, 5, padding='same',
            name="structural_pruning"),
        **pruning_params_2_by_4),
    keras.layers.BatchNormalization(),
    keras.layers.ReLU(),
    keras.layers.MaxPooling2D((2, 2), (2, 2), padding='same'),
    keras.layers.Flatten(),
    prune_low_magnitude(
        keras.layers.Dense(
            1024, activation='relu',
            name="structural_pruning_dense"),
        **pruning_params_2_by_4),
    keras.layers.Dropout(0.4),
    keras.layers.Dense(10)
])

model.compile(optimizer='adam',
              loss=keras.losses.SparseCategoricalCrossentropy(from_logits=True),
              metrics=['accuracy'])

model.summary()
2024-03-09 12:19:11.497336: E external/local_xla/xla/stream_executor/cuda/cuda_driver.cc:282] failed call to cuInit: CUDA_ERROR_NO_DEVICE: no CUDA-capable device is detected
Model: "sequential"
_________________________________________________________________
 Layer (type)                Output Shape              Param #
=================================================================
 prune_low_magnitude_prunin  (None, 28, 28, 32)        1634
 g_sparsity_0_5 (PruneLowMa
 gnitude)

 max_pooling2d (MaxPooling2  (None, 14, 14, 32)        0
 D)

 prune_low_magnitude_struct  (None, 14, 14, 64)        102466
 ural_pruning (PruneLowMagn
 itude)

 batch_normalization (Batch  (None, 14, 14, 64)        256
 Normalization)

 re_lu (ReLU)                (None, 14, 14, 64)        0

 max_pooling2d_1 (MaxPoolin  (None, 7, 7, 64)          0
 g2D)

 flatten (Flatten)           (None, 3136)              0

 prune_low_magnitude_struct  (None, 1024)              6423554
 ural_pruning_dense (PruneL
 owMagnitude)

 dropout (Dropout)           (None, 1024)              0

 dense (Dense)               (None, 10)                10250

=================================================================
Total params: 6538160 (24.94 MB)
Trainable params: 3274762 (12.49 MB)
Non-trainable params: 3263398 (12.45 MB)
_________________________________________________________________
训练和评估模型。
batch_size = 128
epochs = 2

model.fit(
    train_images,
    train_labels,
    batch_size=batch_size,
    epochs=epochs,
    verbose=0,
    callbacks=tfmot.sparsity.keras.UpdatePruningStep(),
    validation_split=0.1)

_, pruned_model_accuracy = model.evaluate(test_images, test_labels, verbose=0)
print('Pruned test accuracy:', pruned_model_accuracy)
Pruned test accuracy: 0.9897000193595886
删除剪枝包装器,以便在将其转换为 TensorFlow Lite 格式时,它不会包含在模型中。
model = tfmot.sparsity.keras.strip_pruning(model)
将模型转换为 tflite 格式
import tempfile

converter = tf.lite.TFLiteConverter.from_keras_model(model)
tflite_model = converter.convert()

_, tflite_file = tempfile.mkstemp('.tflite')
print('Saved converted pruned model to:', tflite_file)
with open(tflite_file, 'wb') as f:
  f.write(tflite_model)
INFO:tensorflow:Assets written to: /tmpfs/tmp/tmp04kvq4rj/assets
INFO:tensorflow:Assets written to: /tmpfs/tmp/tmp04kvq4rj/assets
Saved converted pruned model to: /tmpfs/tmp/tmp218fgsbq.tflite
WARNING: All log messages before absl::InitializeLog() is called are written to STDERR
W0000 00:00:1709986802.425001   13320 tf_tfl_flatbuffer_helpers.cc:390] Ignored output_format.
W0000 00:00:1709986802.425052   13320 tf_tfl_flatbuffer_helpers.cc:393] Ignored drop_control_dependency.
可视化和检查权重
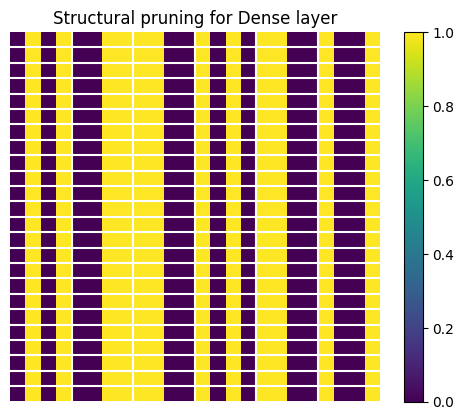
现在可视化使用 2 比 4 稀疏性剪枝的 Dense 层中的权重结构。从 tflite 文件中提取权重。
# Load tflite file with the created pruned model
interpreter = tf.lite.Interpreter(model_path=tflite_file, experimental_preserve_all_tensors=True)
interpreter.allocate_tensors()

details = interpreter.get_tensor_details()

# Weights of the dense layer that has been pruned.
tensor_name = 'structural_pruning_dense/MatMul'
detail = [x for x in details if tensor_name in x["name"]]

# We need the first layer.
tensor_data = interpreter.tensor(detail[0]["index"])()
要验证我们是否选择了已剪枝的正确层,请打印权重张量的形状。
print(f"Shape of Dense layer is {tensor_data.shape}")
Shape of Dense layer is (1, 1024)
现在,我们可视化权重张量的一个小子集的结构。权重张量的结构在最后一个维度上是稀疏的,使用 (2,4) 模式:四个元素中有两个为零。为了使可视化更清晰,我们将所有非零值替换为 1。
import matplotlib.pyplot as plt
import numpy as np

# The value 24 is chosen for convenience.
width = height = 24

subset_values_to_display = tensor_data[0:height, 0:width]

val_ones = np.ones([height, width])
val_zeros = np.zeros([height, width])
subset_values_to_display = np.where(abs(subset_values_to_display) > 0, val_ones, val_zeros)
定义辅助函数以绘制分隔线,以便清楚地看到结构。
def plot_separation_lines(height, width):

    block_size = [1, 4]

    # Add separation lines to the figure.
    num_hlines = int((height - 1) / block_size[0])
    num_vlines = int((width - 1) / block_size[1])
    line_y_pos = [y * block_size[0] for y in range(1, num_hlines + 1)]
    line_x_pos = [x * block_size[1] for x in range(1, num_vlines + 1)]

    for y_pos in line_y_pos:
        plt.plot([-0.5, width], [y_pos - 0.5 , y_pos - 0.5], color='w')

    for x_pos in line_x_pos:
        plt.plot([x_pos - 0.5, x_pos - 0.5], [-0.5, height], color='w')
现在可视化权重张量的子集。
plot_separation_lines(height, width)

plt.axis('off')
plt.imshow(subset_values_to_display)
plt.colorbar()
plt.title("Structural pruning for Dense layer")
plt.show()

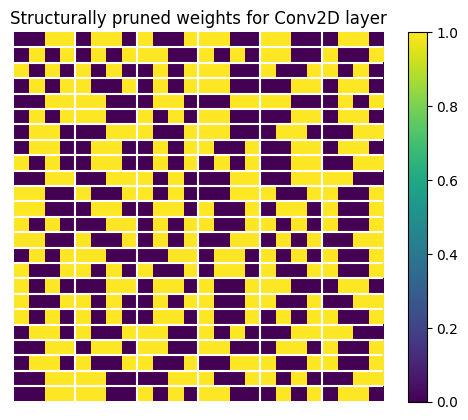
可视化 Conv2D 层的权重。结构化稀疏性应用于最后一个通道,类似于 Dense 层。如上所述,只有第二个 Conv2D 层进行了结构化剪枝。
# Get weights of the convolutional layer that has been pruned with 2 by 4 sparsity.
op_details = interpreter._get_ops_details()
op_name = 'CONV_2D'
op_detail = [x for x in op_details if op_name in x["op_name"]]
tensor_data = interpreter.tensor(op_detail[1]["inputs"][1])()
print(f"Shape of the weight tensor is {tensor_data.shape}")
Shape of the weight tensor is (64, 5, 5, 32)
与 Dense 层的权重类似,内核的最后一个维度具有 (2, 4) 结构。
weights_to_display = tf.reshape(tensor_data, [tf.reduce_prod(tensor_data.shape[:-1]), -1])
weights_to_display = weights_to_display[0:width, 0:height]

val_ones = np.ones([height, width])
val_zeros = np.zeros([height, width])
subset_values_to_display = np.where(abs(weights_to_display) > 1e-9, val_ones, val_zeros)

plot_separation_lines(height, width)

plt.axis('off')
plt.imshow(subset_values_to_display)
plt.colorbar()
plt.title("Structurally pruned weights for Conv2D layer")
plt.show()

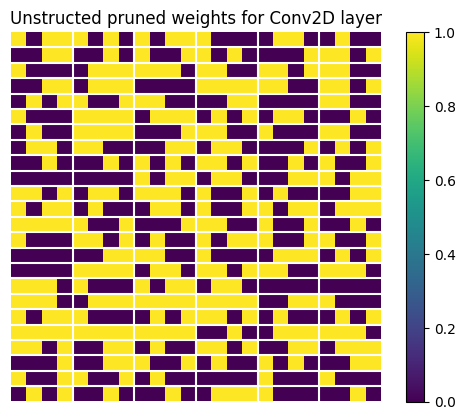
让我们看看那些随机剪枝的权重是什么样的。我们提取它们并显示权重张量的一个子集。
# Get weights of the convolutional layer that has been pruned with random pruning.
tensor_name = 'pruning_sparsity_0_5/Conv2D'
detail = [x for x in details if tensor_name in x["name"]]
tensor_data = interpreter.tensor(detail[0]["index"])()
print(f"Shape of the weight tensor is {tensor_data.shape}")
Shape of the weight tensor is (32, 5, 5, 1)
weights_to_display = tf.reshape(tensor_data, [tensor_data.shape[0],tf.reduce_prod(tensor_data.shape[1:])])
weights_to_display = weights_to_display[0:width, 0:height]

val_ones = np.ones([height, width])
val_zeros = np.zeros([height, width])
subset_values_to_display = np.where(abs(weights_to_display) > 0, val_ones, val_zeros)

plot_separation_lines(height, width)

plt.axis('off')
plt.imshow(subset_values_to_display)
plt.colorbar()
plt.title("Unstructed pruned weights for Conv2D layer")
plt.show()

TensorFlow 模型优化工具包包含一个 Python 脚本,可用于检查给定 tflite 文件中的模型中哪些层具有结构化剪枝的权重:check_sparsity_m_by_n.py。以下命令演示了如何使用此工具检查特定模型中的 2 比 4 稀疏性。
python3 ./tensorflow_model_optimization/python/core/sparsity/keras/tools/check_sparsity_m_by_n.py --model_tflite=pruned_model.tflite --m_by_n=2,4
python3: can't open file '/tmpfs/src/temp/tensorflow_model_optimization/g3doc/guide/pruning/./tensorflow_model_optimization/python/core/sparsity/keras/tools/check_sparsity_m_by_n.py': [Errno 2] No such file or directory
